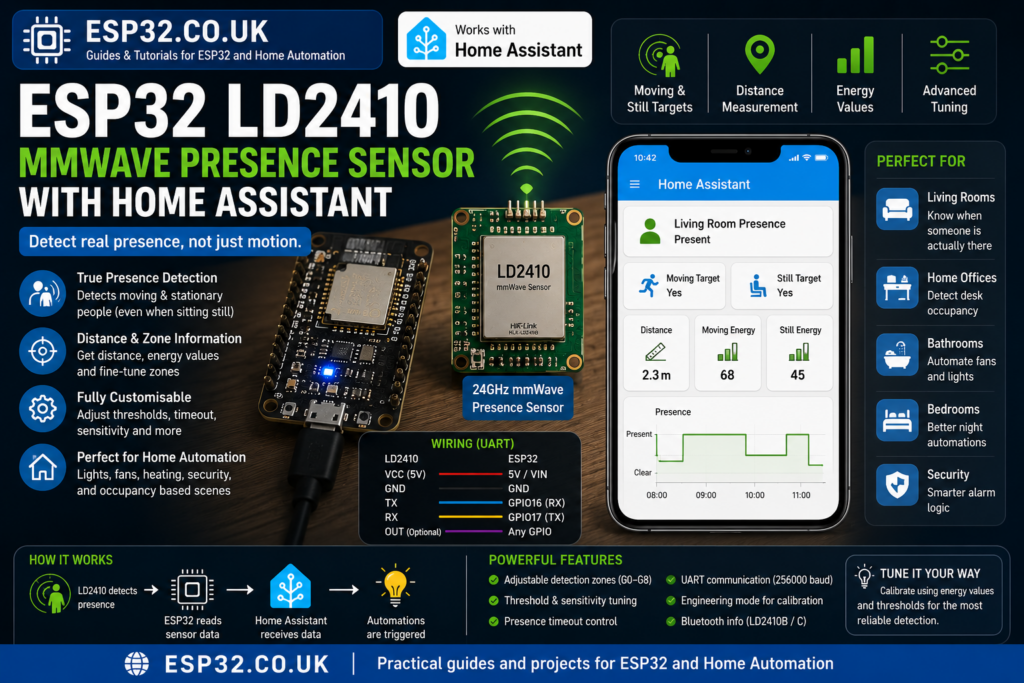
The LD2410 is one of the most useful sensors you can connect to an ESP32 for Home Assistant. It is a 24GHz mmWave presence sensor, which means it can detect small human movement and stationary presence much better than a basic PIR motion sensor.
A PIR sensor is good at detecting movement. Walk into a room and it turns the lights on. But sit still at a desk, on a sofa, or in bed, and the PIR may think the room is empty after a few minutes.
The LD2410 solves that problem. It can detect both moving and still targets, so it is much better for real room occupancy.
ESPHome has built-in support for the Hi-Link LD2410 family, including LD2410, LD2410B and LD2410C. The ESPHome component uses UART communication and exposes presence, moving target, still target, distance, energy values, thresholds and tuning options directly to Home Assistant.
Why use LD2410 instead of a PIR sensor?
A PIR sensor detects changes in infrared radiation. It is cheap, simple and low-power, but it mainly detects movement.
The LD2410 uses mmWave radar. It can detect small movements such as breathing, typing, slight body motion or someone sitting still. That makes it much better for rooms where people remain in one place.
Good use cases include:
- Office presence detection
- Desk occupancy
- Living room lighting
- Bathroom fan automation
- Bedroom night automations
- Kitchen presence detection
- Stair or hallway lighting
- Home Assistant alarm logic
- Room-level occupancy
The key difference is simple:
| Sensor | Best at | Weakness |
|---|---|---|
| PIR | Detecting movement | Can miss someone sitting still |
| LD2410 mmWave | Detecting real presence | Needs tuning to avoid false positives |
For Home Assistant, that makes the LD2410 much more useful than a basic PIR sensor in many rooms.
Parts needed
| Part | Notes |
|---|---|
| ESP32 development board | ESP32 DevKit, ESP32-S3, ESP32-C3 or similar |
| LD2410, LD2410B or LD2410C | Hi-Link mmWave presence sensor |
| Jumper wires | Female-to-female wires are easiest |
| USB cable | For flashing and power |
| 5V power source | Usually from ESP32 VIN / 5V pin |
| Home Assistant with ESPHome | ESPHome add-on or ESPHome Device Builder |
The LD2410 family communicates with ESPHome over UART. ESPHome recommends hardware UART pins because the LD2410 normally runs at 256000 baud by default.
LD2410, LD2410B and LD2410C: which one should you buy?
For a Home Assistant ESPHome project, any of these can work:
| Model | Notes |
|---|---|
| LD2410 | Original module |
| LD2410B | Common version with Bluetooth support |
| LD2410C | Compact version, also popular for DIY sensors |
The LD2410B and LD2410C are usually the easiest choices because they are common, cheap and often available with pins or small adapter boards.
The Bluetooth function is mainly useful for configuration with the Hi-Link app. For ESPHome, the normal and most reliable method is still wiring the sensor to the ESP32 using UART.
Wiring LD2410 to ESP32
The LD2410 has power, ground, UART TX and UART RX pins.
Typical wiring:
| LD2410 pin | ESP32 pin |
|---|---|
| VCC | 5V / VIN |
| GND | GND |
| TX | GPIO16 / ESP32 RX |
| RX | GPIO17 / ESP32 TX |
| OUT | Optional GPIO input |
Important: TX and RX are crossed.
That means:
- LD2410 TX goes to ESP32 RX
- LD2410 RX goes to ESP32 TX
Example wiring:
| Function | ESP32 |
|---|---|
| UART RX | GPIO16 |
| UART TX | GPIO17 |
| Power | 5V |
| Ground | GND |
The LD2410 also has an OUT pin, but for ESPHome you normally want UART because UART gives you full data: moving target, still target, distance, energy and tuning values. The OUT pin can only give a simpler presence signal. ESPHome also documents an optional OUT pin setup if you want to monitor the sensor’s basic output directly.
Basic ESPHome YAML
This is the clean starting configuration.
esphome:
  name: esp32-ld2410-presence
  friendly_name: ESP32 LD2410 Presence

esp32:
  board: esp32dev

logger:

api:
  encryption:
    key: "PASTE_YOUR_API_KEY_HERE"

ota:
  - platform: esphome
    password: "PASTE_YOUR_OTA_PASSWORD_HERE"

wifi:
  ssid: !secret wifi_ssid
  password: !secret wifi_password

  ap:
    ssid: "LD2410 Presence Fallback"
    password: "fallback-password"

captive_portal:

uart:
  id: ld2410_uart
  tx_pin: GPIO17
  rx_pin: GPIO16
  baud_rate: 256000
  parity: NONE
  stop_bits: 1

ld2410:
  id: ld2410_sensor
  uart_id: ld2410_uart

binary_sensor:
  - platform: ld2410
    has_target:
      name: "Presence"
      device_class: presence
    has_moving_target:
      name: "Moving Target"
    has_still_target:
      name: "Still Target"

sensor:
  - platform: ld2410
    moving_distance:
      name: "Moving Distance"
    still_distance:
      name: "Still Distance"
    moving_energy:
      name: "Moving Energy"
    still_energy:
      name: "Still Energy"
    detection_distance:
      name: "Detection Distance"

text_sensor:
  - platform: ld2410
    version:
      name: "LD2410 Firmware Version"
    mac_address:
      name: "LD2410 Bluetooth MAC"

button:
  - platform: ld2410
    restart:
      name: "LD2410 Restart"
    query_params:
      name: "LD2410 Query Params"
After flashing, Home Assistant should discover the ESP32 device and expose the LD2410 entities.
What the main entities mean
The most useful entities are:
| Entity | Meaning |
|---|---|
| Presence | Someone is detected |
| Moving Target | Moving person detected |
| Still Target | Stationary person detected |
| Moving Distance | Distance to moving target |
| Still Distance | Distance to still target |
| Detection Distance | General detected target distance |
| Moving Energy | Strength of moving detection |
| Still Energy | Strength of still detection |
For normal Home Assistant automations, the most important one is usually:
binary_sensor.presenceThis is the entity you use to turn lights, fans or automations on and off.
Full ESPHome YAML with tuning controls
This version exposes more LD2410 settings inside Home Assistant, including timeout, distance gates and engineering mode.
esphome:
  name: esp32-ld2410-presence
  friendly_name: ESP32 LD2410 Presence

esp32:
  board: esp32dev

logger:

api:
  encryption:
    key: "PASTE_YOUR_API_KEY_HERE"

ota:
  - platform: esphome
    password: "PASTE_YOUR_OTA_PASSWORD_HERE"

wifi:
  ssid: !secret wifi_ssid
  password: !secret wifi_password

  ap:
    ssid: "LD2410 Presence Fallback"
    password: "fallback-password"

captive_portal:

uart:
  id: ld2410_uart
  tx_pin: GPIO17
  rx_pin: GPIO16
  baud_rate: 256000
  parity: NONE
  stop_bits: 1

ld2410:
  id: ld2410_sensor
  uart_id: ld2410_uart

binary_sensor:
  - platform: ld2410
    has_target:
      name: "Presence"
      device_class: presence
    has_moving_target:
      name: "Moving Target"
    has_still_target:
      name: "Still Target"
    out_pin_presence_status:
      name: "OUT Pin Presence Status"

sensor:
  - platform: ld2410
    light:
      name: "Light"
    moving_distance:
      name: "Moving Distance"
    still_distance:
      name: "Still Distance"
    moving_energy:
      name: "Moving Energy"
    still_energy:
      name: "Still Energy"
    detection_distance:
      name: "Detection Distance"

    g0:
      move_energy:
        name: "Gate 0 Move Energy"
      still_energy:
        name: "Gate 0 Still Energy"
    g1:
      move_energy:
        name: "Gate 1 Move Energy"
      still_energy:
        name: "Gate 1 Still Energy"
    g2:
      move_energy:
        name: "Gate 2 Move Energy"
      still_energy:
        name: "Gate 2 Still Energy"
    g3:
      move_energy:
        name: "Gate 3 Move Energy"
      still_energy:
        name: "Gate 3 Still Energy"
    g4:
      move_energy:
        name: "Gate 4 Move Energy"
      still_energy:
        name: "Gate 4 Still Energy"
    g5:
      move_energy:
        name: "Gate 5 Move Energy"
      still_energy:
        name: "Gate 5 Still Energy"
    g6:
      move_energy:
        name: "Gate 6 Move Energy"
      still_energy:
        name: "Gate 6 Still Energy"
    g7:
      move_energy:
        name: "Gate 7 Move Energy"
      still_energy:
        name: "Gate 7 Still Energy"
    g8:
      move_energy:
        name: "Gate 8 Move Energy"
      still_energy:
        name: "Gate 8 Still Energy"

switch:
  - platform: ld2410
    engineering_mode:
      name: "Engineering Mode"
    bluetooth:
      name: "LD2410 Bluetooth"

number:
  - platform: ld2410
    timeout:
      name: "Presence Timeout"
    light_threshold:
      name: "Light Threshold"
    max_move_distance_gate:
      name: "Max Move Distance Gate"
    max_still_distance_gate:
      name: "Max Still Distance Gate"

    g0:
      move_threshold:
        name: "Gate 0 Move Threshold"
      still_threshold:
        name: "Gate 0 Still Threshold"
    g1:
      move_threshold:
        name: "Gate 1 Move Threshold"
      still_threshold:
        name: "Gate 1 Still Threshold"
    g2:
      move_threshold:
        name: "Gate 2 Move Threshold"
      still_threshold:
        name: "Gate 2 Still Threshold"
    g3:
      move_threshold:
        name: "Gate 3 Move Threshold"
      still_threshold:
        name: "Gate 3 Still Threshold"
    g4:
      move_threshold:
        name: "Gate 4 Move Threshold"
      still_threshold:
        name: "Gate 4 Still Threshold"
    g5:
      move_threshold:
        name: "Gate 5 Move Threshold"
      still_threshold:
        name: "Gate 5 Still Threshold"
    g6:
      move_threshold:
        name: "Gate 6 Move Threshold"
      still_threshold:
        name: "Gate 6 Still Threshold"
    g7:
      move_threshold:
        name: "Gate 7 Move Threshold"
      still_threshold:
        name: "Gate 7 Still Threshold"
    g8:
      move_threshold:
        name: "Gate 8 Move Threshold"
      still_threshold:
        name: "Gate 8 Still Threshold"

button:
  - platform: ld2410
    factory_reset:
      name: "LD2410 Factory Reset"
    restart:
      name: "LD2410 Restart"
    query_params:
      name: "LD2410 Query Params"

text_sensor:
  - platform: ld2410
    version:
      name: "LD2410 Firmware Version"
    mac_address:
      name: "LD2410 Bluetooth MAC"

select:
  - platform: ld2410
    distance_resolution:
      name: "Distance Resolution"
    baud_rate:
      name: "Baud Rate"
    light_function:
      name: "Light Function"
    out_pin_level:
      name: "OUT Pin Level"
This is the configuration I would use while testing and tuning. Later, you can hide some of the advanced entities from Home Assistant if the dashboard becomes too cluttered.
ESPHome exposes gate energy values and gate thresholds from gate 0 to gate 8, and engineering mode is used for calibration.
Understanding LD2410 gates
The LD2410 divides detection distance into gates. Think of gates as distance bands in front of the sensor.
By default, ESPHome lists gates from g0 to g8. Each gate can have:
- Move energy
- Still energy
- Move threshold
- Still threshold
If the energy is above the threshold, the sensor considers that gate active.
This is how you tune the sensor.
Example:
- Gate 1 detects movement near the sensor
- Gate 4 detects someone sitting at a desk
- Gate 8 detects something further away
- If a far wall, curtain or fan causes false detection, reduce the max distance gate or increase the relevant threshold
ESPHome’s LD2410 documentation gives default threshold values for gates 0 to 8, and these are adjustable from Home Assistant when exposed as number entities.
First test after flashing
After flashing the ESP32:
- Open Home Assistant
- Go to the ESPHome device
- Check whether Presence changes when you stand in front of the sensor
- Check Moving Target while walking
- Check Still Target while sitting still
- Watch Detection Distance
- Enable Engineering Mode temporarily
- Watch the gate energy values
- Tune thresholds only after observing the sensor for a few minutes
Do not start changing every setting immediately. First, see what the sensor reports in your actual room.
Best placement
Placement matters more with mmWave than with PIR.
Good placement:
- Facing the area where people sit or stand
- Around chest height or slightly higher
- Away from moving curtains
- Away from fans
- Away from vibrating appliances
- Not directly facing a busy corridor unless that is intentional
- Not pointing through a thin wall into another room
Bad placement:
- Pointing at a spinning fan
- Pointing at a window with moving curtains
- Pointing at a hallway when you only care about a room
- Hidden behind metal
- Too close to the ESP32 Wi-Fi antenna
- Inside a sealed metal enclosure
For desk presence, place it facing the chair area. For room presence, place it where it sees the normal occupied part of the room but not every irrelevant movement outside the room.
Home Assistant automation examples
Turn lights on with presence
alias: Living room lights on with presence
trigger:
  - platform: state
    entity_id: binary_sensor.presence
    to: "on"
condition:
  - condition: sun
    after: sunset
action:
  - service: light.turn_on
    target:
      entity_id: light.living_room
mode: single
Turn lights off when room is empty
alias: Living room lights off when empty
trigger:
  - platform: state
    entity_id: binary_sensor.presence
    to: "off"
    for:
      minutes: 5
action:
  - service: light.turn_off
    target:
      entity_id: light.living_room
mode: single
For mmWave sensors, do not turn lights off immediately. Give it a delay. A delay of 3 to 10 minutes is usually more natural.
Desk occupancy automation
alias: Desk lamp on when desk occupied
trigger:
  - platform: state
    entity_id: binary_sensor.office_presence
    to: "on"
action:
  - service: light.turn_on
    target:
      entity_id: light.desk_lamp
mode: single
Bathroom fan automation
alias: Bathroom fan with presence
trigger:
  - platform: state
    entity_id: binary_sensor.bathroom_presence
    to: "on"
action:
  - service: switch.turn_on
    target:
      entity_id: switch.bathroom_fan
mode: single
And off after the room clears:
alias: Bathroom fan off after room empty
trigger:
  - platform: state
    entity_id: binary_sensor.bathroom_presence
    to: "off"
    for:
      minutes: 10
action:
  - service: switch.turn_off
    target:
      entity_id: switch.bathroom_fan
mode: single
Combining LD2410 with PIR
The best setup is often LD2410 plus PIR.
Use PIR for instant movement detection and LD2410 for continued occupancy.
Example logic:
- PIR turns the light on quickly
- LD2410 keeps the light on while someone is still there
- Light turns off only when LD2410 has been clear for several minutes
This gives a better user experience than relying on one sensor only.
Tuning false positives
False positives are the main downside of mmWave sensors.
Common causes:
| Problem | Fix |
|---|---|
| Detects people through thin walls | Reduce max distance gate |
| Detects curtains | Change angle or increase threshold |
| Detects fan movement | Avoid pointing at fan |
| Detects hallway movement | Reposition sensor |
| Never clears presence | Increase still thresholds |
| Clears too quickly | Increase timeout |
| Detects too far | Lower max move/still distance gate |
The most useful setting is often:
max_still_distance_gateIf the sensor is detecting presence beyond the useful part of the room, reduce the maximum still detection gate.
Tuning process
A practical tuning method:
- Enable Engineering Mode
- Leave the room empty
- Watch which gates show still or moving energy
- Increase thresholds for noisy gates
- Sit in the normal occupied position
- Make sure the correct gate still detects you
- Walk around the room
- Check moving target behaviour
- Reduce max distance gates if it detects outside the room
- Disable Engineering Mode when done
ESPHome’s own calibration process follows the same basic idea: enable engineering mode, monitor gate move/still energy values, adjust thresholds, and then disable engineering mode.
Recommended starting settings
Do not copy these blindly, but they are reasonable starting points.
For a small bathroom:
| Setting | Suggested value |
|---|---|
| Max move distance gate | 4 |
| Max still distance gate | 4 |
| Timeout | 15–30 seconds |
For an office desk:
| Setting | Suggested value |
|---|---|
| Max move distance gate | 5 |
| Max still distance gate | 5 |
| Timeout | 30–60 seconds |
For a living room:
| Setting | Suggested value |
|---|---|
| Max move distance gate | 6–8 |
| Max still distance gate | 6–8 |
| Timeout | 60–180 seconds |
For lighting automations, I prefer a longer Home Assistant delay rather than relying only on the sensor timeout.
Should you use Bluetooth?
The LD2410B and LD2410C commonly include Bluetooth, but for ESPHome the wired UART method is usually better.
Use UART because:
- It is stable
- It exposes more data to ESPHome
- It does not rely on Bluetooth range
- It works directly with the ESP32
- It is easier to troubleshoot
Bluetooth is useful mainly for initial setup or tuning with the Hi-Link app.
ESPHome also exposes a Bluetooth switch and MAC address for supported LD2410 variants, and the default Bluetooth password is documented as HiLink.
Optional OUT pin method
If you only want a simple presence signal, you can use the LD2410 OUT pin.
Example:
binary_sensor:
  - platform: gpio
    pin: GPIO25
    name: "LD2410 OUT Presence"
    device_class: presence
This is simple, but it misses the main benefit of the LD2410. You do not get distance, moving target, still target, energy values or tuning data.
For Home Assistant, UART is the better method.
Power supply notes
The LD2410 is normally powered from 5V. Many ESP32 boards have a 5V or VIN pin when powered by USB, which is usually fine for this sensor.
Basic rules:
- Power LD2410 from 5V / VIN
- Connect grounds together
- Do not forget common GND
- Keep UART wires short during testing
- Avoid loose breadboard connections for permanent installs
If the sensor behaves randomly, suspect power or wiring first.
Troubleshooting
No data in Home Assistant
Check:
- TX and RX are crossed correctly
- ESP32 GND and LD2410 GND are connected
- UART baud rate is
256000 parity: NONEstop_bits: 1- You used suitable GPIO pins
- The LD2410 is powered from 5V
ESPHome says UART is required for the LD2410 component and specifically notes parity: NONE and stop_bits: 1.
Sensor always shows presence
Likely causes:
- It is detecting through a wall
- It is seeing a fan or curtain
- Still threshold is too low
- Max still distance gate is too high
- It is facing the wrong direction
- Engineering mode shows noise in one or more gates
Fix by reducing the maximum distance gates first. Then tune thresholds.
Sensor misses someone sitting still
Likely causes:
- Still threshold too high
- Sensor aimed too low or too high
- Person is outside the configured still detection distance
- Max still distance gate is too low
- Sensor is badly placed
Use Engineering Mode and check the still energy value while someone sits in the normal position.
Sensor detects movement outside the room
This is common. mmWave can detect through some thin materials.
Fixes:
- Reposition the sensor
- Angle it away from doors and walls
- Reduce max move distance gate
- Reduce max still distance gate
- Increase thresholds on far gates
Distance readings jump around
Some variation is normal. Do not build critical automations based on exact centimetre values. Use the binary presence entity for normal automations and use distance mainly for tuning.
Best rooms for LD2410
The LD2410 is especially good in:
- Office
- Living room
- Bathroom
- Bedroom
- Kitchen
- Utility room
- Small workshop
- Gaming room
- Home cinema room
It is less ideal for:
- Outdoor areas
- Rooms with lots of moving fabric
- Rooms with fans pointing directly at the sensor
- Spaces where it can see through thin walls into another occupied room
LD2410 vs LD2450
The LD2410 is a presence sensor. It is cheap, simple and very good for detecting whether a room is occupied.
The LD2450 is more advanced and can track multiple targets with coordinates. That makes it better for zone-based presence detection, but it is also a bit more complex.
Simple choice:
| Sensor | Best for |
|---|---|
| LD2410 | Cheap room presence detection |
| LD2450 | Multi-zone and multi-target tracking |
For most Home Assistant users, the LD2410 is the better first mmWave sensor.
Is LD2410 worth it?
Yes. For Home Assistant, the LD2410 is one of the best cheap upgrades over a normal PIR sensor.
It is not perfect. It needs tuning, and it can create false positives if placed badly. But once tuned, it gives much better real occupancy detection than a basic motion sensor.
For lights, fans, heating, cooling and room automations, that difference is huge.
Conclusion
The ESP32 and LD2410 make a powerful Home Assistant presence sensor. With ESPHome, the setup is local, cheap and highly configurable.
The best setup is:
- ESP32 board
- LD2410B or LD2410C sensor
- UART connection
- ESPHome LD2410 component
- Presence entity for normal automations
- Engineering Mode for tuning
- Sensible Home Assistant delays before turning things off
If your current PIR sensors turn lights off while someone is sitting still, the LD2410 is exactly the kind of sensor you want.