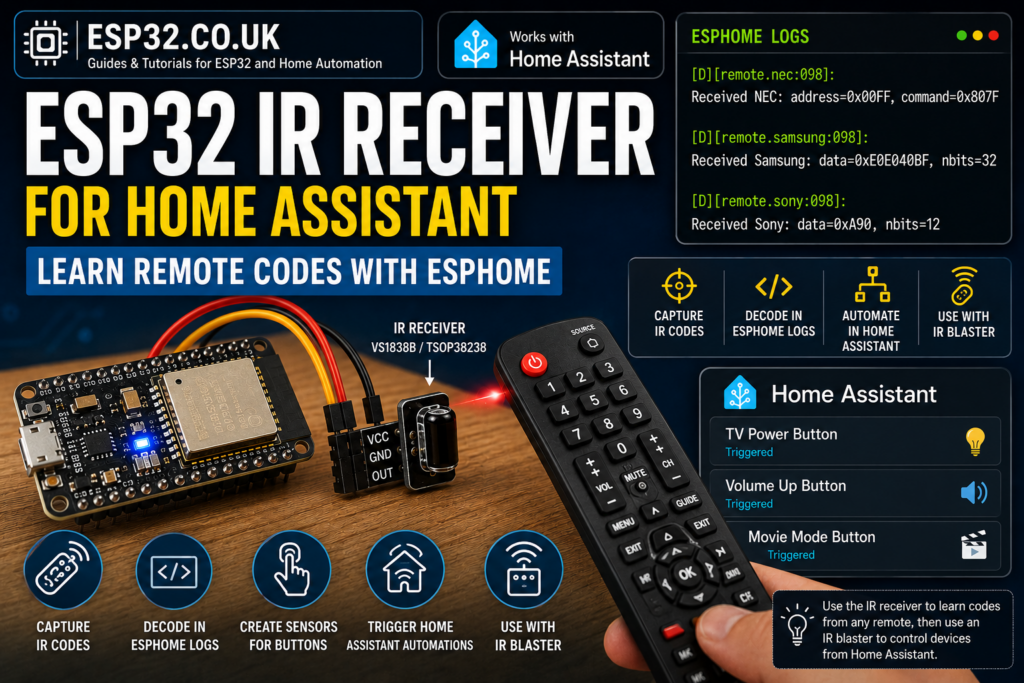
An ESP32 IR receiver is one of the simplest ways to learn remote control codes for Home Assistant. Instead of guessing which protocol your TV, air conditioner, fan or LED strip remote uses, you can point the remote at a cheap IR receiver module and let ESPHome show you the decoded signal.
This is especially useful if you are building an ESP32 IR blaster. First you use the receiver to learn the original remote codes. Then you copy those codes into your IR blaster configuration and let Home Assistant control the device automatically.
ESPHome includes a remote_receiver component that can receive and decode common infrared and RF remote control signals. It can also dump received codes to the ESPHome logs, which makes it ideal for learning unknown remote buttons.
What this project does
This project lets you:
- Capture IR remote codes using an ESP32
- View decoded IR codes in ESPHome logs
- Identify buttons such as power, volume, mode, temperature up and temperature down
- Create Home Assistant binary sensors for specific remote buttons
- Trigger Home Assistant automations from a normal IR remote
- Use the captured codes later with an ESP32 IR blaster
This is not only for TVs. It can also work with many infrared-controlled devices, including:
- Air conditioners
- Fans
- LED strip controllers
- Soundbars
- Projectors
- Media boxes
- Cheap RGB lamps
- Old Hi-Fi equipment
Parts needed
You only need a few parts:
| Part | Notes |
|---|---|
| ESP32 development board | ESP32 DevKit, ESP32-S3, ESP32-C3 or similar |
| IR receiver module | VS1838B, TSOP38238, KY-022 or similar |
| Jumper wires | Female-to-female wires are easiest |
| USB cable | For flashing and powering the ESP32 |
| Home Assistant with ESPHome | ESPHome add-on or ESPHome Device Builder |
A typical IR receiver module has three pins:
| IR receiver pin | Connect to ESP32 |
|---|---|
| VCC | 3.3V |
| GND | GND |
| OUT / DATA / S | GPIO23 |
GPIO23 is only an example. You can use another safe GPIO pin if needed. Avoid using boot strapping pins unless you know exactly what your board does during startup.
How an IR receiver works
An IR remote sends short bursts of infrared light. The receiver module detects those bursts and outputs a digital signal to the ESP32.
ESPHome then tries to decode the signal. If the protocol is recognised, you may see something like Samsung, NEC, Sony, Panasonic or LG in the logs. If ESPHome does not recognise the protocol, it can still show the raw timing data. ESPHome’s IR guide explains that known codecs are shown as decoded values, while unknown ones can still be captured as raw data.
That means you do not always need to know the protocol in advance.
Basic ESPHome YAML for learning IR codes
Create a new ESPHome device and use this as a starting point:
esphome:
  name: esp32-ir-receiver
  friendly_name: ESP32 IR Receiver

esp32:
  board: esp32dev

logger:
  level: DEBUG

api:
  encryption:
    key: "PASTE_YOUR_API_KEY_HERE"

ota:
  - platform: esphome
    password: "PASTE_YOUR_OTA_PASSWORD_HERE"

wifi:
  ssid: !secret wifi_ssid
  password: !secret wifi_password

  ap:
    ssid: "ESP32 IR Receiver Fallback"
    password: "fallback-password"

captive_portal:

remote_receiver:
  id: ir_receiver
  pin:
    number: GPIO23
    inverted: true
    mode:
      input: true
      pullup: true
  dump: all
  tolerance: 25%
  filter: 50us
  idle: 10ms
The important part is this:
remote_receiver:
  pin:
    number: GPIO23
    inverted: true
    mode:
      input: true
      pullup: true
  dump: all
dump: all tells ESPHome to print any decoded remote codes in the logs. The ESPHome documentation also notes that some IR receiver modules may need an internal pull-up and inverted input, which is why this configuration is a good practical starting point.
How to capture IR remote codes
After flashing the ESP32:
- Open the ESPHome logs
- Point your remote control at the IR receiver
- Press one button at a time
- Watch the log output
- Copy the decoded code or raw data
- Repeat the same button several times to confirm it is consistent
You may see output like this:
[D][remote.nec:098]: Received NEC: address=0x00FF, command=0x807FOr something like this:
[D][remote.samsung:098]: Received Samsung: data=0xE0E040BF, nbits=32For an unknown protocol, you may see raw timing data instead:
[D][remote.raw:041]: Received Raw: 9024, -4478, 563, -563, 563, -1687, 563, -563The decoded format is easier to use, but raw codes are still useful. ESPHome’s documentation says raw output is a sequence of pulse widths in microseconds, with positive values for marks and negative values for spaces.
Recommended workflow for learning buttons
Do not capture the whole remote randomly. Make a small table while testing.
Example:
| Button | Protocol | Code |
|---|---|---|
| Power | NEC | address 0x00FF, command 0x807F |
| Volume Up | Samsung | data 0xE0E0E01F |
| Volume Down | Samsung | data 0xE0E0D02F |
| Mute | Samsung | data 0xE0E0F00F |
| Input | Raw | copy full raw code |
Press every button at least three times. Some remotes send a repeat code when you hold the button down, so use short presses when learning.
Creating Home Assistant sensors for remote buttons
Once you know a code, you can create a binary sensor for that exact remote button.
Example for a NEC remote button:
binary_sensor:
  - platform: remote_receiver
    name: "TV Remote Power"
    nec:
      address: 0x00FF
      command: 0x807F
Example for a Samsung remote button:
binary_sensor:
  - platform: remote_receiver
    name: "Samsung Remote Volume Up"
    samsung:
      data: 0xE0E0E01F
      nbits: 32
When ESPHome receives that exact code, the binary sensor briefly turns on and then off again. ESPHome documents this behaviour for remote_receiver binary sensors.
This is useful when you want Home Assistant to react to normal remote control buttons.
Triggering Home Assistant automations from an IR remote
You can use the IR receiver as a simple Home Assistant remote control.
For example:
- Press a spare TV remote button
- ESP32 detects the IR code
- Home Assistant toggles a lamp, scene, speaker or automation
Here is an ESPHome example using a binary sensor:
binary_sensor:
  - platform: remote_receiver
    name: "IR Remote Lamp Button"
    nec:
      address: 0x00FF
      command: 0x40BF
Then in Home Assistant:
alias: Toggle lamp from IR remote
trigger:
  - platform: state
    entity_id: binary_sensor.ir_remote_lamp_button
    to: "on"
action:
  - service: light.toggle
    target:
      entity_id: light.living_room_lamp
mode: single
This turns an old remote control into a cheap physical controller for Home Assistant.
Better method: use ESPHome events
For more advanced setups, you can send a Home Assistant event from ESPHome when a specific IR code is received.
Example:
api:
  encryption:
    key: "PASTE_YOUR_API_KEY_HERE"

remote_receiver:
  id: ir_receiver
  pin:
    number: GPIO23
    inverted: true
    mode:
      input: true
      pullup: true
  dump: all

binary_sensor:
  - platform: remote_receiver
    name: "IR Remote Scene Button"
    nec:
      address: 0x00FF
      command: 0x40BF
    on_press:
      then:
        - homeassistant.event:
            event: esphome.ir_remote_button
            data:
              button: scene_button
              room: living_room
ESPHome can send events to the Home Assistant event bus using the native API, but the event name must begin with esphome.. Home Assistant actions from ESPHome also need to be allowed from the ESPHome integration options.
In Home Assistant, you can listen for that event:
alias: IR remote scene button
trigger:
  - platform: event
    event_type: esphome.ir_remote_button
    event_data:
      button: scene_button
action:
  - service: scene.turn_on
    target:
      entity_id: scene.movie_mode
mode: single
This keeps your ESPHome device simple and lets Home Assistant handle the actual automation logic.
Using decoded buttons directly inside ESPHome
ESPHome also supports protocol-specific automation triggers such as on_samsung, on_nec, on_raw and others. The official documentation recommends considering these on_* triggers for new projects because they are better suited to momentary button press events than binary sensors.
Example:
remote_receiver:
  id: ir_receiver
  pin:
    number: GPIO23
    inverted: true
    mode:
      input: true
      pullup: true
  dump: all

  on_samsung:
    then:
      - if:
          condition:
            lambda: 'return x.data == 0xE0E040BF;'
          then:
            - homeassistant.event:
                event: esphome.ir_remote_button
                data:
                  button: samsung_power
This is cleaner if you are handling several buttons from the same remote.
Using the learned codes with an IR blaster
Once you have captured the code, you can use it with an ESP32 IR transmitter.
For example, if your receiver logs this:
Received Samsung: data=0xE0E040BF, nbits=32You can transmit it from an IR blaster like this:
button:
  - platform: template
    name: "Samsung TV Power"
    on_press:
      - remote_transmitter.transmit_samsung:
          data: 0xE0E040BF
          nbits: 32
ESPHome’s remote_transmitter component is designed to send common remote control signals, including infrared and 433 MHz RF signals.
This is why the IR receiver and IR blaster work well as a pair:
- Receiver learns the original code
- Blaster sends the learned code
- Home Assistant controls the device
Full example: IR receiver with three learned buttons
This example creates three Home Assistant-visible buttons from an IR remote:
esphome:
  name: esp32-ir-receiver
  friendly_name: ESP32 IR Receiver

esp32:
  board: esp32dev

logger:
  level: DEBUG

api:
  encryption:
    key: "PASTE_YOUR_API_KEY_HERE"
  # Optional: use this if very fast IR button presses are missed
  # batch_delay: 0ms

ota:
  - platform: esphome
    password: "PASTE_YOUR_OTA_PASSWORD_HERE"

wifi:
  ssid: !secret wifi_ssid
  password: !secret wifi_password

remote_receiver:
  id: ir_receiver
  pin:
    number: GPIO23
    inverted: true
    mode:
      input: true
      pullup: true
  dump: all
  tolerance: 25%
  filter: 50us
  idle: 10ms

binary_sensor:
  - platform: remote_receiver
    name: "IR Remote Power"
    nec:
      address: 0x00FF
      command: 0x807F
    on_press:
      then:
        - homeassistant.event:
            event: esphome.ir_remote_button
            data:
              button: power

  - platform: remote_receiver
    name: "IR Remote Lamp"
    nec:
      address: 0x00FF
      command: 0x40BF
    on_press:
      then:
        - homeassistant.event:
            event: esphome.ir_remote_button
            data:
              button: lamp

  - platform: remote_receiver
    name: "IR Remote Movie Mode"
    nec:
      address: 0x00FF
      command: 0x20DF
    on_press:
      then:
        - homeassistant.event:
            event: esphome.ir_remote_button
            data:
              button: movie_mode
Then create Home Assistant automations for each button.
Example:
alias: IR remote movie mode
trigger:
  - platform: event
    event_type: esphome.ir_remote_button
    event_data:
      button: movie_mode
action:
  - service: scene.turn_on
    target:
      entity_id: scene.movie_mode
mode: single
Troubleshooting
Nothing appears in the logs
Check these first:
- Make sure
logger.levelis set toDEBUG - Make sure
dump: allis enabled - Check the IR receiver wiring
- Try another GPIO pin
- Try
inverted: trueif you usedinverted: false - Try
inverted: falseif your module behaves differently - Move the remote closer to the receiver
- Check that the receiver is powered from 3.3V and GND
Some IR receivers are sensitive to wiring and noise. Keep the wires short while testing.
Logs are full of random raw data
This usually means noise, unstable wiring, or a floating input.
Try:
pin:
  number: GPIO23
  inverted: true
  mode:
    input: true
    pullup: true
Also move the ESP32 away from strong sunlight, LED strips, plasma TVs or other sources of infrared noise.
The same button gives slightly different raw values
That is normal with raw IR captures. Timing values can vary slightly. If ESPHome decodes the protocol, prefer the decoded protocol output instead of raw data.
For example, use this if available:
Received NEC: address=0x00FF, command=0x807FRather than relying on a long raw timing list.
Quick button presses are missed
ESPHome notes that rapid remote button presses can be missed when using IR remote binary sensors, and suggests batch_delay: 0ms in the API configuration if needed. This sends state changes immediately, although it can increase network traffic.
Example:
api:
  batch_delay: 0ms
Only use this if you actually have missed presses.
Air conditioner remote codes are huge
This is normal. Many AC remotes send the full state every time, not just “temperature up” or “mode”. The code may include:
- Power state
- Mode
- Fan speed
- Temperature
- Swing setting
- Timer status
For air conditioners, you usually need to capture each useful state separately, such as:
- Cool 22°C auto fan
- Cool 23°C auto fan
- Heat 22°C auto fan
- Off
This is more annoying, but it is normal.
Best uses for an ESP32 IR receiver
An ESP32 IR receiver is useful for more than just learning codes.
Good uses include:
- Learning codes for an ESP32 IR blaster
- Turning an old remote into a Home Assistant scene controller
- Controlling smart lights with a TV remote
- Triggering automations without buying extra Zigbee buttons
- Detecting when someone uses the original remote
- Debugging unknown IR devices
- Building a universal remote control system
Limitations
This project is useful, but it has limits:
- It only receives IR signals; it does not transmit unless you add an IR LED
- Some remotes use unusual carrier frequencies
- Some AC remotes send very long state-based codes
- Raw codes can be messy
- Direct sunlight can interfere with reception
- Very cheap receiver modules may be inconsistent
For most normal TV, fan, LED controller and simple remote projects, it works very well.
Conclusion
An ESP32 IR receiver is a cheap but very useful Home Assistant tool. With one ESP32 and one IR receiver module, you can capture remote control codes, identify useful buttons, and use those buttons inside Home Assistant automations.
The best way to use it is as part of a two-step setup:
- Use the ESP32 IR receiver to learn the original remote codes
- Use an ESP32 IR blaster to send those codes from Home Assistant
That gives you local control of old infrared devices without cloud accounts, manufacturer apps or expensive universal remote hubs.