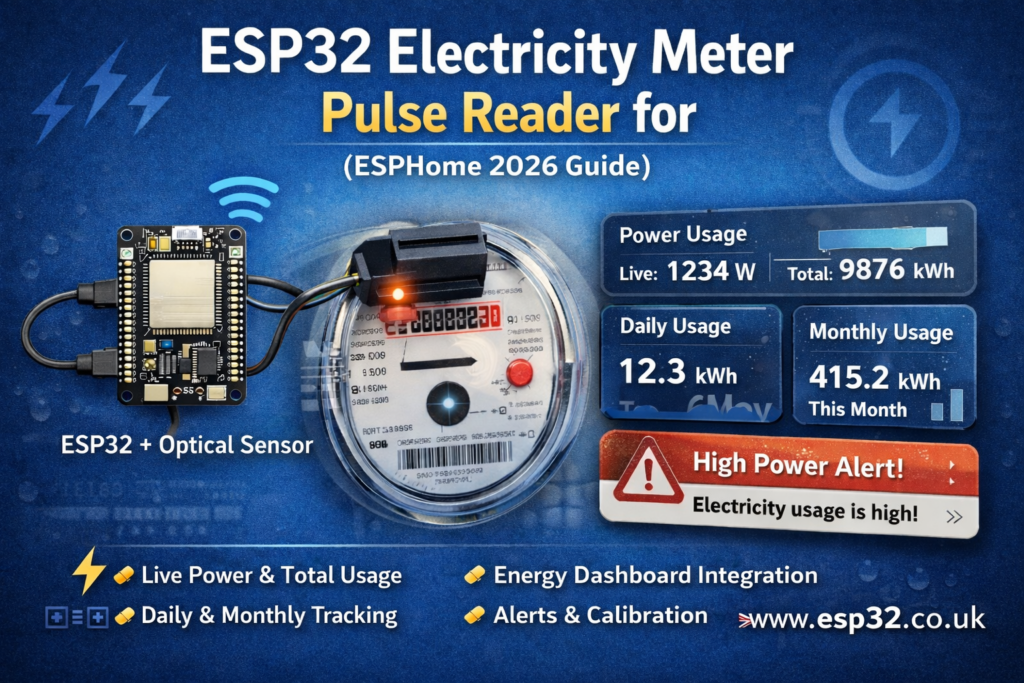
Read your home electricity meter’s pulse LED with an ESP32 and ESPHome, then send real-time power and total kWh to Home Assistant. This guide covers optical sensor setup, pulse_meter configuration, conversion from imp/kWh to watts and kWh, Energy dashboard integration, calibration, and common fixes for false pulses and spikes.
Home Assistant has made this kind of project more useful than it used to be. The Energy dashboard now supports real-time power alongside energy data, and the Now view shows live power badges at a glance. Home Assistant also officially documents Home Assistant Glow, an open-source ESPHome-based way to read an electricity meter’s flashing activity LED.
Why this project is worth doing
A simple optical pulse reader gives you:
- live power in watts
- total imported energy in kWh
- proper Energy dashboard support
- daily and monthly usage tracking
- a fully local setup with no cloud dependency
ESPHome’s pulse_meter is a strong fit because it measures the time between pulses instead of only counting pulses in a fixed interval, which gives better resolution at low pulse rates.
Which electricity meters this works with
This guide is for meters that have a small flashing LED or other visible pulse indicator. Home Assistant’s electricity-grid docs explicitly note that many meters flash an LED whenever energy passes through them, and that monitoring the time between flashes lets you determine consumption.
This is the best fit when you want a non-invasive external reader stuck over the pulse LED, basically the same idea as Home Assistant Glow.
If your meter exposes a smarter interface such as P1, IEC62056-21, or SML, those are often better than pulse-reading because they can provide richer direct data. Home Assistant documents all of those options too.
What you need
- an ESP32 development board
- a small optical sensor positioned over the meter LED
- a short cable and jumper wires
- black heat-shrink, foam, or a small printed hood to block ambient light
- Home Assistant
- ESPHome
The most important value is the meter constant, usually printed on the front as something like:
1000 imp/kWh2000 imp/kWh10000 imp/kWh
That tells you how many LED flashes equal 1 kWh, and it controls all the math. ESPHome’s own examples use this impulse constant directly for the conversion.
How the pulse math works
pulse_meter reports pulses per minute by default. ESPHome’s documentation shows the power conversion formula using the meter’s impulse constant. For a 10000 pulses/kWh meter, the example multiplier is 6, which comes from (60 / impulse constant) × 1000.
Using that same formula:
- Power in W = pulses/min ×
60000 / imp_per_kWh - Total in kWh = total pulses ×
1 / imp_per_kWh
So:
- for 1000 imp/kWh, multiply live pulses/min by 60
- for 2000 imp/kWh, multiply by 30
- for 10000 imp/kWh, multiply by 6
And for totals:
- 1000 imp/kWh → total multiplier
0.001 - 2000 imp/kWh → total multiplier
0.0005 - 10000 imp/kWh → total multiplier
0.0001
Wiring and placement
The critical part is not the ESP32. It is the sensor placement.
You want the optical sensor to see only the meter’s pulse LED and as little room light as possible. In practice, that means:
- place the sensor directly over the flashing LED
- shield it from daylight and reflections
- keep the wiring tidy and short
- test with the utility cupboard open and closed
Home Assistant Glow follows exactly this “stick it on top of the meter LED” approach.
ESPHome YAML example for 1000 imp/kWh
This is the easiest common example. It assumes:
- your meter flashes 1000 impulses per kWh
- you are reading the meter’s pulse LED optically
- the sensor output is presented to GPIO27
esphome:
  name: esp32-electricity-meter
  friendly_name: ESP32 Electricity Meteresp32:
  board: esp32dev
  framework:
    type: arduinologger:api:ota:wifi:
  ssid: !secret wifi_ssid
  password: !secret wifi_passwordsensor:
  - platform: pulse_meter
    pin: GPIO27
    name: "Grid Power"
    id: grid_power
    unit_of_measurement: "W"
    device_class: power
    state_class: measurement
    accuracy_decimals: 0    # Start conservative and tune later
    internal_filter: 20ms
    timeout: 30s    # 1000 imp/kWh:
    # W = pulses/min × (60000 / 1000) = pulses/min × 60
    filters:
      - multiply: 60    total:
      name: "Grid Energy Total"
      id: grid_energy_total
      unit_of_measurement: "kWh"
      device_class: energy
      state_class: total_increasing
      accuracy_decimals: 3      # kWh = total pulses × (1 / 1000)
      filters:
        - multiply: 0.001
That matches Home Assistant’s requirements for Energy dashboard entities: power sensors should use device_class: power with state_class: measurement, while energy totals should use device_class: energy with state_class: total or total_increasing and an accepted unit such as kWh.
ESPHome YAML example for 10000 imp/kWh
Many digital meters use a much higher pulse rate such as 10000 imp/kWh. ESPHome’s own docs use that example and show a live-power multiplier of 6.
sensor:
  - platform: pulse_meter
    pin: GPIO27
    name: "Grid Power"
    id: grid_power
    unit_of_measurement: "W"
    device_class: power
    state_class: measurement
    accuracy_decimals: 0
    internal_filter: 20ms
    timeout: 30s
    filters:
      - multiply: 6    total:
      name: "Grid Energy Total"
      id: grid_energy_total
      unit_of_measurement: "kWh"
      device_class: energy
      state_class: total_increasing
      accuracy_decimals: 3
      filters:
        - multiply: 0.0001
Choosing the debounce filter
ESPHome documents internal_filter as a debounce/noise filter: if a pulse shorter than that time is detected, it is discarded.
For electricity meters, a good starting point is often around 20 ms, and ESPHome’s example uses that exact value for a 10000 imp/kWh meter at up to 16 kW. Their cookbook walks through the reasoning: at that pulse rate, anything faster than about 22.5 ms would imply a higher load than expected, so 20 ms is a sensible rejection threshold.
In real life:
- if you get false spikes, increase the filter a bit
- if you miss pulses at high load, the filter may be too aggressive
- if the reading jumps around in daylight, improve the light shielding first
Adding it to Home Assistant Energy
Once the ESPHome node is online:
- confirm Grid Power changes when the house load changes
- confirm Grid Energy Total only ever goes upward
- let Home Assistant collect statistics
- add the total kWh sensor to the Energy dashboard
- optionally add the live power sensor where real-time power is supported
If a sensor does not appear in Energy, Home Assistant says to check four things first:
- correct
device_class - correct
state_class - correct unit
- no statistics errors in Developer Tools
Calibrating the total to match the real meter
ESPHome supports pulse_meter.set_total_pulses, which lets you set the raw pulse count so your ESPHome total matches the actual utility meter. ESPHome also notes an important detail: this value is the raw pulse count, not the filtered engineering value you see after conversion.
So if your physical electricity meter reads 12345.678 kWh:
- at 1000 imp/kWh, raw pulses =
12345.678 × 1000 = 12,345,678 - at 10000 imp/kWh, raw pulses =
12345.678 × 10000 = 123,456,780
Example API action:
api:
  actions:
    - action: set_grid_total
      variables:
        new_total: int
      then:
        - pulse_meter.set_total_pulses:
            id: grid_power
            value: !lambda "return new_total;"
That is useful after first installation, after testing, or if you ever want the ESPHome total to line up exactly with the utility meter again.
Daily and monthly tracking with Utility Meter
The Energy dashboard is useful, but for billing-style views you will usually also want daily and monthly helper sensors.
Home Assistant’s utility_meter integration is built for exactly that. It tracks a source sensor in billing-style cycles, supports tariffs, and keeps values persistent across restarts. The docs also explain that if your source sensor is a domestic utility meter that does not reset during normal use, periodically_resetting should be disabled.
utility_meter:
  electricity_daily:
    source: sensor.grid_energy_total
    cycle: daily
    periodically_resetting: false  electricity_monthly:
    source: sensor.grid_energy_total
    cycle: monthly
    periodically_resetting: false  electricity_yearly:
    source: sensor.grid_energy_total
    cycle: yearly
    periodically_resetting: false
If you use time-of-use tariffs, utility_meter can also split the same source into peak and off-peak counters.
Common problems
Power is stuck at zero
Usually one of these:
- wrong sensor position
- LED is too dim for your optical setup
- wrong GPIO
- wrong logic level from the sensor
timeoutis fine but pulses are simply not being seen
Power is absurdly high
Usually:
- wrong imp/kWh constant
- false double-counting
- ambient light causing phantom pulses
internal_filtertoo low
This is the classic “looks impressive but is nonsense” problem.
Total energy drifts from the real meter
Usually:
- a few missed pulses from bad alignment
- occasional false pulses from reflections
- wrong multiplier
- total not calibrated at the start
The sensor will not appear in Energy
Check the entity attributes first:
- power sensor:
device_class: power,state_class: measurement - total sensor:
device_class: energy,state_class: totalortotal_increasing - energy unit should be
kWhor another accepted energy unit - fix any statistics warnings before trying again
Good dashboard ideas
Once it works, add:
- a live watts tile for current demand
- daily and monthly utility-meter cards
- a history graph for evening peaks
- an automation that notifies you if base load never drops overnight
- a card comparing today vs yesterday
This kind of project gets even more useful now that Home Assistant’s Energy dashboard includes live power views and clearer utility sections.
This is one of the better ESP32 + Home Assistant projects because it solves a real problem. It is cheap, local, non-invasive, and it plugs neatly into the official Home Assistant energy workflow. For a lot of homes, an optical pulse reader is also the easiest route because you do not need to interfere with the meter internals at all.