The LD2450 is one of the more interesting mmWave sensors for Home Assistant because it is not just a simple “occupied or not” radar. ESPHome describes it as a human presence, motion detection and tracking radar that can track the position of moving targets in real time, including distance, angle, and speed relative to the sensor. That makes it far more useful for directional room automations and multi-person spaces than the usual one-bit presence sensor.
Why the LD2450 is different
A lot of presence sensors are basically glorified yes/no detectors. They can be useful, but they do not really tell you where someone is.
The LD2450 is different because it is built for target tracking. ESPHome’s documentation says it can expose real-time measurements such as:
- target distance
- target angle
- target speed
- X and Y coordinates
- per-target data
- zone-based presence logic
That means you can do things like:
- turn on desk lights only when somebody is near the desk
- keep the sofa lamp on when someone is sitting on the sofa
- ignore movement in a doorway while tracking the main seating area
- build left/right or near/far automations in one room
That is the real appeal. It is not just presence. It is position-aware presence.
Why use an ESP32 with it
You use the LD2450 with an ESP32 because ESPHome already has an official ld2450 component. That matters a lot. It means you do not need old custom external components or weird hacks anymore. ESPHome added native LD2450 support in 2025.3.0, calling it “the long-awaited Ld2450,” and the official component is now the sensible starting point.
Using an ESP32 and ESPHome gives you:
- direct Home Assistant integration
- local processing
- easy entity creation
- configurable zones and settings
- cleaner updates than custom integrations
Bluntly, now that the official component exists, there is very little reason to build a new LD2450 setup the hard way.
What you need
- an ESP32 development board
- an HLK-LD2450 radar module
- jumper wires
- a stable 5V or 3.3V-powered setup depending on your board and wiring design
- Home Assistant
- ESPHome
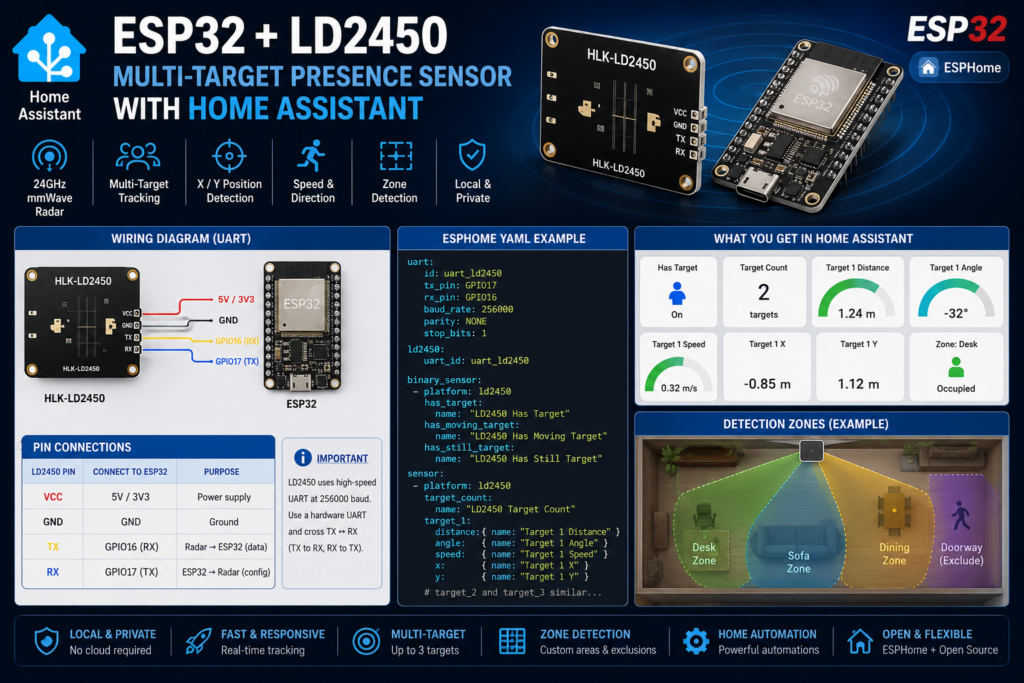
The important technical point from the ESPHome docs is that the LD2450 uses UART, and ESPHome strongly recommends using a hardware UART because the sensor’s default speed is 256000 baud. The docs also say parity must be NONE and stop_bits must be 1.
Before you start: firmware requirement
This bit matters.
ESPHome says the LD2450 should be running firmware V2.02.23090617 or later for proper integration functionality. If it is older, update it first using the vendor’s HLKRadarTool mobile app.
If you skip this and things behave strangely, do not immediately blame ESPHome. Sometimes the boring answer is the right one: outdated sensor firmware.
Wiring the LD2450 to the ESP32
The official docs focus on UART setup rather than giving one single mandatory pinout, so a typical practical approach is:
- LD2450 TX → ESP32 RX
- LD2450 RX → ESP32 TX
- GND → GND
- VCC → appropriate power rail for your module and board setup
Visual wiring diagram
The LD2450 uses a UART connection, so the wiring is simple once you remember the golden rule:
- LD2450 TX goes to ESP32 RX
- LD2450 RX goes to ESP32 TX
Wiring overview
HLK-LD2450 radar                ESP32
──────────────────────────      ─────────────────────
VCC   ───────────────────────▶  5V or 3V3*
GND   ───────────────────────▶  GND
TX    ───────────────────────▶  GPIO16 (RX)
RX    ───────────────────────▶  GPIO17 (TX)
* Use the correct supply voltage for your specific LD2450 board/module version and your wiring setup.
Pin-by-pin table
| LD2450 pin | Connect to ESP32 | Purpose |
|---|---|---|
| VCC | 5V or 3V3 | Power |
| GND | GND | Ground |
| TX | GPIO16 (RX) | Radar sends data to ESP32 |
| RX | GPIO17 (TX) | ESP32 sends config data to radar |
Recommended ESP32 UART pins
A common clean setup is:
- GPIO17 as TX
- GPIO16 as RX
That matches this ESPHome config:
uart:
  id: uart_ld2450
  tx_pin: GPIO17
  rx_pin: GPIO16
  baud_rate: 256000
  parity: NONE
  stop_bits: 1
Quick “don’t get it backwards” reminder
This is the part people mess up:
- sensor TX → ESP32 RX
- sensor RX → ESP32 TX
Not TX to TX.
Not RX to RX.
LD2450 wiring tip: The module uses high-speed UART at 256000 baud, so use a hardware UART on the ESP32, keep wiring short, and double-check that TX/RX are crossed correctly.
┌────────────────────┐         ┌────────────────────┐
│     HLK-LD2450     │         │       ESP32        │
├────────────────────┤         ├────────────────────┤
│ VCC                ├────────▶│ 5V / 3V3           │
│ GND                ├────────▶│ GND                │
│ TX                 ├────────▶│ GPIO16 (RX)        │
│ RX                 ◀─────────┤ GPIO17 (TX)        │
└────────────────────┘         └────────────────────┘
A common example on ESP32 dev boards is to use a secondary hardware UART, such as GPIO16 and GPIO17, but the exact pins depend on your board. The part that matters is using a real hardware UART that supports the required baud rate reliably. That recommendation comes directly from the ESPHome docs.
What the LD2450 is good at
The LD2450 is mainly for indoor human target tracking. ESPHome describes the module as part of Hi-Link’s 24 GHz millimeter-wave radar series and says it is primarily intended indoors for location tracking of moving human targets.
So it is well suited to places like:
- home offices
- living rooms
- kitchens
- hallways
- open-plan rooms
- bed positioning or desk positioning projects
It is less appealing if all you want is the simplest possible occupancy sensor for a tiny room. In that case, a simpler LD2410-type setup is often enough. The LD2450 makes more sense when you actually care about where the person is.
Example ESPHome YAML
Here is a clean starting example for an ESP32 with the LD2450 on a hardware UART.
esphome:
  name: ld2450-presence
  friendly_name: LD2450 Presence

esp32:
  board: esp32dev
  framework:
    type: arduino

logger:

api:

ota:

wifi:
  ssid: !secret wifi_ssid
  password: !secret wifi_password

uart:
  id: uart_ld2450
  tx_pin: GPIO17
  rx_pin: GPIO16
  baud_rate: 256000
  parity: NONE
  stop_bits: 1

ld2450:
  uart_id: uart_ld2450

binary_sensor:
  - platform: ld2450
    has_target:
      name: "LD2450 Has Target"
    has_moving_target:
      name: "LD2450 Has Moving Target"
    has_still_target:
      name: "LD2450 Has Still Target"

sensor:
  - platform: ld2450
    target_count:
      name: "LD2450 Target Count"

    target_1:
      x:
        name: "Target 1 X"
      y:
        name: "Target 1 Y"
      speed:
        name: "Target 1 Speed"
      angle:
        name: "Target 1 Angle"
      distance:
        name: "Target 1 Distance"

    target_2:
      x:
        name: "Target 2 X"
      y:
        name: "Target 2 Y"
      speed:
        name: "Target 2 Speed"
      angle:
        name: "Target 2 Angle"
      distance:
        name: "Target 2 Distance"

    target_3:
      x:
        name: "Target 3 X"
      y:
        name: "Target 3 Y"
      speed:
        name: "Target 3 Speed"
      angle:
        name: "Target 3 Angle"
      distance:
        name: "Target 3 Distance"
ESPHome’s official docs confirm the component supports target tracking metrics like distance, angle, speed, and coordinates, and the API docs also show direction-related enums such as approaching, moving away, and stationary.
What entities you actually get
The exact entity list depends on your YAML, but the official component is designed to expose much more than a single occupancy state. In practice, useful entities include:
- overall target present
- moving target present
- still target present
- target count
- per-target X/Y position
- per-target distance
- per-target angle
- per-target speed
That is what makes the LD2450 worth the extra effort. With simpler sensors, you get presence. With the LD2450, you get presence plus spatial context.
Zones are where this gets interesting
The raw target coordinates are useful, but zones are what turn the sensor into something genuinely practical.
Instead of asking “is there someone in the room,” you can ask:
- is someone in the desk zone
- is someone in the sofa zone
- is someone near the TV wall
- is someone in the doorway but not actually in the room
The ESPHome component and underlying API docs include zone support, and the community discussion around LD2450 products and setups has also focused heavily on area detection and exclusion areas because that is the feature that makes multi-target radar feel smarter than basic PIR or basic occupancy.
For real homes, zones are the whole point.
Good Home Assistant use cases
Desk lighting
Turn on task lighting only when someone is sitting near the desk, not just whenever the room has movement.
Sofa presence
Keep ambient lighting and media automations active only when someone is actually in the sofa area.
Hallway filtering
Ignore traffic passing through a doorway so lights in the main room do not keep changing unnecessarily.
Dual-purpose room logic
In an office/guest room or kitchen/dining room, use different automations based on which zone is occupied.
That is where the LD2450 earns its keep. Otherwise, you are paying for richer tracking data and then throwing it away.
Placement matters more than people admit
All mmWave sensors are sensitive to placement, but multi-target tracking makes this even more obvious.
A few practical rules:
- mount it where it can see the useful part of the room
- avoid pointing it straight through busy walk-through paths unless that is your goal
- think about the coordinate system before defining zones
- test with real people standing and sitting where they actually use the room
- do not expect one sensor to understand your room layout automatically
The official docs emphasize the LD2450 as an indoor human target tracker, not a magic room-awareness box. You still need to place it sensibly and tune it.
LD2450 vs simpler presence sensors
The easiest way to think about it:
- PIR: cheap, simple, motion only
- basic mmWave: presence, sometimes stillness detection, but not much location awareness
- LD2450: target tracking with coordinates and multiple targets
So the LD2450 is not automatically the best choice for every room. It is the better choice when:
- you want zones
- you want multi-person tracking
- you want directional automations
- you want to distinguish one side of a room from another
If you only need “turn bathroom light on when someone enters,” it is probably overkill.
Common problems
No data or flaky data
The first things to check are the boring ones:
- firmware version on the LD2450
- UART pin mapping
- hardware UART usage
- baud rate set to
256000 - parity and stop bits matching the official requirements
Those requirements come directly from the ESPHome docs.
Entities appear but automations feel weird
That usually means one of these:
- poor sensor placement
- zones not tuned properly
- you are using raw target data when a binary zone entity would be better
- the room is too busy for your current logic
Target tracking works but does not feel useful
That usually means you have not turned coordinates into actual room logic yet. Raw X/Y numbers look clever in dashboards, but zones and practical automations are what make the setup worth having.
A practical automation idea
A good starting pattern is:
- use
has_targetas broad occupancy - use a zone or target coordinates for the main action
- add a short delay before clearing presence
- keep the automation simple at first
For example:
- if desk zone occupied → turn on desk lamp
- if sofa zone occupied → turn on warm ambient light
- if only doorway area triggered → ignore
That is much better than trying to use every possible entity from day one.
Final thoughts
The ESP32 LD2450 combination is one of the more advanced and useful Home Assistant presence projects because it gives you something most cheap sensors do not: real target tracking. The official ESPHome component now makes it much easier to build than it used to be, as long as you respect the UART requirements and firmware version requirements.
The blunt summary is this: if you want simple occupancy, buy something simpler. If you want position-aware presence with multiple targets, the LD2450 is where things start getting genuinely interesting.