
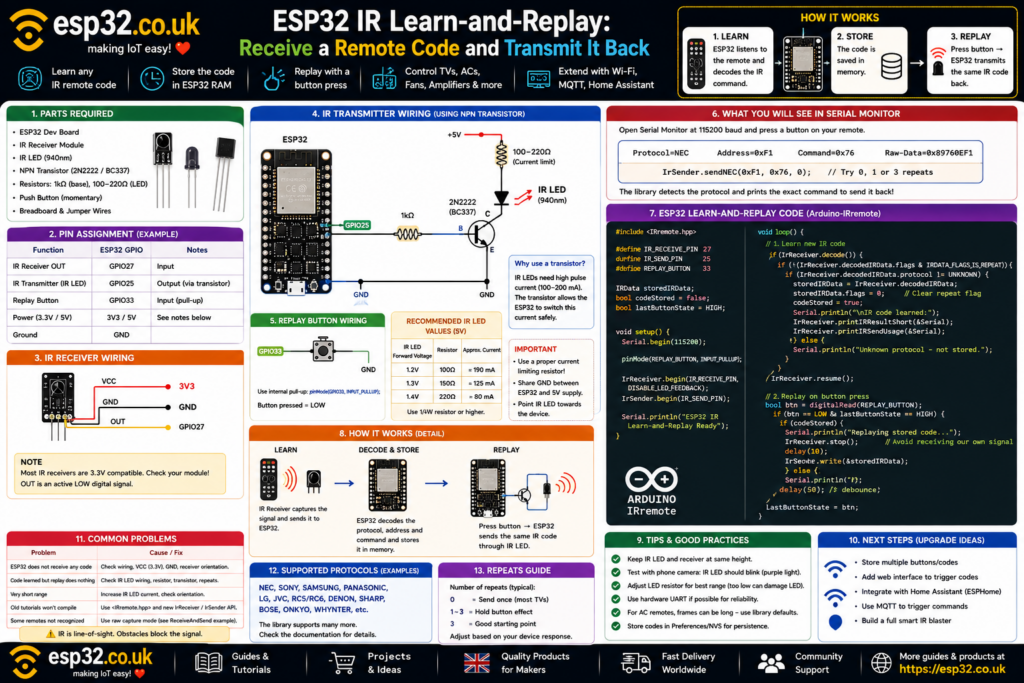
This project turns an ESP32 into a simple learning IR remote. An IR receiver captures a button press from a TV, amplifier, fan or other infrared remote, the ESP32 identifies the protocol, address and command, stores the code in memory, and an IR LED transmits the same command again when a pushbutton is pressed. The current Arduino-IRremote library provides dedicated IrReceiver and IrSender objects and can even print the exact send command needed to reproduce a received signal.
What is an IR learning remote?
A normal infrared remote contains a list of commands programmed by the manufacturer.
Press:
Volume Up
and the remote transmits a specific infrared pattern.
Press:
Power
and it sends another.
A learning remote does not need to know those codes in advance.
Instead, it:
- listens to the original remote
- decodes the received IR message
- stores it
- transmits the same message later
That is exactly what the ESP32 will do in this project.
The official Arduino-IRremote library includes a ReceiveAndSend example specifically designed to record the last received IR signal and play it back later.
What can this project control?
Infrared is still widely used for:
- televisions
- AV receivers
- soundbars
- projectors
- LED controllers
- fans
- set-top boxes
- some air conditioners
- older home appliances
Once the ESP32 learns a command, it can eventually be triggered by:
- a physical button
- Wi-Fi
- MQTT
- Home Assistant
- a web page
- a timer
- a sensor
- voice assistants
This tutorial starts with the simplest version:
Remote → ESP32 learns → pushbutton → ESP32 replays
Once that works, adding Home Assistant is straightforward.
Parts required
A basic build needs:
- ESP32 development board
- IR receiver module
- IR LED
- NPN transistor such as 2N2222 or BC337
- transistor base resistor
- IR LED current-limiting resistor
- momentary pushbutton
- breadboard and jumper wires
A common demodulated IR receiver designed for consumer remote-control frequencies is easiest because it outputs a clean digital signal instead of requiring the ESP32 to process the raw infrared carrier directly.
Recommended GPIOs
For a classic ESP32 DevKit, this guide uses:
| Function | GPIO |
|---|---|
| IR receiver | GPIO27 |
| IR transmitter | GPIO25 |
| Replay button | GPIO33 |
These are ordinary GPIOs that avoid the classic ESP32 boot-strapping pins.
Other suitable pins can be used if the project already needs GPIO25, GPIO27 or GPIO33.
IR receiver wiring
Most IR receiver modules have three connections:
VCC
GND
OUT
Typical wiring:
| IR receiver | ESP32 |
|---|---|
| VCC | 3.3V |
| GND | GND |
| OUT | GPIO27 |
Check the pin order on the actual receiver module because different packages can arrange VCC, GND and OUT differently.
The Arduino-IRremote library allows the receive input to be placed on essentially any suitable ESP32 GPIO. On ESP32, the library uses an hw_timer_t timer for IR reception.
IR transmitter wiring
An IR LED can technically be driven at low current directly from a GPIO, but the range is usually disappointing.
A much better arrangement uses a transistor.
                     +5V
                      │
                Current-limiting
                   resistor
                      │
                  IR LED
                      │
                   Collector
                      │
ESP32 GPIO25 ─1kΩ─ Base
                    2N2222
                      │
                   Emitter
                      │
                     GND
The ESP32 controls only the transistor.
The transistor supplies the pulsed LED current.
This gives substantially better IR range than asking the ESP32 GPIO itself to drive a high-current infrared LED.
The exact LED resistor depends on:
- supply voltage
- IR LED forward voltage
- desired pulse current
- transistor
- IR LED current rating
Values around 100–220 Ω are commonly practical for a modest 5 V transmitter, but the correct resistor should be chosen from the specifications of the actual IR LED.
Always share ground between the ESP32 and IR LED power supply.
Why an IR LED does not simply stay on
Infrared remote-control signals are modulated.
A typical remote does not transmit:
LED ON for 100 ms
Instead, it rapidly switches the IR LED using a carrier frequency, commonly around 38 kHz, while encoding the actual command as bursts and gaps.
The Arduino-IRremote library generates this carrier automatically when transmitting supported protocols. On ESP32 it uses the platform’s PWM facilities, and the library can use arbitrary suitable send pins.
So there is no need to manually generate a 38 kHz signal using digitalWrite().
Install the Arduino-IRremote library
In Arduino IDE:
Sketch
→ Include Library
→ Manage Libraries
Search for:
IRremote
Install:
Arduino-IRremote
Modern examples use:
#include <IRremote.hpp>
rather than the old:
#include <IRremote.h>
The 4.x API also uses global objects:
IrReceiver
IrSender
instead of older tutorials that manually create IRrecv and IRsend objects.
First test: receive an IR command
Before trying to replay anything, confirm that the ESP32 can read the original remote.
Use:
#include <IRremote.hpp>

#define IR_RECEIVE_PIN 27

void setup() {
  Serial.begin(115200);

  IrReceiver.begin(IR_RECEIVE_PIN, ENABLE_LED_FEEDBACK);

  Serial.println("IR receiver ready");
}

void loop() {
  if (IrReceiver.decode()) {

    IrReceiver.printIRResultShort(&Serial);
    IrReceiver.printIRSendUsage(&Serial);

    IrReceiver.resume();
  }
}
Open Serial Monitor at:
115200 baud
Then point the original remote toward the IR receiver and press a button.
What the Serial Monitor tells you
For a recognised protocol, output can look similar to:
Protocol=NEC
Address=0xF1
Command=0x76
Raw-Data=0x89760EF1
The library can then print something similar to:
IrSender.sendNEC(0xF1, 0x76, <numberOfRepeats>);
This is one of the most useful features of the modern Arduino-IRremote library: printIRSendUsage() tells you how the detected signal can be transmitted again.
The exact protocol may instead be:
- NEC
- Samsung
- Sony
- RC5
- RC6
- Panasonic/Kaseikyo
- LG
- JVC
- another supported format
The library handles many common consumer IR protocols.
Protocol, address and command explained
A decoded IR message commonly contains several pieces of information.
Protocol
This defines the signalling format.
Example:
NEC
Address
This usually identifies the device or device family.
Example:
0xF1
Command
This identifies the button function.
Example:
0x76
So two buttons on the same remote might look like:
Power
Address = 0xF1
Command = 0x10
and:
Volume Up
Address = 0xF1
Command = 0x11
The address remains the same while the command changes.
The Arduino-IRremote documentation notes that addresses are often constant for a device while commands are grouped according to function.
The complete simple learn-and-replay sketch
The following example learns the most recently received recognised protocol, stores it in RAM and sends it again whenever a local button is pressed.
#include <IRremote.hpp>

#define IR_RECEIVE_PIN 27
#define IR_SEND_PIN    25
#define REPLAY_BUTTON  33

IRData storedIRData;

bool codeStored = false;
bool lastButtonState = HIGH;

void setup() {
  Serial.begin(115200);

  pinMode(REPLAY_BUTTON, INPUT_PULLUP);

  // Start IR receiver
  IrReceiver.begin(IR_RECEIVE_PIN, DISABLE_LED_FEEDBACK);

  // Start IR transmitter
  IrSender.begin(IR_SEND_PIN);

  Serial.println();
  Serial.println("ESP32 IR Learn-and-Replay");
  Serial.println("Point remote at receiver and press a button.");
}

void loop() {

  // Learn a new IR code
  if (IrReceiver.decode()) {

    if (!(IrReceiver.decodedIRData.flags & IRDATA_FLAGS_IS_REPEAT)) {

      if (IrReceiver.decodedIRData.protocol != UNKNOWN) {

        storedIRData = IrReceiver.decodedIRData;

        // Clear repeat flags before later transmission
        storedIRData.flags = 0;

        codeStored = true;

        Serial.println();
        Serial.println("IR code learned:");

        IrReceiver.printIRResultShort(&Serial);
        IrReceiver.printIRSendUsage(&Serial);

        Serial.println("Press the replay button to transmit it.");
      }
      else {
        Serial.println("Unknown protocol - not stored by this simple example.");
      }
    }

    IrReceiver.resume();
  }

  // Read local replay button
  bool buttonState = digitalRead(REPLAY_BUTTON);

  // Send once when button is pressed
  if (buttonState == LOW && lastButtonState == HIGH) {

    if (codeStored) {

      Serial.println("Replaying stored IR command...");

      // Prevent receiver from detecting our own transmission
      IrReceiver.stop();

      delay(10);

      IrSender.write(&storedIRData);

      delay(50);

      IrReceiver.start();

      Serial.println("Done.");
    }
    else {
      Serial.println("No IR command has been learned yet.");
    }

    delay(50); // simple button debounce
  }

  lastButtonState = buttonState;
}
This simplified approach follows the same architecture used by Arduino-IRremote’s official ReceiveAndSend example: copy the decoded IRData, stop reception before transmitting, use IrSender.write() to send the stored protocol, then restart the receiver.
What happens when a remote button is pressed?
This line checks whether a full infrared message has arrived:
if (IrReceiver.decode())
When decoding succeeds, information about the signal becomes available through:
IrReceiver.decodedIRData
The library’s IRData structure includes fields such as protocol, address, command, raw data and flags.
The sketch then copies that structure:
storedIRData = IrReceiver.decodedIRData;
Now the ESP32 has remembered the command.
Why repeat frames are ignored when learning
Holding a remote button often does not resend the complete command every single time.
Many protocols transmit:
Full command
Repeat
Repeat
Repeat
The library marks these using:
IRDATA_FLAGS_IS_REPEAT
The official ReceiveDemo and ReceiveAndSend examples specifically detect repeat frames separately.
For a simple learning remote, it is better to store the original full command rather than accidentally storing a repeat frame.
That is why the sketch checks:
if (!(IrReceiver.decodedIRData.flags & IRDATA_FLAGS_IS_REPEAT))
Replaying the command
The important transmit line is:
IrSender.write(&storedIRData);
The Arduino-IRremote library examines the stored protocol and selects the appropriate sender internally. The official ReceiveAndSend example uses exactly this technique for known protocols.
So the sketch does not need a huge block like:
if NEC...
else if Sony...
else if Samsung...
The library handles the protocol selection.
Why stop the receiver while transmitting?
The IR LED and receiver are normally only a few centimetres apart.
If the receiver remains enabled while the ESP32 sends a command, it can detect its own transmission.
That can create confusing behaviour:
Transmit command
→ receiver sees command
→ command is learned again
→ unexpected repeat behaviour
The official Arduino-IRremote ReceiveAndSend example stops the receiver before transmitting and restarts it afterward.
That is why the example uses:
IrReceiver.stop();

IrSender.write(&storedIRData);

IrReceiver.start();
Why the code disappears after reboot
The simple sketch stores the learned command in RAM.
That means:
Power removed
→ learned command lost
This is intentional for a beginner example.
The next upgrade is storing learned commands in:
- ESP32 Preferences/NVS
- EEPROM emulation
- LittleFS
- SPIFFS
Then commands can survive a reboot or power failure.
Learning several remote buttons
Once one command works, the same idea can be expanded.
Instead of:
IRData storedIRData;
use several storage locations:
IRData powerCode;
IRData volumeUpCode;
IRData volumeDownCode;
IRData sourceCode;
The ESP32 can then become a programmable universal remote.
For example:
Button 1 → TV Power
Button 2 → Volume Up
Button 3 → Volume Down
Button 4 → HDMI Input
Or those commands could later become Home Assistant buttons.
What if the protocol says UNKNOWN?
Not every infrared signal can be decoded into a recognised protocol.
When Arduino-IRremote reports:
Protocol=UNKNOWN
the waveform can still potentially be replayed using its raw mark/space timings.
The official ReceiveAndSend example handles unknown and generic pulse-width/pulse-distance formats by copying the raw timing buffer and later using:
IrSender.sendRaw(...)
It assumes a 38 kHz carrier for that fallback example.
This is useful for unusual remotes that the decoder does not understand.
Why raw replay is more complicated
A recognised protocol might be represented compactly as:
Protocol = NEC
Address = 0x10
Command = 0x34
Raw mode instead stores something like:
9000
4500
560
560
560
1690
560
560
...
These numbers represent the timing of the infrared marks and spaces.
The buffer is therefore much larger.
Arduino-IRremote includes the official ReceiveAndSend example specifically for projects that need to store and replay both recognised and raw signals.
For a first project, begin with recognised protocols.
Use ReceiveDemo when troubleshooting
Arduino IDE includes:
File
→ Examples
→ IRremote
→ ReceiveDemo
The project documentation recommends ReceiveDemo when learning codes from an existing remote because it prints both the decoded information and the appropriate transmit statement.
This should be the first diagnostic tool whenever:
- a remote isn’t recognised
- addresses appear strange
- commands don’t replay correctly
- repeats behave unexpectedly
Example: NEC remote
Suppose Serial Monitor displays:
Protocol=NEC
Address=0x2
Command=0x34
and then:
IrSender.sendNEC(0x2, 0x34, <numberOfRepeats>);
The same command can be transmitted manually with:
IrSender.sendNEC(0x2, 0x34, 0);
The Arduino-IRremote project’s own sample logs show this same address/command approach for NEC messages.
Using:
0 repeats
sends one normal command frame.
How many repeats should be transmitted?
Some devices respond perfectly with no repeats.
Others expect the command to be held slightly longer.
Arduino-IRremote’s documentation suggests three repeats as a practical starting point when the correct repeat count is unknown, then reducing it if fewer repeats work reliably.
For a normal button press, start with:
0 or 1 repeats
and increase only if necessary.
Receiver works but transmitter does nothing
This is one of the most common IR projects to fail halfway.
The ESP32 successfully prints:
Protocol=NEC
Address=...
Command=...
but the television does nothing when replay is pressed.
Check the transmitter hardware first.
Common causes include:
- IR LED connected backwards
- no current-limiting resistor
- transistor wired incorrectly
- no common ground
- IR LED pointed away from appliance
- wrong send GPIO
- IR LED current too low
- wrong protocol/repeat count
A phone camera can sometimes show infrared LEDs as a faint flashing purple/white light, making it a useful quick check that the transmitter is actually emitting.
The IR LED works only from a few centimetres away
The likely cause is insufficient LED current.
Driving an IR LED directly from an ESP32 GPIO is fine for testing but usually provides poor range.
Use:
ESP32
→ transistor
→ IR LED
for a practical remote-control transmitter.
The Arduino-IRremote documentation also discusses transmitter current and carrier duty cycle because IR receiver range depends strongly on peak emitter intensity rather than simply average power.
The remote code changes when holding the button
This can be completely normal.
A protocol can transmit:
Initial command
Repeat frame
Repeat frame
Repeat frame
or send slightly different repeat information.
Use:
IrReceiver.printIRResultShort(&Serial);
and inspect the flags.
The official library’s examples explicitly distinguish new commands from repeat frames.
Old tutorials won’t compile
Many older IRremote tutorials contain code such as:
#include <IRremote.h>

IRrecv irrecv(RECV_PIN);
decode_results results;
and:
irrecv.enableIRIn();
That is the old API.
Current Arduino-IRremote 4.x uses:
#include <IRremote.hpp>
and:
IrReceiver.begin(...)
with received information stored in:
IrReceiver.decodedIRData
The project’s migration documentation explicitly explains this change.
When following older ESP32 IR tutorials, this is one of the most common reasons code fails to compile.
Can the same ESP32 receive and send?
Yes.
Arduino-IRremote explicitly supports both receiving and transmitting in the same application, and its official examples include ReceiveAndSend and SendAndReceive.
The practical trick is simply to avoid receiving your own transmission by temporarily stopping the receiver during replay.
Can one ESP32 learn an entire remote?
Yes.
A more advanced version can provide a learning mode:
Select "TV Power"
→ press original Power button
→ save command

Select "Volume Up"
→ press original Volume Up
→ save command

Select "Volume Down"
→ press original Volume Down
→ save command
The ESP32 can save each learned command into non-volatile storage.
At that point, the device behaves like a proper programmable IR bridge.
Adding Home Assistant later
Once the send side works, each stored IR command can become a Home Assistant button.
For example:
TV Power
Volume Up
Volume Down
Mute
Input
Home Assistant can then trigger those functions through:
- dashboards
- automations
- scenes
- voice control
That creates a DIY alternative to a commercial Wi-Fi IR blaster.
The important part is to first prove the remote code can be learned and replayed locally before adding Wi-Fi, MQTT or Home Assistant complexity.
Air conditioners are more complicated
TV remotes commonly transmit relatively simple button commands.
Many air-conditioner remotes work differently.
Instead of:
Temperature Up
the remote may transmit the entire AC state:
Power = ON
Mode = COOL
Temperature = 23°C
Fan = AUTO
Swing = ON
in one long frame.
This creates much longer and more complicated IR packets.
Arduino-IRremote supports numerous protocols and raw capture, but AC remotes may require larger buffers or a library specifically designed around HVAC protocols. The Arduino-IRremote ReceiveDemo source itself notes that some air-conditioner protocols require a larger record gap to capture the complete frame.
For a first learn-and-replay project, test with a TV or simple appliance remote.
Best way to develop the project
Build it in stages.
Start with:
IR receiver
↓
Serial Monitor
Confirm that codes are decoded.
Then add:
IR transmitter
↓
Send known code
Confirm that the appliance responds.
Then combine them:
Original Remote
      ↓
 IR Receiver
      ↓
    ESP32
   stores code
      ↓
 Replay Button
      ↓
   IR LED
      ↓
 TV / Device
Only after this works reliably should additional features such as Home Assistant or persistent storage be added.
Final recommendation
An ESP32 is an excellent platform for building a simple IR learning remote because one board can both receive and transmit infrared while also providing Wi-Fi for later smart-home integration.
The key steps are:
- connect an IR receiver to a safe GPIO
- use the modern
IRremote.hppAPI - call
IrReceiver.decode()to capture a signal - inspect protocol, address and command
- copy
IrReceiver.decodedIRData - ignore repeat frames while learning
- drive the IR LED through a transistor for useful range
- stop the receiver before replaying
- send the stored command using
IrSender.write() - restart the receiver after transmitting
Arduino-IRremote already contains nearly all of the difficult protocol handling required. Its official ReceiveDemo can show how a received command should be sent, while ReceiveAndSend demonstrates the full record-and-playback pattern used in this project.
Once one button can be learned and replayed reliably, the same idea can grow into a complete ESP32 universal IR remote for Home Assistant.