If ESP8266 was the pioneer and the original ESP32 was the heavyweight champ, ESP32-C3 is the modern workhorse: Espressif’s first big move to RISC-V, built to be an affordable, power-efficient “drop-in upgrade” class for Wi-Fi IoT — but with Bluetooth LE, strong security features, and a built-in USB Serial/JTAG controller.
In 2026, you’ll see ESP32-C3 in two big places:
- General DIY + IoT (ESPHome/Tasmota/MQTT sensors, relays, small web UIs)
- Tiny USB-C boards (because C3 can expose native USB without needing a separate USB-UART chip on every design)
This guide breaks down:
- C3 silicon “flavors” (FN/FH, flash sizes, temp grades)
- module families (WROOM vs MINI)
- official Espressif dev boards + popular third-party boards
- what to buy for each use case
TL;DR: what should you buy?
- Best default “full dev board”: ESP32-C3-DevKitC-02 (WROOM module, full headers)
- Best official compact board: ESP32-C3-DevKitM-1 (MINI module, smaller footprint)
- Need external antenna: choose WROOM-02U or MINI-1U variants
- Battery-friendly tiny board: Seeed XIAO ESP32C3 (USB-C + battery charging)
- Tiny + sensor connectors: Adafruit QT Py ESP32-C3 (STEMMA QT ecosystem; note C3 has no DAC/touch)
- Cheapest tiny USB-C boards: “ESP32-C3 SuperMini” class (often LED on GPIO8; board-specific)
- D1 mini shield compatibility: LOLIN C3 mini (D1 mini footprint)
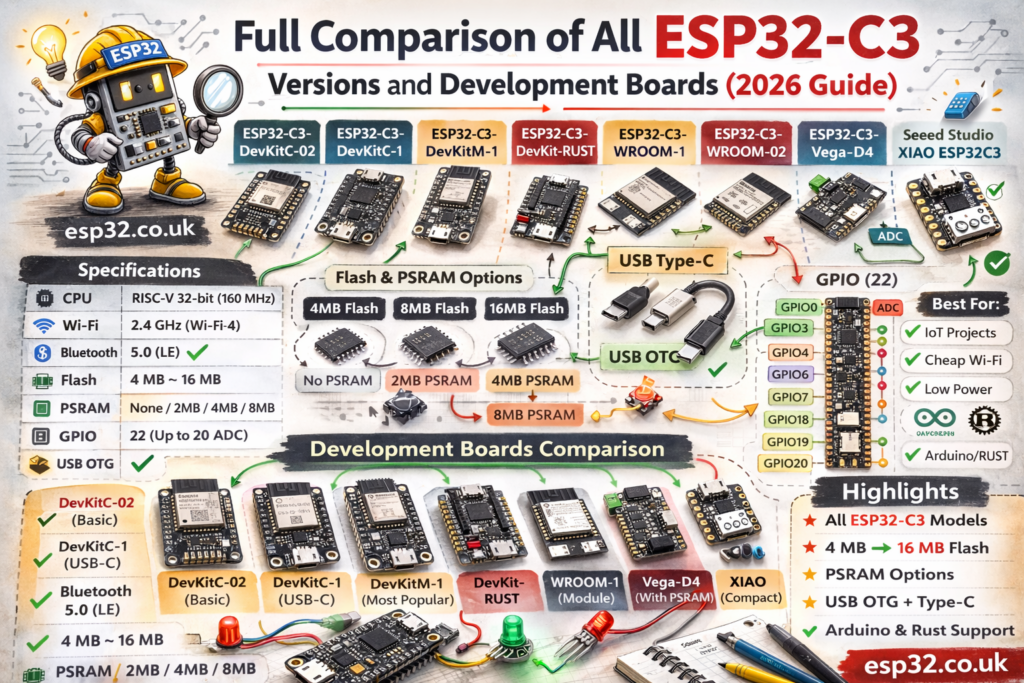
1) ESP32-C3 core specs (what every C3 shares)
From Espressif’s datasheet, ESP32-C3 includes:
- 32-bit RISC-V single-core, up to 160 MHz
- Wi-Fi 4 (802.11 b/g/n, 2.4 GHz) and Bluetooth LE (Bluetooth 5 + BLE mesh features in the datasheet)
- ROM 384 KB, SRAM 400 KB (16 KB cache), plus 8 KB RTC SRAM
- Full-speed USB Serial/JTAG controller (built in)
Why the USB Serial/JTAG matters: on many C3 boards you can flash/debug using native USB interfaces; ESP-IDF documents flashing directly via the USB Serial/JTAG port.
2) C3 silicon “versions”: the naming that actually matters
Espressif’s C3 nomenclature is refreshingly straightforward compared to the original ESP32 era:
- F indicates a flash option in the chip series naming
- H / N indicates temperature grade (H = high temperature, N = normal)
- the number indicates flash size (MB) for in-package flash variants
You’ll commonly see chips referenced like ESP32-C3FN4 or ESP32-C3FH4 (same core DNA, different temp grade / flash packaging) in Espressif’s ecosystem and module datasheets.
Practical takeaway
If you’re not designing your own PCB, you don’t usually buy the bare chip — you buy a module. The module choice determines:
- PCB antenna vs external antenna connector
- external flash vs in-package flash module family
- temperature grade options (e.g., “H4” variants rated for higher temps)
3) Module families you’ll actually buy (WROOM vs MINI)
3.1 ESP32-C3-WROOM-02 vs WROOM-02U
This is the most common module family on “full size” dev boards.
Espressif’s DevKitC-02 user guide states the board is based on ESP32-C3-WROOM-02 or ESP32-C3-WROOM-02U, and that these modules have 4 MB SPI flash; 02U adds an external antenna connector.
Choose WROOM-02U if the device goes in an enclosure or you care about predictable RF performance.
3.2 ESP32-C3-MINI-1 vs MINI-1U
This is the compact module family used for smaller boards.
The MINI-1 datasheet describes it as a small module with:
- 4 MB flash in the chip package
- PCB antenna (MINI-1) or external connector (MINI-1U)
Choose MINI-1U if you want compact + external antenna.
4) Official Espressif development boards
4.1 ESP32-C3-DevKitC-02 (the “default full dev board”)
The DevKitC-02 guide makes it explicit:
- It’s based on WROOM-02 / WROOM-02U modules
- Both offer Wi-Fi + BLE coexistence
- WROOM-02 is PCB antenna; WROOM-02U has external antenna connector
- Both integrate 4 MB SPI flash
This board is the best target for tutorials because it’s “standard dev board shaped” and breaks out a lot of pins.
4.2 ESP32-C3-DevKitM-1 (the “official compact board”)
Espressif describes DevKitM-1 as an entry-level board based on ESP32-C3-MINI-1 or MINI-1U, with most I/O broken out for easy breadboard wiring.
Pick DevKitM-1 if you want a smaller board but still want official documentation and predictable hardware.
5) Why C3 enabled the “tiny USB-C board” boom
ESP32-C3 includes a USB Serial/JTAG controller. ESP-IDF even documents flashing directly via the USB Serial/JTAG port.
That’s why you see so many tiny third-party boards: manufacturers can sometimes ship a smaller, cheaper PCB without adding a bulky USB-UART bridge.
Important nuance: some boards still include a USB-UART bridge anyway (for compatibility and simplicity). For example, the DevKitC-02 guide describes a USB-to-UART bridge chip on that board.
6) Popular third-party C3 boards (what people actually buy)
6.1 ESP32-C3 SuperMini (cheap tiny boards)
These boards are popular because they’re tiny, USB-C, and “good enough” for embedded DIY. In practice, many have the onboard LED on GPIO8 (verify per board).
Trade-offs: fewer GPIOs broken out, more board-specific quirks.
6.2 Seeed Studio XIAO ESP32C3 (battery-friendly)
Seeed’s getting started guide explicitly lists a battery charging chip and uses USB Type-C.
If you’re building battery sensors, this form factor is hard to beat.
6.3 Adafruit QT Py ESP32-C3 (STEMMA QT / Qwiic)
Adafruit’s guide is brutally clear: on C3 there’s no DAC and no native capacitive touch, and the chip targets simpler, low-cost projects (more “ESP8266 replacement” than “classic ESP32”).
QT Py is great when you want plug-and-play I²C sensors via STEMMA QT.
6.4 LOLIN C3 mini (D1 mini footprint)
Wemos/LOLIN’s own documentation positions C3 mini as compatible with LOLIN D1 mini shields, includes Type-C USB, 4 MB flash, and an onboard WS2812B RGB LED.
This is the “bridge board” for people with a pile of D1 mini shields.
7) Head-to-head: why C3 is the “sweet spot”
A quick perspective table (for choosing the right family):
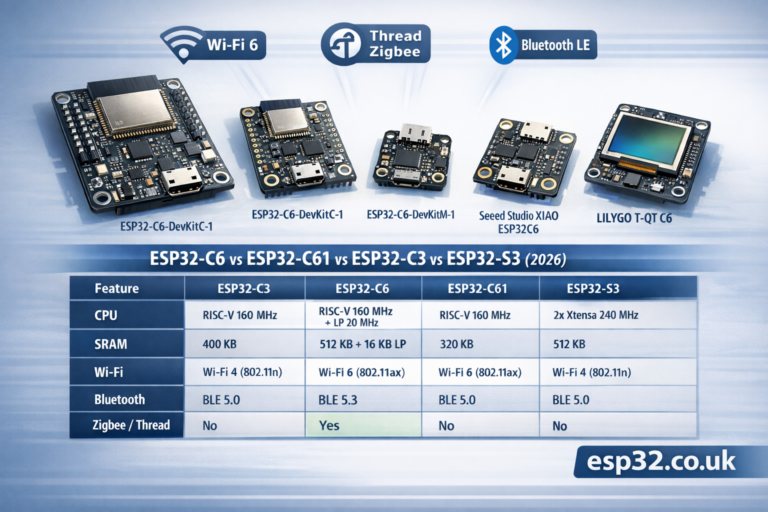
| Feature | ESP8266 | ESP32-C3 | ESP32-S3 | ESP32-C6 |
|---|---|---|---|---|
| CPU | older single-core class | RISC-V 1-core @ 160 MHz | dual-core, higher-end | RISC-V + Wi-Fi 6 + 802.15.4 |
| Wi-Fi | Wi-Fi 4 | Wi-Fi 4 | Wi-Fi 4 | Wi-Fi 6 (2.4) |
| Bluetooth | none | BLE (BT5) ( | BLE | BLE + 802.15.4 |
| USB | no | USB Serial/JTAG | native USB OTG | varies |
When C3 is “correct”: 80% of typical IoT jobs (sensors, relays, basic BLE presence, MQTT) don’t need Thread/Zigbee or dual cores — they just need reliable Wi-Fi + BLE, good security, and low cost. C3 is built exactly for that role.
8) Common mistakes (C3 edition)
- Expecting DAC or capacitive touch like classic ESP32
Many C3 boards/docs call out: no DAC, no native capacitive touch. - Buying PCB antenna modules for enclosed products
If it’s going inside a box, use the U external antenna variants (WROOM-02U / MINI-1U). - Assuming “board name” implies the same pinout
SuperMini / clone boards can wire LEDs and boot buttons differently. Treat “LED pin” as board-specific and verify.
Resources
ESP32-C3 Series datasheet:
https://documentation.espressif.com/esp32-c3_datasheet_en.html

USB Serial/JTAG Console (ESP-IDF):
https://docs.espressif.com/projects/esp-idf/en/stable/esp32c3/api-guides/usb-serial-jtag-console.html

ESP32-C3-DevKitC-02 user guide:
https://docs.espressif.com/projects/esp-dev-kits/en/latest/esp32c3/esp32-c3-devkitc-02/user_guide.html

ESP32-C3-DevKitM-1 user guide:
https://docs.espressif.com/projects/esp-idf/en/v5.2/esp32c3/hw-reference/esp32c3/user-guide-devkitm-1.html

ESP32-C3-WROOM-02 / 02U datasheet:
https://documentation.espressif.com/esp32-c3-wroom-02_datasheet_en.html

ESP32-C3-MINI-1 / MINI-1U datasheet (PDF):
https://documentation.espressif.com/esp32-c3-mini-1_datasheet_en.pdf

Seeed XIAO ESP32C3 getting started:
https://wiki.seeedstudio.com/XIAO_ESP32C3_Getting_Started/

Adafruit QT Py ESP32-C3 overview:
https://learn.adafruit.com/adafruit-qt-py-esp32-c3-wifi-dev-board/overview

LOLIN C3 mini (official docs):
https://www.wemos.cc/en/latest/c3/c3_mini.html