
The HLK-LD2420 is a 24 GHz mmWave presence sensor that works very well with an ESP32 and Home Assistant through ESPHome. Unlike a PIR sensor, it can maintain presence from both movement and smaller stationary-body movements. ESPHome provides native LD2420 support, adjustable detection gates, separate moving/still thresholds, presence timeout, moving-distance reporting and — with firmware 1.5.4 or newer — automatic gate calibration. Each detection gate represents roughly 70 cm, with a practical recommended maximum of about 9 metres.
1. What is the LD2420?
The HLK-LD2420 is a compact mmWave radar module intended for human motion and presence detection.
It communicates with an ESP32 using UART, while also providing a separate presence-output pin. ESPHome has a dedicated ld2420 component, so no custom component is required.
The LD2420 is useful for Home Assistant projects such as:
- room occupancy
- lighting automation
- bathroom presence
- office occupancy
- corridor detection
- garage automation
- HVAC control
- automatic displays
- alarm systems
The important advantage over a simple PIR motion sensor is that the LD2420 can report presence from both moving and still targets through its configurable energy thresholds. ESPHome exposes this as a single has_target binary sensor.
2. Why use mmWave instead of PIR?
A PIR sensor works extremely well when a person is actively moving.
The problem appears when someone:
- sits at a desk
- watches television
- reads
- works quietly
- sleeps
- remains in the bathroom without making large movements
A PIR may eventually stop reporting motion.
The LD2420 instead evaluates radar energy across a set of distance gates and maintains a presence state when either moving or still-target energy exceeds the configured thresholds.
That makes it particularly useful for automations where false “room empty” events are annoying.
A typical example is:
Person enters office
→ light turns on

Person sits at desk for 30 minutes
→ light remains on

Person leaves
→ light turns off after configured timeout
3. LD2420 vs LD2410
Both sensors target human presence rather than X/Y position tracking.
The LD2420’s main strengths are its configurable 16 detection gates, long detection range and automatic gate calibration in newer firmware. ESPHome allows gates 0–15 to be individually tuned for moving and stationary energy. Each increment represents approximately 70 cm.
The LD2410 has a larger user base and is often the easier first mmWave sensor.
The LD2420 becomes particularly attractive when:
- a longer detection area is required
- detailed distance-gate tuning is useful
- automatic environmental calibration is desirable
- the installation is a corridor, garage or larger room
4. LD2420 detection range
ESPHome exposes gates:
Gate 0
Gate 1
...
Gate 15
Each gate represents approximately 70 cm of distance.
ESPHome states that gate 15 corresponds to roughly 12 metres, but accuracy may be reduced at that extreme. The recommended maximum is gate 12, corresponding to approximately 9 metres.
This gives the LD2420 considerably more configurable range than many small room-presence sensors.
A practical interpretation is:
| Gate | Approximate distance |
|---|---|
| 1 | 0.7 m |
| 2 | 1.4 m |
| 4 | 2.8 m |
| 6 | 4.2 m |
| 8 | 5.6 m |
| 10 | 7.0 m |
| 12 | 8.4–9 m practical |
| 15 | ~12 m maximum |
These are approximate gate zones rather than precision laser-distance measurements. ESPHome specifically describes the moving-distance output as an approximation.
5. Important firmware differences
Before wiring the sensor, it is important to know which LD2420 firmware version is installed.
ESPHome documents three important firmware changes.
Firmware 1.5.2 and older
UART speed:
256000 baud
Pin roles:
| Pin | Function |
|---|---|
| 3V3 | Power |
| GND | Ground |
| OT1 | Presence output |
| RX | UART RX |
| OT2 | UART TX |
Firmware 1.5.3 and newer
UART speed:
115200 baud
The serial TX pin moved from OT2 to OT1.
Pin roles became:
| Pin | Function |
|---|---|
| 3V3 | Power |
| GND | Ground |
| OT1 | UART TX |
| RX | UART RX |
| OT2 | Presence output |
Firmware 1.5.4 and newer
Firmware 1.5.4 introduced gate-energy reporting and ESPHome’s dynamic calibration capability.
For a new Home Assistant installation, firmware 1.5.4 or newer is strongly preferable because the calibration tools make tuning much easier.
6. Wiring LD2420 to ESP32
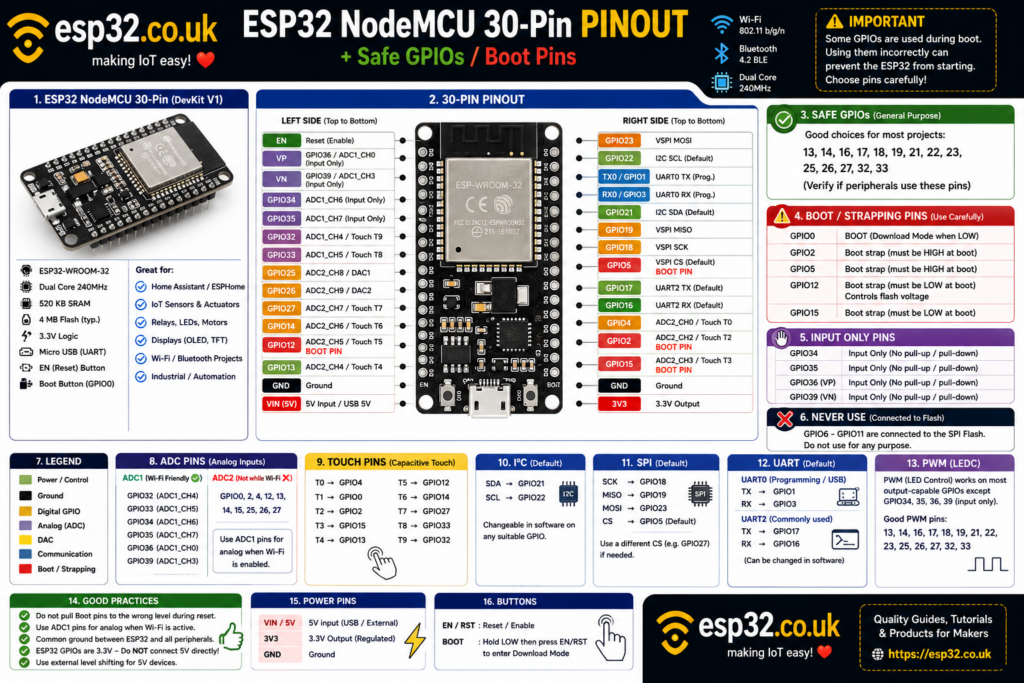
For a classic ESP32 DevKit, a convenient UART connection is:
| LD2420 | ESP32 |
|---|---|
| 3V3 | 3V3 |
| GND | GND |
| OT1 / TX | GPIO16 |
| RX | GPIO17 |
Remember that UART lines cross:
LD2420 TX → ESP32 RX

LD2420 RX ← ESP32 TX
For firmware 1.5.3 and newer:
OT1 → ESP32 RX
RX  → ESP32 TX
For firmware 1.5.2 and older, the module’s UART TX is on OT2 instead.
Using GPIO16 and GPIO17 is convenient on a classic ESP32 because they form a commonly used secondary hardware-UART pair.
7. Basic ESPHome configuration
For firmware 1.5.3 or newer, start with:
uart:
  id: uart_ld2420
  tx_pin: GPIO17
  rx_pin: GPIO16
  baud_rate: 115200

ld2420:
For firmware older than 1.5.3, change:
baud_rate: 256000
and remember that the sensor’s TX wire comes from OT2 instead of OT1. ESPHome documents both the baud-rate and pin-function change.
8. Add presence to Home Assistant
The most important entity is the binary presence sensor:
binary_sensor:
  - platform: ld2420
    has_target:
      name: "Room Presence"
ESPHome sets has_target to true when either moving or still-target energy is detected. The state remains active for the configured presence timeout after the last qualifying detection.
After the ESPHome node is added to Home Assistant, this becomes a normal occupancy-style entity that can be used in dashboards and automations.
9. Add moving-distance reporting
The LD2420 can also expose an approximate distance to a detected moving target:
sensor:
  - platform: ld2420
    moving_distance:
      name: "Moving Target Distance"
ESPHome describes this as the approximate distance between the module and a moving object in the detection field.
This can be useful for troubleshooting.
For example, if false detections repeatedly appear around 7 metres, the problem may be a doorway, reflective wall or movement outside the intended room.
10. Show the firmware version in Home Assistant
Add:
text_sensor:
  - platform: ld2420
    fw_version:
      name: "LD2420 Firmware"
This is particularly useful because the sensor’s UART speed, TX pin and available calibration features depend on its firmware revision.
Once the firmware version is known, the rest of the configuration becomes much easier.
11. Detection gates explained
The LD2420 does not simply have one global sensitivity slider.
Instead, its detection range is divided into gates.
Each gate can have separate thresholds for:
- moving energy
- still energy
ESPHome exposes gates 0 through 15 and allows the thresholds to be edited individually.
Imagine a room arranged like this:
LD2420

Gate 1  → nearby furniture
Gate 2  → front of desk
Gate 3  → chair
Gate 4  → centre of room
Gate 5  → sofa
Gate 6  → doorway
Gate 7+ → wall / corridor outside
If unwanted motion is being detected beyond the room, there is no need to reduce sensitivity everywhere.
Instead:
reduce the maximum gate or raise the thresholds only in the problematic distance region.
That is one of the biggest advantages of mmWave gate tuning.
12. Minimum and maximum detection gates
ESPHome can expose the minimum and maximum gates directly to Home Assistant:
number:
  - platform: ld2420
    min_gate_distance:
      name: "Minimum Detection Gate"

    max_gate_distance:
      name: "Maximum Detection Gate"
ESPHome allows:
- minimum gate from 0 to one below the configured maximum
- maximum gate from 1 to 15
with each increment representing approximately 70 cm.
For a normal room, there is often little benefit in configuring the radar to see far beyond the opposite wall.
Reducing maximum range can significantly reduce false detections.
13. Presence timeout
Presence timeout determines how long Home Assistant continues seeing the room as occupied after the radar no longer detects qualifying energy.
ESPHome defaults this value to:
120 seconds.
Expose it using:
number:
  - platform: ld2420
    presence_timeout:
      name: "Presence Timeout"
A bathroom might use:
60–120 seconds
An office might use:
30–60 seconds
A corridor might use:
5–15 seconds
There is no universally correct value.
The best setting depends on the automation.
14. Moving vs still thresholds
Each distance gate has two sensitivity values:
- move threshold
- still threshold
The sensor’s measured radar energy is compared with these thresholds to decide whether movement or stationary presence exists. ESPHome allows either a compact gate-selection interface or individual controls for all gates.
Lower thresholds generally make detection easier.
Higher thresholds make detection less sensitive.
The goal is not:
“Set everything to maximum sensitivity.”
The goal is:
“Set each gate sensitive enough to detect a person, but high enough to ignore background reflections and noise.”
15. Compact gate-control interface
Instead of exposing 32 different threshold controls in Home Assistant, ESPHome can provide a compact interface:
number:
  - platform: ld2420
    gate_select:
      name: "Select Gate"

    still_threshold:
      name: "Still Threshold"

    move_threshold:
      name: "Move Threshold"
Choose a gate, then change its moving and stationary thresholds.
ESPHome notes that gate_select cannot be used at the same time as the individual gate_0 through gate_15 configuration method.
For most users, the compact interface is easier.
16. Automatic calibration
Firmware 1.5.4 and newer adds one of the LD2420’s best features:
automatic gate calibration.
ESPHome provides three operating modes:
- Normal
- Calibrate
- Simple
Normal mode continuously records gate energy information when supported.
Calibrate mode records average and peak energy for each gate so ESPHome can determine the environmental noise floor and unwanted reflections. ESPHome recommends leaving the monitored area empty during calibration and collecting data for at least 30 seconds.
Longer calibration can be useful if intermittent sources of interference exist nearby.
17. Add calibration controls
Add:
select:
  - platform: ld2420
    operating_mode:
      name: "LD2420 Operating Mode"
Then add the calibration sensitivity controls:
number:
  - platform: ld2420
    gate_move_sensitivity:
      name: "Move Calibration Sensitivity"

    gate_still_sensitivity:
      name: "Still Calibration Sensitivity"
ESPHome defaults both calibration sensitivity factors to 0.5, with values from 0 to 1. In this setting, 0 corresponds to higher sensitivity and 1 to lower sensitivity.
18. How to calibrate the room
A practical calibration process is:
- Install the sensor in its final location.
- Remove people and moving objects from the detection area.
- Select Calibrate mode.
- Leave the room undisturbed for at least 30 seconds.
- Allow longer if fans, appliances or other intermittent interference may appear.
- Press Apply Config.
- Return the sensor to normal use.
- Walk, sit and remain still at the important positions in the room.
- Fine-tune individual gates if necessary.
ESPHome states that pressing Apply Config after calibration writes the calculated values and returns the sensor to Normal mode. Leaving calibration without applying the configuration discards the captured session data.
19. Add configuration buttons
ESPHome can expose four useful controls:
button:
  - platform: ld2420
    apply_config:
      name: "Apply LD2420 Config"

    revert_config:
      name: "Undo LD2420 Changes"

    restart_module:
      name: "Restart LD2420"

    factory_reset:
      name: "Factory Reset LD2420"
These allow Home Assistant to:
- save changes
- undo unsaved edits
- restart the radar
- restore baseline defaults
ESPHome documents all four controls in the native component.
20. Complete ESPHome example
Here is a practical configuration for firmware 1.5.4 or newer:
esphome:
  name: ld2420-presence
  friendly_name: LD2420 Presence Sensor

esp32:
  board: esp32dev
  framework:
    type: arduino

logger:

api:

ota:

wifi:
  ssid: !secret wifi_ssid
  password: !secret wifi_password

uart:
  id: uart_ld2420
  tx_pin: GPIO17
  rx_pin: GPIO16
  baud_rate: 115200

ld2420:

binary_sensor:
  - platform: ld2420
    has_target:
      name: "Room Presence"

sensor:
  - platform: ld2420
    moving_distance:
      name: "Moving Target Distance"

text_sensor:
  - platform: ld2420
    fw_version:
      name: "LD2420 Firmware"

select:
  - platform: ld2420
    operating_mode:
      name: "LD2420 Operating Mode"

number:
  - platform: ld2420
    presence_timeout:
      name: "Presence Timeout"

    min_gate_distance:
      name: "Minimum Detection Gate"

    max_gate_distance:
      name: "Maximum Detection Gate"

    gate_select:
      name: "Select Gate"

    still_threshold:
      name: "Still Threshold"

    move_threshold:
      name: "Move Threshold"

    gate_move_sensitivity:
      name: "Move Calibration Sensitivity"

    gate_still_sensitivity:
      name: "Still Calibration Sensitivity"

button:
  - platform: ld2420
    apply_config:
      name: "Apply LD2420 Config"

    revert_config:
      name: "Undo LD2420 Changes"

    restart_module:
      name: "Restart LD2420"

    factory_reset:
      name: "Factory Reset LD2420"
These entities correspond directly to the controls ESPHome currently exposes for the LD2420.
21. Home Assistant automation example
Once Room Presence appears in Home Assistant, it can control lighting.
A simple logic pattern is:
Presence becomes ON
→ turn room light ON

Presence becomes OFF
→ wait 30 seconds
→ turn room light OFF
The LD2420’s own presence timeout can already provide part of this delay, so avoid stacking excessively long Home Assistant and sensor timeouts unless that behaviour is intentional.
For a responsive room:
LD2420 presence timeout = 15 seconds
Home Assistant off delay = 15 seconds
may be more useful than:
LD2420 timeout = 120 seconds
Home Assistant delay = 120 seconds
which could keep lights on for several minutes after the room is empty.
22. Best sensor placement
Mounting position has a huge effect on mmWave performance.
Avoid pointing the radar directly toward:
- ceiling fans
- moving curtains
- rotating equipment
- busy hallways outside the target area
- highly reflective metal objects
- vibrating machinery
ESPHome specifically warns that walls and solid objects within the configured detection range can produce reflections and abnormal gate thresholds.
A sensible first installation is usually:
- facing the occupied area
- not directly against a large metal surface
- with maximum detection gate limited to the actual room depth
23. Walls can cause false detections
mmWave radar can reflect strongly from walls and objects.
A common mistake is configuring:
maximum gate = 12
inside a room only four metres deep.
The radar then evaluates several metres beyond the wall, potentially reacting to reflections or activity outside the intended space.
ESPHome recommends testing unexpected detections in an open environment without moving objects to determine whether the installation itself is producing reflections.
A better approach is:
only enable the distance that is actually required.
24. Do not point two LD2420 sensors at each other
ESPHome explicitly warns against overlapping the detection fields of multiple LD2420 sensors because interference can produce false detections.
If several sensors are required:
- point them in different directions
- separate them physically
- avoid overlapping radar coverage where possible
This matters particularly in corridors and open-plan rooms.
25. Presence is detected but distance is zero
This does not necessarily indicate a fault.
The presence binary sensor can respond to either moving or stationary energy, while the moving_distance sensor specifically approximates distance to a moving target.
Therefore:
Presence = ON
Moving Distance = no useful reading
can occur when someone is sitting relatively still.
For Home Assistant occupancy automation, the binary presence entity is the important one.
26. Sensor is constantly detecting someone
Common causes include:
- gate sensitivity too high
- maximum gate too long
- wall reflections
- moving curtains
- fans
- appliances
- overlapping mmWave sensors
The best troubleshooting process is:
- Reduce maximum detection distance.
- Put the room in an empty state.
- Run automatic calibration.
- Observe which gates show excessive background energy.
- Raise the thresholds only in the problematic gates.
ESPHome’s calibration mode was designed specifically to establish the noise floor and identify unwanted reflection peaks.
27. Sensor misses a person sitting still
First check the still threshold for the distance gate where the person sits.
The goal is to make that gate sensitive enough to recognise subtle body movement without accepting the room’s normal background noise.
Try:
- Sit in the normal position.
- Identify the relevant gate.
- Gradually increase sensitivity.
- Leave the room and confirm the gate eventually clears.
- Repeat calibration if necessary.
Avoid changing all 16 gates at once.
Per-gate adjustment is much easier to troubleshoot.
28. LD2420 not detected by ESPHome
The first checks should be:
Firmware 1.5.3+
baud = 115200
sensor TX = OT1
Firmware 1.5.2 or older
baud = 256000
sensor TX = OT2
Then verify:
Sensor TX → ESP32 RX
Sensor RX → ESP32 TX
GND       → GND
ESPHome documents both the baud-rate change and the OT1/OT2 pin swap between firmware generations.
29. Should the firmware be updated?
There is a major warning here.
ESPHome states that LD2420 firmware updates are performed using Hi-Link’s tool, and that only firmware 1.5.6 and newer should currently be upgraded. ESPHome explicitly warns not to attempt a downgrade to an older firmware because this can brick the module.
If the existing sensor already works correctly, do not update firmware merely because a newer version exists.
For older modules, first determine:
- current firmware
- whether the update tool supports it
- whether the update is actually necessary
30. Best Home Assistant use cases
Bedroom
LD2420 can work well where detecting someone lying or sitting still matters.
A longer presence timeout is usually preferable.
Office
One of the strongest use cases.
Tune the still threshold around the desk/chair gates so the room remains occupied while someone works quietly.
Bathroom
Presence radar avoids the classic PIR problem where lights switch off while someone is stationary.
Limit the maximum gate aggressively so the sensor does not detect activity outside the bathroom.
Corridor
LD2420’s longer configurable range makes it particularly attractive.
Use a short presence timeout because people normally pass through quickly.
Garage or workshop
The extended gate range is useful, but metal surfaces and moving machinery can create radar reflections, so calibration is particularly important.
31. LD2420 strengths
The LD2420’s strongest points for Home Assistant are:
- native ESPHome integration
- detection of moving and still presence
- up to 16 configurable distance gates
- approximately 70 cm gate spacing
- practical range around 9 m
- moving-distance reporting
- configurable presence timeout
- separate moving/still thresholds
- automatic calibration on newer firmware
- configuration directly through ESPHome/Home Assistant
These capabilities are all exposed by ESPHome’s current native component.
32. LD2420 limitations
The sensor also has some important limitations:
- no X/Y position tracking
- no separate identification of multiple people
- moving-distance output is approximate
- installation reflections can produce false triggers
- firmware revisions change UART behaviour
- overlapping mmWave sensors can interfere
- tuning may require experimentation
For X/Y room zones or tracking several people individually, a sensor such as the LD2450 belongs to a different category.
For simple:
“Is someone still in this room?”
the LD2420 is much better suited.
33. Final recommendation
The ESP32 + LD2420 + ESPHome combination is an excellent Home Assistant presence sensor when long configurable range and strong stationary-presence detection are more important than 2D target tracking.
For the easiest setup:
- use firmware 1.5.4 or newer if available
- connect the sensor through hardware UART
- expose the firmware version first
- limit the maximum gate to the actual room size
- run automatic calibration in the final mounting position
- tune only problematic gates afterward
- use the
has_targetentity for automations - treat
moving_distancemainly as useful diagnostic information
The biggest mistake is simply installing the sensor at maximum sensitivity and maximum distance.
A properly calibrated LD2420 that only monitors the space that matters will normally produce much better Home Assistant automations than one configured to detect everything it possibly can.