(Universal method — works with any ESP8266 board)
ESP-NOW is one of the fastest and most reliable ways to send data wirelessly between ESP32/ESP8266 devices.
Unlike Wi-Fi or MQTT, it requires no router, no pairing, and has almost zero latency (1–3 ms).
In this guide we build a complete Master/Slave setup:
- ESP32 → Master (Transmitter)
- ESP8266 → Slave (Receiver + GC9A01 round display)
But we use a special technique that makes this system universal:
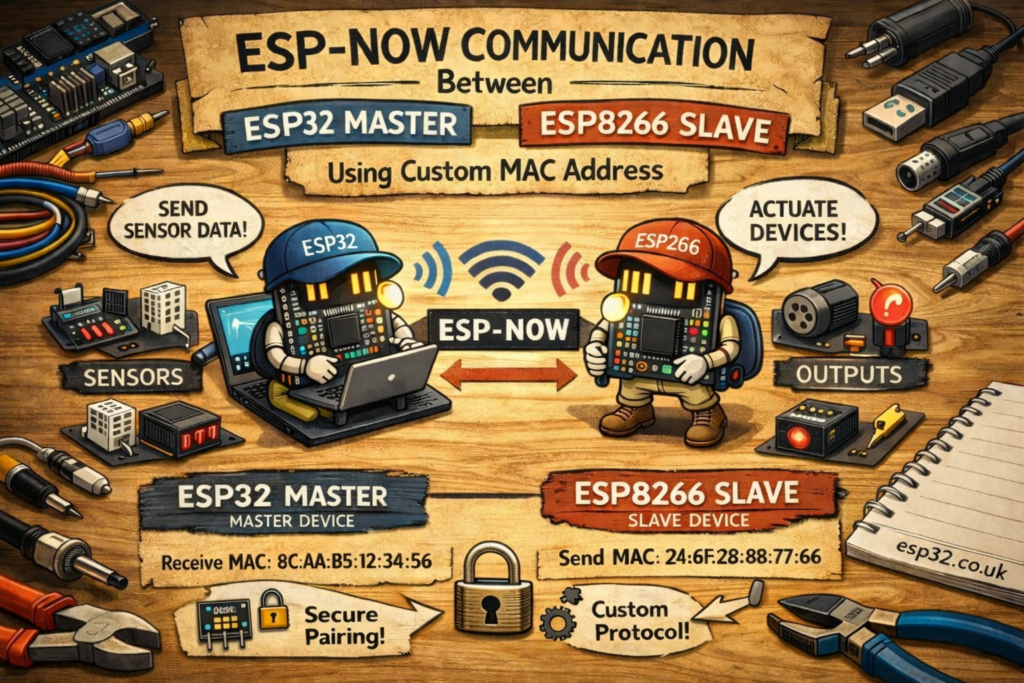
⭐ Key Concept: Using a Custom MAC Address
Normally ESP-NOW requires the sender to target the physical MAC address of the receiver.
This means every slave board has to be discovered and paired manually.
But in this project:
✔ The ESP32 does not use the real MAC of the ESP8266
✔ Instead, it sends to a fixed custom MAC address
✔ The ESP8266 changes its Wi-Fi MAC address to match this custom MAC
This line is the magic:
wifi_set_macaddr(STATION_IF, &newMACAddress[0]);
You are overriding the ESP8266’s real MAC address, so it “pretends” to be the MAC the ESP32 expects.
✔ No MAC lookup
✔ No board-specific configuration
✔ Any ESP8266 you flash becomes a valid receiver
This is the cleanest, fastest way to build universal ESP-NOW systems.
1. ESP32 MASTER CODE (Sender)
This ESP32 sends a struct of 5 variables to the custom MAC address.
#include <esp_now.h>
#include <WiFi.h>

uint8_t broadcastAddress[] = {0x18, 0xFE, 0x34, 0xDA, 0x82, 0x31};

typedef struct struct_message {
  int a;
  long b;
  float c;
  float d;
  bool e;
} struct_message;

struct_message myData;
int a;
esp_now_peer_info_t peerInfo;
void OnDataSent(const wifi_tx_info_t *info, esp_now_send_status_t status) {
  Serial.print("\r\nLast Packet Send Status:\t");
  Serial.println(status == ESP_NOW_SEND_SUCCESS ? "Delivery Success" : "Delivery Fail");
}

void setup() {
  Serial.begin(115200);
  WiFi.mode(WIFI_STA);

  if (esp_now_init() != ESP_OK) {
    Serial.println("Error initializing ESP-NOW");
    return;
  }

  esp_now_register_send_cb(OnDataSent);


  memcpy(peerInfo.peer_addr, broadcastAddress, 6);
  peerInfo.channel = 0;
  peerInfo.encrypt = false;

  if (esp_now_add_peer(&peerInfo) != ESP_OK){
    Serial.println("Failed to add peer");
    return;
  }
}

void loop() {
  myData.a = a++;
  myData.b = 44868;
  myData.c = 12.8;
  myData.d = 14.6;
  myData.e = false;

 esp_err_t result = esp_now_send(broadcastAddress, (uint8_t *)&myData, sizeof(myData));

  if (result == ESP_OK) Serial.println("Sent with success");
  else Serial.println("Error sending data");

  delay(100);
}
2. ESP8266 SLAVE CODE (Receiver with GC9A01 Display Or Serial Port)
It:
- Changes its MAC address
- Initializes ESP-NOW
- Receives the struct
- Displays live data on the round GC9A01 display
Comment out // the Serial port lines for GC9A01 to work
#include <ESP8266WiFi.h>
#include <espnow.h>

// --- Struct Definition ---
typedef struct struct_message {
    int a;
    long b;
    float c;
    float d;
    bool e;
} struct_message;

struct_message myData;

// Custom MAC – same as ESP32 target MAC
uint8_t newMACAddress[] = {0x18, 0xFE, 0x34, 0xDA, 0x82, 0x31};

// --- Display Setup ---
#include <Arduino_GFX_Library.h>
#if defined(DISPLAY_DEV_KIT)
Arduino_GFX *gfx = create_default_Arduino_GFX();
#else /* !defined(DISPLAY_DEV_KIT) */
/* More data bus class: https://github.com/moononournation/Arduino_GFX/wiki/Data-Bus-Class */
//Arduino_DataBus *bus = new Arduino_ESP32SPI(27 /* DC */, 5 /* CS */, 18 /* SCK */, 23 /* MOSI */, -1 /* MISO */, VSPI /* spi_num */);
Arduino_DataBus *bus = new Arduino_ESP8266SPI(1 /* DC */, 16 /* CS */);
/* More display class: https://github.com/moononournation/Arduino_GFX/wiki/Display-Class */
Arduino_GFX *gfx = new Arduino_GC9A01(bus, 1 /* RST */, 0 /* rotation */, true /* IPS */);
#endif /* !defined(DISPLAY_DEV_KIT) */

// --- Receive Callback ---
void OnDataRecv(uint8_t * mac, uint8_t *incomingData, uint8_t len) {
  digitalWrite(LED_BUILTIN, LOW);
  memcpy(&myData, incomingData, sizeof(myData));

 Serial.printf("Bytes received: %d\n", len);
 Serial.printf("Int: %d\n", myData.a);
 Serial.printf("Long: %ld\n", myData.b);
 Serial.printf("Float: %.2f\n", myData.c);
 Serial.printf("Float: %.2f\n", myData.d);
 Serial.printf("Bool: %d\n\n", myData.e);
}

void setup() {
  gfx->begin();
  gfx->fillScreen(RGB565_BLACK);

  pinMode(LED_BUILTIN, OUTPUT);

  Serial.begin(115200);
  WiFi.mode(WIFI_STA);

  // Override the ESP8266 MAC address!
  wifi_set_macaddr(STATION_IF, &newMACAddress[0]);

  if (esp_now_init() != 0) {
    Serial.println("Error initializing ESP-NOW");
    return;
  }

  Serial.println("ESP-NOW Ready");
  esp_now_set_self_role(ESP_NOW_ROLE_SLAVE);
  esp_now_register_recv_cb(OnDataRecv);
}

void loop() {
  digitalWrite(LED_BUILTIN, HIGH);
  screen1();
  delay(100);
}

void screen1() {

   gfx->fillScreen(RGB565_BLACK);
   gfx->setTextColor(RGB565_WHITE,RGB565_BLACK);
    gfx->setTextSize(4 , 4 , 0 /* pixel_margin */);
  gfx->setCursor(80, 185);
    gfx->println(myData.a);


}
3. How the Custom-MAC Method Works (Simple Explanation)
✔ ESP32 → Sends to 18:FE:34:DA:82:31
✔ ESP8266 → Changes its MAC to 18:FE:34:DA:82:31
✔ Therefore the ESP32 always sends to the correct receiver
The boards no longer need:
- MAC lookup
- Unique pairing
- Per-device configuration
- Setup steps per board
You flash any ESP8266 → it instantly becomes the correct slave.
This is perfect for:
- Dashboards
- Instrument clusters
- Remote sensor nodes
- Cloned or replicated devices
4. Summary
| Feature | Benefit |
|---|---|
| Custom MAC address | Universal compatibility |
| MAC override on ESP8266 | No pairing or discovery |
| Struct transmission | Fast, organized data |
| ESP-NOW | Ultra-low latency |
| GC9A01 display | Perfect for gauges & dashboards |