This example shows how to control 8 LEDs using the PCF8574 I²C GPIO expander with an ESP32. The sketch cycles through each LED by sinking current through the expander pins, demonstrating how the PCF8574 works and why wiring matters.
The PCF8574 is one of the simplest and most useful chips you can add to an ESP32. It gives you 8 extra GPIO pins over I²C, which is perfect when you run out of pins or want to simplify wiring.

What this example does
This sketch creates a simple LED chaser using the PCF8574.
- Initializes the PCF8574 at address
0x20 - Configures all 8 pins as outputs
- Turns LEDs ON one by one
- Turns them OFF again before moving to the next
The important detail is how the LEDs are driven. This example uses current sinking, not sourcing.
⚠️ Important concept: PCF8574 sinks current
This is the most important thing to understand:
- The PCF8574 cannot source current reliably
- It is designed to sink current (pull to GND)
That’s why the comment in the code says:
LEDs must be connected with the cathodes to the expander
Correct wiring
Each LED should be connected like this:
- LED anode (+) → VCC (3.3V or 5V via resistor)
- LED cathode (-) → PCF8574 pin
So when the pin goes LOW, it pulls the line to ground → LED turns ON.
When the pin goes HIGH, it stops sinking current → LED turns OFF.
Libraries used
This example uses:
Adafruit_PCF8574.h
Install it via Arduino Library Manager.
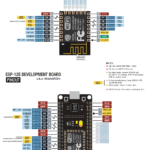
Wiring the PCF8574 to ESP32
Typical I²C wiring:
VCC→3.3VGND→GNDSDA→GPIO21SCL→GPIO22
Optional:
- Address pins (
A0–A2) define the I²C address (default =0x20)
Code walkthrough
Creating the PCF8574 object
Adafruit_PCF8574 pcf;
This creates the expander instance.
setup()
Serial.begin(115200);
while (!Serial) { delay(10); }
Standard Serial initialization.
Initializing the PCF8574
if (!pcf.begin(0x20, &Wire)) {
  Serial.println("Couldn't find PCF8574");
  while (1);
}
0x20is the default I²C address&Wiretells it to use the default I²C bus
If the chip is not found, the code stops.
Configuring all pins as outputs
for (uint8_t p=0; p<8; p++) {
  pcf.pinMode(p, OUTPUT);
}
The PCF8574 has 8 pins (0–7). This sets all of them as outputs.
The main loop
for (uint8_t p=0; p<8; p++) {
  pcf.digitalWrite(p, LOW);
  delay(100);
  pcf.digitalWrite(p, HIGH);
}
What happens here
For each pin:
LOW→ sinks current → LED ON- wait 100ms
HIGH→ stops sinking → LED OFF
Then it moves to the next LED.
This creates a simple running light effect.
Why LOW = ON?
This confuses a lot of people at first.
Normally:
- HIGH = ON
- LOW = OFF
But here it’s reversed because:
- The LED is powered from VCC
- The PCF8574 pulls it to ground
So:
LOW→ current flows → LED ONHIGH→ no current → LED OFF
Common mistakes
1. Wiring LEDs the wrong way
If you connect:
It will not work properly.
2. Forgetting resistors
Each LED still needs a current limiting resistor.
3. Wrong I²C address
If pcf.begin(0x20) fails:
- Check A0–A2 pins
- Scan I²C bus to confirm address
4. Expecting high current drive
The PCF8574 is not meant to drive heavy loads.
- Good for LEDs, buttons, logic signals
- Not good for relays (without transistor)
Expanding this example
Once this works, you can easily extend it:
- Button inputs on unused pins
- LED patterns or animations
- Driving relays via transistors
- Combining multiple PCF8574 chips (up to 8 addresses)
Why use PCF8574?
It’s ideal when:
- You run out of ESP32 GPIOs
- You want cleaner wiring (only 2 I²C lines)
- You need multiple simple outputs or inputs
Final thoughts
This is a simple example, but it teaches one critical concept:
👉 Not all GPIO expanders behave like normal pins
The PCF8574 is designed around current sinking, and once you understand that, everything else makes sense.
From there, you can build much more complex projects with very little extra wiring.
|
1 2 3 4 5 6 7 8 9 10 11 12 13 14 15 16 17 18 19 20 21 22 23 24 25 26 27 28 29 30 31 32 |
#include <Adafruit_PCF8574.h> /* Example for 8 output LEDs that are connected from power to the GPIO expander pins * Note the LEDs must be connected with the CATHODES to the expander, to SINK current! * The PCF8574 cannot SOURCE current! */ Adafruit_PCF8574 pcf; void setup() { Serial.begin(115200); while (!Serial) { delay(10); } Serial.println("Adafruit PCF8574 LED blink test"); if (!pcf.begin(0x20, &Wire)) { Serial.println("Couldn't find PCF8574"); while (1); } for (uint8_t p=0; p<8; p++) { pcf.pinMode(p, OUTPUT); } } void loop() { for (uint8_t p=0; p<8; p++) { pcf.digitalWrite(p, LOW); // turn LED on by sinking current to ground delay(100); pcf.digitalWrite(p, HIGH); // turn LED off by turning off sinking transistor } } |