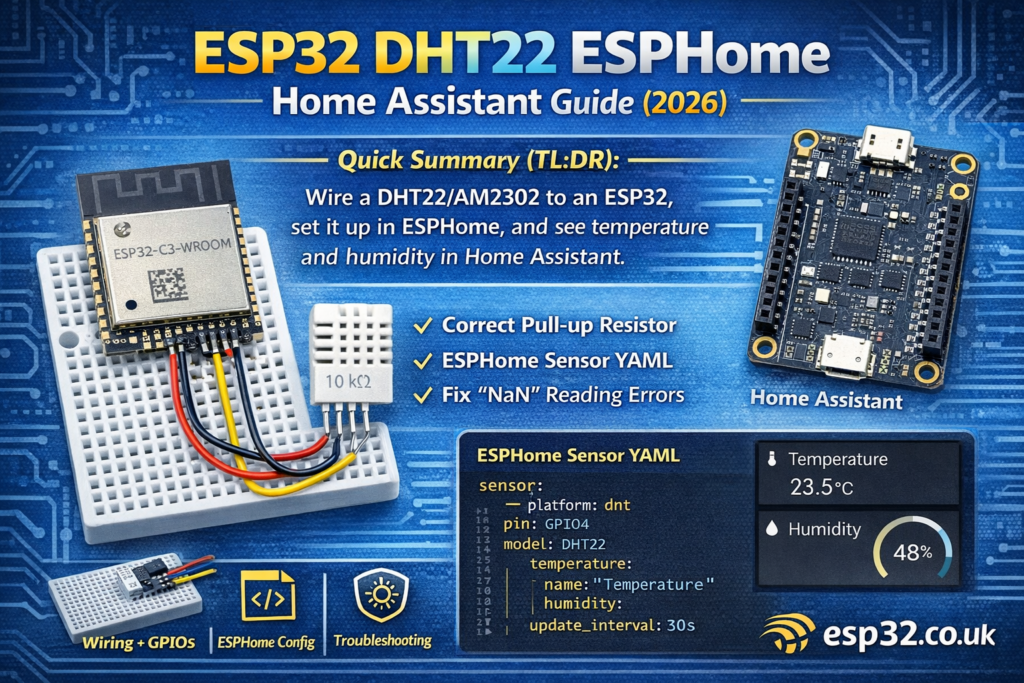
This guide shows how to wire a DHT22/AM2302 to an ESP32, set it up in ESPHome, and get temperature + humidity into Home Assistant (with optional MQTT). It includes the correct pull-up resistor, safe GPIO choices, recommended update intervals, and fixes for the most common NaN / unstable readings.
1) Why use a DHT22/AM2302 with ESP32?
The DHT22 (AM2302) is one of the most common budget sensors for indoor climate monitoring:
- Measures temperature + humidity
- Cheap, widely available, easy to wire
- “Good enough” for many rooms, garages, basements
Downsides (we’ll mitigate them):
- Slow update rate (don’t poll too fast)
- Sensitive to wiring/pull-ups
- Sometimes returns “NaN” if timing is off or wires are long
2) What you need
- ESP32 dev board (DevKitC, NodeMCU-style ESP32, etc.)
- DHT22 / AM2302 sensor (3-pin module or 4-pin bare sensor)
- 10 kΩ resistor (pull-up) if using the bare 4-pin sensor
(Most 3-pin breakout modules already have the pull-up.) - Jumper wires + breadboard (optional)
3) Wiring (ESP32 ↔ DHT22)
3.1 DHT22 pinout (bare 4-pin sensor)
Looking at the front grill, pins left → right:
- VCC
- DATA
- NC (not connected)
- GND
3.2 Wiring table (recommended)
| DHT22 | ESP32 |
|---|---|
| VCC | 3V3 |
| DATA | GPIO4 (recommended) |
| GND | GND |
3.3 Pull-up resistor (important)
- If you’re using the bare 4-pin DHT22, add a 10 kΩ pull-up from DATA → 3V3.
- If you’re using a 3-pin DHT22 module, it usually already includes a pull-up, but not always. If readings are flaky, adding your own 10 kΩ pull-up often fixes it.
3.4 Best GPIO pins to use on ESP32
Pick a normal “safe” GPIO like:
- GPIO4, 5, 18, 19, 21, 22, 23, 25, 26, 27, 32, 33
Avoid:
- GPIO0, 2, 12, 15 (boot/strapping pins)
- GPIO34–39 (input-only; DHT needs bidirectional timing)
4) ESPHome YAML (Home Assistant native)
Create a new ESPHome device and paste this baseline config.
4.1 Minimal ESPHome config (recommended)
esphome:
  name: esp32-dht22
  friendly_name: ESP32 DHT22esp32:
  board: esp32dev
  framework:
    type: arduinologger:api:ota:wifi:
  ssid: !secret wifi_ssid
  password: !secret wifi_password  ap:
    ssid: "ESP32-DHT22 Fallback"
    password: !secret ap_passwordcaptive_portal:sensor:
  - platform: dht
    pin: GPIO4
    model: DHT22
    temperature:
      name: "Temperature"
      filters:
        - median:
            window_size: 5
            send_every: 5
            send_first_at: 1
    humidity:
      name: "Humidity"
      filters:
        - median:
            window_size: 5
            send_every: 5
            send_first_at: 1
    update_interval: 30s
Why these settings:
update_interval: 30s→ DHT sensors should not be hammered every 1–2 seconds.- Median filter → smooths occasional “spikes” and helps with noisy installs.
4.2 Notes on model
Common DHT variants:
DHT22(AM2302) → use DHT22- If you accidentally have a DHT11, you must change
model: DHT11(different scaling)
5) Add it to Home Assistant
Once you flash the ESP32:
- Home Assistant will detect the ESPHome node under Settings → Devices & Services → ESPHome
- Click Configure
- You’ll get entities:
- Temperature
- Humidity
Create a simple dashboard card:
- Entities card (Temperature + Humidity)
or - Gauge for humidity
or - History graph for trends
6) MQTT option (if you prefer MQTT over native API)
Most Home Assistant + ESPHome setups don’t need MQTT anymore, but if your setup is MQTT-first, you can use it.
Add this:
mqtt:
  broker: 192.168.1.10
  username: !secret mqtt_user
  password: !secret mqtt_pass
If you enable MQTT, you can still keep the native API, but most people use one or the other.
7) Troubleshooting
7.1 “NaN” readings (most common)
Causes and fixes:
- Missing pull-up → add 10 kΩ DATA → 3V3
- Cable too long → keep the DHT close or use twisted pair (DATA+GND)
- Update interval too fast → set 30s or 60s
- Noise from relays/motors → add decoupling (0.1 µF + 10 µF near sensor)
7.2 Humidity is stuck at 0% or 100%
- Wrong
model(DHT11 vs DHT22) - Bad/fake sensor (unfortunately common)
- Data line wiring mistake
7.3 Temperature reads too high (ESP32 self-heating)
If the sensor is too close to the ESP32/regulator:
- Move the DHT away from the board (even 10–20 cm helps)
- Avoid enclosing the sensor with heat sources
- Ensure air can circulate around it
7.4 Readings “jump” randomly
- Add filtering (already included)
- Add a short delay between Wi-Fi heavy tasks (rare)
- Consider upgrading to SHT31/SHT45 or BME280 if you want stable readings
8) Accuracy and expectations (be realistic)
DHT22 is fine for “comfort monitoring”, but it’s not a calibrated lab sensor.
If you care about:
- fast response
- stable humidity
- better long-term accuracy
…look at SHT3x/SHT4x or BME280.
9) Practical automations in Home Assistant
9.1 Bathroom fan (humidity trigger)
- Trigger when humidity rises above baseline + X%
- Turn off when it falls back
Example logic:
- ON if humidity > 70%
- OFF if humidity < 60%
(add hysteresis to avoid rapid toggling)
9.2 Alert on extreme conditions
- Humidity > 75% for 30 minutes → mold risk alert
- Temperature < 5°C → frost warning (garage/storage)
10) FAQ
Can I power DHT22 from 5V?
Some modules allow it, but for ESP32 keep it simple: use 3.3V.
Can I use GPIO34/35/36/39?
No. Those are input-only; DHT needs bidirectional timing.
Can I put the sensor on long wires (5–10m)?
You can, but DHT is not great for it. Use good wiring, pull-up, and expect occasional errors. For long runs, consider I²C sensors or a digital bus like DS18B20.