The BME280 is a tiny environmental sensor that measures:
- Temperature
- Humidity
- Barometric pressure
From pressure, you can also estimate altitude, which is exactly what the Adafruit example you posted does.
In this guide we’ll:
- Explain what the BME280 is and why it’s useful
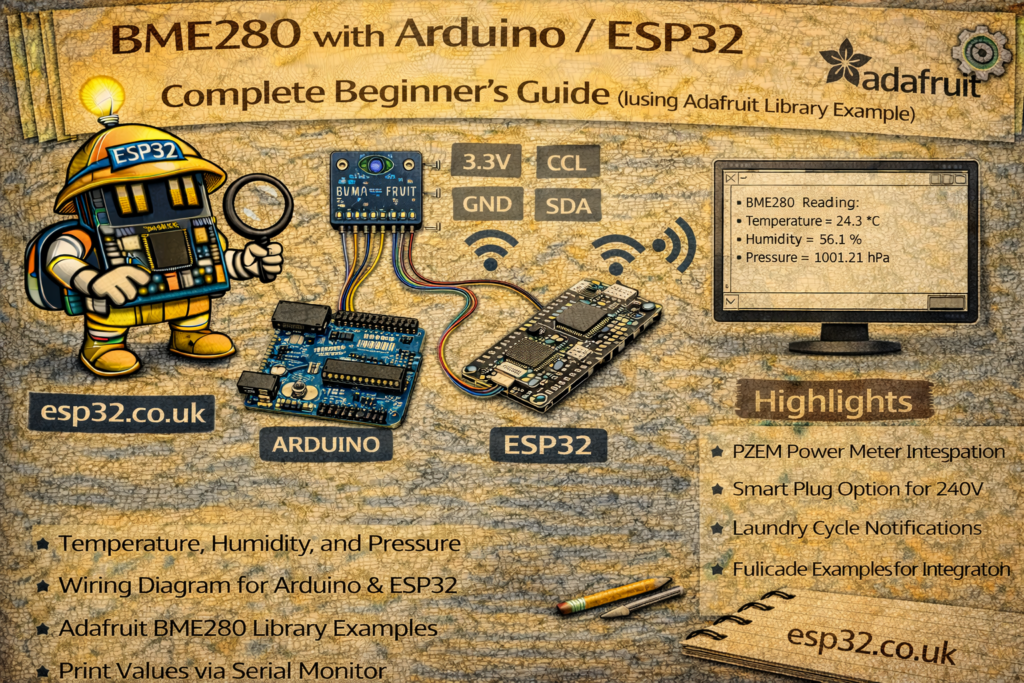
- Show how to wire it (I²C, and mention SPI)
- Install the Adafruit_BME280 library
- Walk through the example sketch line by line
- Show how to adapt it for ESP32 and your own projects
1. What is the BME280?
The Bosch BME280 is a combined temperature, humidity and pressure sensor, commonly sold on small breakout boards (Adafruit, generic modules, etc.). It communicates over:
- I²C (2 wires: SDA, SCL)
- or SPI (4 wires: SCK, MISO, MOSI, CS)
Typical specs:
- Temperature: about −40 to +85 °C
- Humidity: 0–100% RH
- Pressure: ~300–1100 hPa
This makes it a great all-in-one sensor for:
- Weather stations
- Home automation (comfort monitoring, HVAC control)
- Altitude estimation (rough) for portable devices
The Adafruit library makes it very easy to use: you call functions like readTemperature() and readHumidity(), and you get real values in °C and %RH.
2. Hardware – what you need
You’ll need:
- An ESP32 dev board or Arduino (Uno, Nano, etc.)
- A BME280 breakout board (3.3 V or 5 V compatible – many handle both)
- Jumper wires
- Optional: breadboard
Most breakout boards have pins like:
VINor3V3(orVCC)GNDSCLSDA- Sometimes pins for SPI:
SCK,MISO,MOSI,CS
The example uses I²C, which is the easiest option.
3. Wiring the BME280 (I²C mode)
3.1 Arduino Uno / Nano (classic)
- BME280
VIN→ 5V - BME280
GND→ GND - BME280
SCL→ A5 (hardware I²C SCL) - BME280
SDA→ A4 (hardware I²C SDA)
(Or use the pins marked SDA/SCL if your board has them.)
3.2 ESP32 (DevKit style)
On a typical ESP32 DevKit:
- Default I²C is often:
- SDA = GPIO21
- SCL = GPIO22
You can also define your own pins in Wire.begin().
Example wiring:
- BME280
VIN→ 3.3V (recommended) - BME280
GND→ GND - BME280
SCL→ GPIO22 - BME280
SDA→ GPIO21
Most Adafruit / clones have level shifting on board, so they tolerate both 3.3 V and 5 V. If you have a bare-bones BME280 module, keep it at 3.3 V only.
4. Installing the Adafruit BME280 library
In the Arduino IDE:
- Go to Tools → Manage Libraries…
- Search for “Adafruit BME280” and install it.
- Also make sure “Adafruit Unified Sensor” (Adafruit_Sensor) is installed – the BME280 library depends on it.
Then at the top of your sketch include:
#include <Wire.h>
#include <SPI.h>
#include <Adafruit_Sensor.h>
#include <Adafruit_BME280.h>
Exactly like in your example.
5. The example sketch – full listing
This is the Adafruit example you posted, slightly cleaned up for readability:
/***************************************************************************
  BME280 default test sketch using Adafruit_BME280 library
 ***************************************************************************/

#include <Wire.h>
#include <SPI.h>
#include <Adafruit_Sensor.h>
#include <Adafruit_BME280.h>

#define BME_SCK 13
#define BME_MISO 12
#define BME_MOSI 11
#define BME_CS 10

#define SEALEVELPRESSURE_HPA (1013.25)

Adafruit_BME280 bme; // I2C
//Adafruit_BME280 bme(BME_CS); // hardware SPI
//Adafruit_BME280 bme(BME_CS, BME_MOSI, BME_MISO, BME_SCK); // software SPI

unsigned long delayTime;

void setup() {
  Serial.begin(9600);
  while(!Serial);    // time to get serial running
  Serial.println(F("BME280 test"));

  unsigned status;

  // default settings
  status = bme.begin();
  // You can also pass in a Wire library object like &Wire2
  // status = bme.begin(0x76, &Wire2)
  if (!status) {
    Serial.println("Could not find a valid BME280 sensor, check wiring, address, sensor ID!");
    Serial.print("SensorID was: 0x"); Serial.println(bme.sensorID(),16);
    Serial.print("        ID of 0xFF probably means a bad address, a BMP 180 or BMP 085\n");
    Serial.print("   ID of 0x56-0x58 represents a BMP 280,\n");
    Serial.print("        ID of 0x60 represents a BME 280.\n");
    Serial.print("        ID of 0x61 represents a BME 680.\n");
    while (1) delay(10);
  }

  Serial.println("-- Default Test --");
  delayTime = 1000;

  Serial.println();
}

void loop() {
  printValues();
  delay(delayTime);
}

void printValues() {
  Serial.print("Temperature = ");
  Serial.print(bme.readTemperature());
  Serial.println(" °C");

  Serial.print("Pressure = ");
  Serial.print(bme.readPressure() / 100.0F);
  Serial.println(" hPa");

  Serial.print("Approx. Altitude = ");
  Serial.print(bme.readAltitude(SEALEVELPRESSURE_HPA));
  Serial.println(" m");

  Serial.print("Humidity = ");
  Serial.print(bme.readHumidity());
  Serial.println(" %");

  Serial.println();
}
Now let’s break down what each part does.
6. Explaining the example code
6.1 Includes and pin definitions
#include <Wire.h>
#include <SPI.h>
#include <Adafruit_Sensor.h>
#include <Adafruit_BME280.h>

#define BME_SCK 13
#define BME_MISO 12
#define BME_MOSI 11
#define BME_CS 10

#define SEALEVELPRESSURE_HPA (1013.25)
Wire.h– I²C supportSPI.h– SPI support (if you want to use SPI instead of I²C)Adafruit_Sensor.h– unified sensor base classAdafruit_BME280.h– the actual BME280 driver
The BME_SCK, BME_MISO, BME_MOSI, BME_CS defines are for SPI mode, but in this example we don’t actually use them (I²C only). They’re kept here to show how you’d configure SPI if you needed it.
SEALEVELPRESSURE_HPA is a constant used to calculate altitude from pressure. 1013.25 hPa is the standard mean sea-level pressure.
6.2 Creating the sensor object
Adafruit_BME280 bme; // I2C
//Adafruit_BME280 bme(BME_CS); // hardware SPI
//Adafruit_BME280 bme(BME_CS, BME_MOSI, BME_MISO, BME_SCK); // software SPI
Adafruit_BME280 bme;→ tells the library to use I²C.- The commented versions show alternative constructors if you want hardware SPI or software SPI.
So:
- For I²C: use
Adafruit_BME280 bme; - For hardware SPI: use
Adafruit_BME280 bme(BME_CS);(and connect to the Arduino’s hardware SPI pins). - For software SPI: you pass all four SPI pins manually.
6.3 setup() – Serial and sensor init
Serial.begin(9600);
while(!Serial);    // time to get serial running
Serial.println(F("BME280 test"));
- Starts Serial at 9600 baud.
while(!Serial);waits until the Serial port is ready (mainly useful on boards like Leonardo / native USB; on ESP32 you can usually skip it).F("BME280 test")stores the string in flash instead of RAM (small optimisation).
unsigned status;

// default settings
status = bme.begin();
// You can also pass in a Wire library object like &Wire2
// status = bme.begin(0x76, &Wire2)
bme.begin()initializes the sensor on I²C.- By default, it tries address
0x76or0x77(BME280 typical addresses). - That return value is stored in
status– it’s non-zero if the sensor was found.
You can specify:
- A fixed address, e.g.
bme.begin(0x76) - A different Wire instance, e.g.
&Wire1on boards with multiple I²C buses.
if (!status) {
    Serial.println("Could not find a valid BME280 sensor, check wiring, address, sensor ID!");
    Serial.print("SensorID was: 0x"); Serial.println(bme.sensorID(),16);
    Serial.print("        ID of 0xFF probably means a bad address, a BMP 180 or BMP 085\n");
    Serial.print("   ID of 0x56-0x58 represents a BMP 280,\n");
    Serial.print("        ID of 0x60 represents a BME 280.\n");
    Serial.print("        ID of 0x61 represents a BME 680.\n");
    while (1) delay(10);
}
If .begin() returns false:
- It prints a useful diagnostic message.
- Reads the
sensorID()register and prints it:- 0x60 → BME280
- 0x56/0x57/0x58 → BMP280 (no humidity)
- 0x61 → BME680
- 0xFF → likely no response / wrong address
- Then it halts forever in
while(1).
This is very helpful when you’ve bought a cloned “BME280” breakout that is actually a BMP280.
Serial.println("-- Default Test --");
delayTime = 1000;

Serial.println();
- Just some user feedback: default test mode, and set
delayTimeto 1000 ms (1 second) between readings.
6.4 loop() – main logic
void loop() {
    printValues();
    delay(delayTime);
}
- Every loop, it calls
printValues()and then waitsdelayTimems (1 second).
You could easily:
- Change
delayTimefor faster/slower logging - Replace
printValues()with your own logic (e.g. send to MQTT or display)
6.5 printValues() – reading data
void printValues() {
    Serial.print("Temperature = ");
    Serial.print(bme.readTemperature());
    Serial.println(" °C");
bme.readTemperature()returns °C as afloat.- The library handles all compensation formulae internally.
    Serial.print("Pressure = ");

    Serial.print(bme.readPressure() / 100.0F);
    Serial.println(" hPa");
bme.readPressure()returns pressure in Pascals (Pa).- Dividing by
100.0Fconverts Pa → hPa (hectopascals), which is equivalent to millibars.
    Serial.print("Approx. Altitude = ");
    Serial.print(bme.readAltitude(SEALEVELPRESSURE_HPA));
    Serial.println(" m");
bme.readAltitude(seaLevelPressure)estimates altitude in metres using the barometric formula.SEALEVELPRESSURE_HPAis set to 1013.25 hPa, which is “standard atmosphere” pressure at sea level.- If you know your local pressure from a weather service, you can set this constant more accurately.
    Serial.print("Humidity = ");
    Serial.print(bme.readHumidity());
    Serial.println(" %");

    Serial.println();
}
bme.readHumidity()returns % relative humidity as a float.
The result on Serial might look like:
Temperature = 24.56 °C
Pressure = 1012.45 hPa
Approx. Altitude = 11.34 m
Humidity = 52.30 %
7. Adapting the example for ESP32
The original example assumes the default Wire pins of your board. On ESP32 it’s good practice to explicitly set the I²C pins before calling bme.begin().
Here’s a version tailored for ESP32 (I²C, address 0x76):
#include <Wire.h>
#include <SPI.h>
#include <Adafruit_Sensor.h>
#include <Adafruit_BME280.h>

#define SEALEVELPRESSURE_HPA (1013.25)

Adafruit_BME280 bme;

unsigned long delayTime = 2000; // 2 seconds

void setup() {
  Serial.begin(115200);
  delay(1000);

  Serial.println();
  Serial.println("ESP32 + BME280 test (I2C)");

  // Explicitly set I2C pins for ESP32 (change if needed)
  // Common devkit: SDA = 21, SCL = 22
  Wire.begin(21, 22);

  bool status = bme.begin(0x76);  // change to 0x77 if your board uses that address
  if (!status) {
    Serial.println("Could not find a valid BME280 sensor, check wiring or address!");
    Serial.print("SensorID: 0x"); Serial.println(bme.sensorID(), 16);
    while (1) {
      delay(1000);
    }
  }

  Serial.println("BME280 initialized successfully.");
}

void loop() {
  Serial.println("------------------------------");

  float temperature = bme.readTemperature();           // °C
  float pressure_hPa = bme.readPressure() / 100.0F;    // hPa
  float altitude_m = bme.readAltitude(SEALEVELPRESSURE_HPA);
  float humidity = bme.readHumidity();                 // %

  Serial.print("Temperature: ");
  Serial.print(temperature);
  Serial.println(" °C");

  Serial.print("Pressure:    ");
  Serial.print(pressure_hPa);
  Serial.println(" hPa");

  Serial.print("Altitude:    ");
  Serial.print(altitude_m);
  Serial.println(" m");

  Serial.print("Humidity:    ");
  Serial.print(humidity);
  Serial.println(" %");

  Serial.println();

  delay(delayTime);
}
Adjust:
Wire.begin(21, 22)→ match your ESP32 board’s SDA/SCLbme.begin(0x76)→ to0x77if your module is on that address
You can quickly test the I²C address with an I²C scanner sketch if you’re not sure.
8. Common issues & troubleshooting
1. “Could not find a valid BME280 sensor…”
- Check VCC and GND first.
- Check SDA/SCL wiring – they must match the pins used in
Wire.begin(). - Check the I²C address:
- Many Adafruit-style modules default to 0x77
- Many generic ones default to 0x76
- Try
bme.begin(0x76)andbme.begin(0x77).
2. Sensor ID is not 0x60
0x60= proper BME2800x56–0x58= BMP280 (no humidity)0x61= BME680 (gas sensor)0xFF= nothing answering / wiring/address wrong
→ Good clue for dealing with “mystery” AliExpress boards.
3. Altitude readings look wrong
- Altitude depends heavily on the sea-level pressure constant.
- Replace
SEALEVELPRESSURE_HPAwith your local current pressure (from a weather service) for more realistic values.
4. Humidity looks weird (e.g. 0% or 100% all the time)
- Make sure you really have a BME280, not a BMP280.
- Check
sensorID(). BMP280 has no humidity sensor.