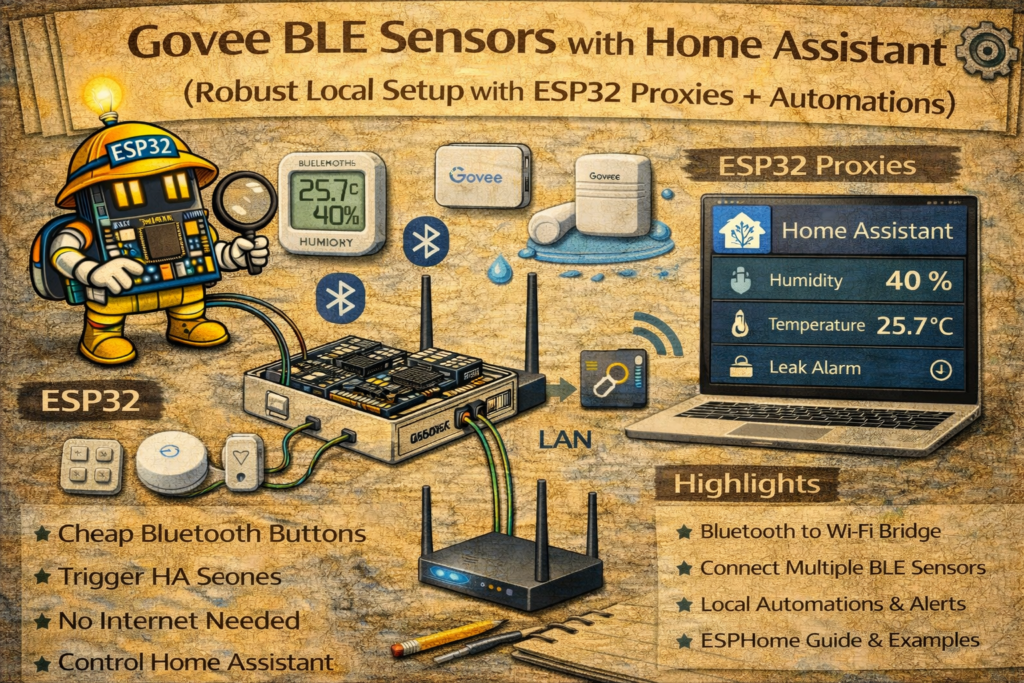
Govee BLE thermometers/hygrometers are cheap and surprisingly useful in Home Assistant—if the Bluetooth side is engineered properly. The integration itself is mostly UI-based today, but to make it robust (no dropouts, good range, usable automations) there are two places where “code” still matters:
- Range & stability: ESP32 Bluetooth Proxies (ESPHome)
- Actually using the data: automations + calibration templates in Home Assistant
Phase 1: Hardware foundation
Option A — Best overall: ESP32 Bluetooth Proxies (recommended)
If Home Assistant runs in a closet / rack / basement, you will almost always get better results by putting Bluetooth “ears” around the house:
- One proxy near bedrooms
- One near living room
- One near bathroom (if you’re doing fan automations)
- One near garage/entrance if needed
This turns BLE from “sometimes updates” into “boringly reliable”.
Option B — USB Bluetooth dongle (can be fine if placed correctly)
A dongle can work well, but Bluetooth is sensitive to RF noise and placement.
Practical rule (not a religion):
- If the dongle is on a USB 3.x port or right next to USB 3.x devices, range can collapse.
- Using a USB 2.0 port and/or a short extension cable to move the dongle away from the computer/host often improves stability a lot.
So it’s not “never plug it in directly”—it’s “don’t let USB 3 noise and bad placement wreck your BLE”.
Phase 2: Extending range with ESPHome Bluetooth Proxies (the code)
What you need
- Any ESP32 board (ESP32 / ESP32-C3 / ESP32-S3 all work)
- ESPHome installed in Home Assistant
- Wi-Fi coverage where you’ll place the proxy
Recommended ESPHome proxy YAML
This is a clean “production” proxy config. It uses ESP-IDF, which is widely preferred for Bluetooth stability on ESP32.
substitutions:
  name: "ble-proxy-living-room"
  friendly_name: "BLE Proxy Living Room"

esphome:
  name: ${name}
  friendly_name: ${friendly_name}

esp32:
  board: esp32dev           # change to your board if needed
  framework:
    type: esp-idf

logger:

api:

ota:
  - platform: esphome

wifi:
  ssid: "YOUR_WIFI_SSID"
  password: "YOUR_WIFI_PASSWORD"
  ap:
    ssid: "BLE-Proxy-Fallback"
    password: "change_this_password"

captive_portal:

bluetooth_proxy:
  active: true
That’s enough for most homes.
When to enable “active scanning”
Some BLE devices expose extra data only with active scanning. In practice:
- Passive scanning = listens only (lower power impact on sensors)
- Active scanning = asks for more info (can help compatibility, but may increase sensor battery usage)
If a Govee device is missing battery or behaves oddly, active scanning is worth testing on one proxy first.
esp32_ble_tracker:
  scan_parameters:
    active: true

bluetooth_proxy:
  active: true
Best practice: only enable active scanning if you actually need it. Otherwise you can end up paying for it in coin cells.
Phase 3: Home Assistant integration (UI setup)
Once Bluetooth is working (dongle or proxies), Home Assistant setup is mostly visual:
- Settings → Devices & Services
- Ensure Bluetooth is configured and healthy
- Add Govee BLE integration
- Wait a minute or two for discovery prompts
If discovery is slow:
- Move a proxy closer to the sensor temporarily
- Wake the sensor (some devices advertise more aggressively right after battery insert)
Phase 4: Use the data (Automations + Templates)
4.1 Freezer / fridge alarm (classic)
This avoids false alarms when the door opens briefly.
File: automations.yaml
alias: "Alert: Freezer Temperature High"
description: "Notify if freezer is above -5°C for 10 minutes"
trigger:
  - platform: numeric_state
    entity_id: sensor.freezer_govee_temperature
    above: -5
    for: "00:10:00"
action:
  - service: notify.mobile_app_your_phone
    data:
      title: "❄️ Freezer Alert"
      message: >
        Freezer is {{ states('sensor.freezer_govee_temperature') }}°C for 10 minutes.
mode: single
4.2 Calibration (correct cheap sensor drift)
Instead of mental math, create a corrected sensor.
File: configuration.yaml (or wherever you keep templates)
template:
  - sensor:
      - name: "Living Room Temp (Corrected)"
        unit_of_measurement: "°C"
        device_class: temperature
        state_class: measurement
        state: >
          {% set raw = states('sensor.living_room_govee_temperature') | float(0) %}
          {{ (raw - 1.5) | round(1) }}
Change - 1.5 to your real offset.
4.3 Bathroom fan automation (humidity-driven)
Simple version:
alias: "Bathroom Fan - Humidity High"
trigger:
  - platform: numeric_state
    entity_id: sensor.bathroom_govee_humidity
    above: 70
    for: "00:03:00"
action:
  - service: switch.turn_on
    target:
      entity_id: switch.bathroom_fan
mode: single
Better version uses humidity rise and cooldown timers (your “Smart Bathroom Fan” article can link here as the sensor source).
Phase 5: Troubleshooting (real-world checklist)
Problem 1: Entity is “Unavailable” or updates are random
Cause: range/placement, not the integration.
Fix:
- Add/move a proxy closer
- Avoid hiding proxies behind metal or inside cabinets
- If using a dongle, move it away from USB 3.x noise using a USB 2.0 port/extension
Problem 2: Battery level missing/unknown
Cause: some devices require active scanning to expose extra fields.
Fix:
- In HA Bluetooth settings, try enabling active scanning (if available), or
- Enable active scanning on the proxy nearest to that sensor (not necessarily all proxies)
Problem 3: Data “flatlines” (stale readings)
Cause: Bluetooth stack or a weak reception path.
Fixes:
- Improve reception (proxy closer)
- Reboot the proxy/host (if it’s a true stack hang)
- Prefer proxies over cheap dongles if it repeats
Problem 4: RSSI is awful (e.g., -90 dBm) and it drops
Fix: that’s basically “out of range.” Either move the sensor, move the proxy, or add a proxy.
Phase 6: Make reliability visible (optional but smart)
Create an “alive” binary sensor so it’s obvious when BLE is dropping.
template:
  - binary_sensor:
      - name: "Bedroom Govee Alive"
        state: >
          {{ (as_timestamp(now()) - as_timestamp(states.sensor.bedroom_govee_temperature.last_changed)) < 900 }}
This says: “alive if updated within 15 minutes.”
Phase 7: If the official path doesn’t support your model
Sometimes a specific model isn’t decoded well (or temporarily breaks after an update). The clean fallback is:
- Theengs Gateway → MQTT → Home Assistant
It listens to BLE adverts and publishes decoded values over MQTT. It’s a solid “plan B” when model support is uneven.
Summary
A robust Govee BLE + Home Assistant setup is mostly about RF design, not YAML:
- Use ESP32 Bluetooth Proxies for coverage and stability
- Treat USB dongles carefully (placement matters a lot)
- Enable active scanning only when needed
- Add automations and calibration so the sensors become useful, not just graphs