Wi-Fi is great indoors, but it often fails for:
- A garden shed at the back of the property
- A well / pump room down a slope
- A greenhouse behind thick walls
- A gate sensor far from the router
LoRa solves this problem: it’s long-range, low-power, and ideal for small sensor payloads.
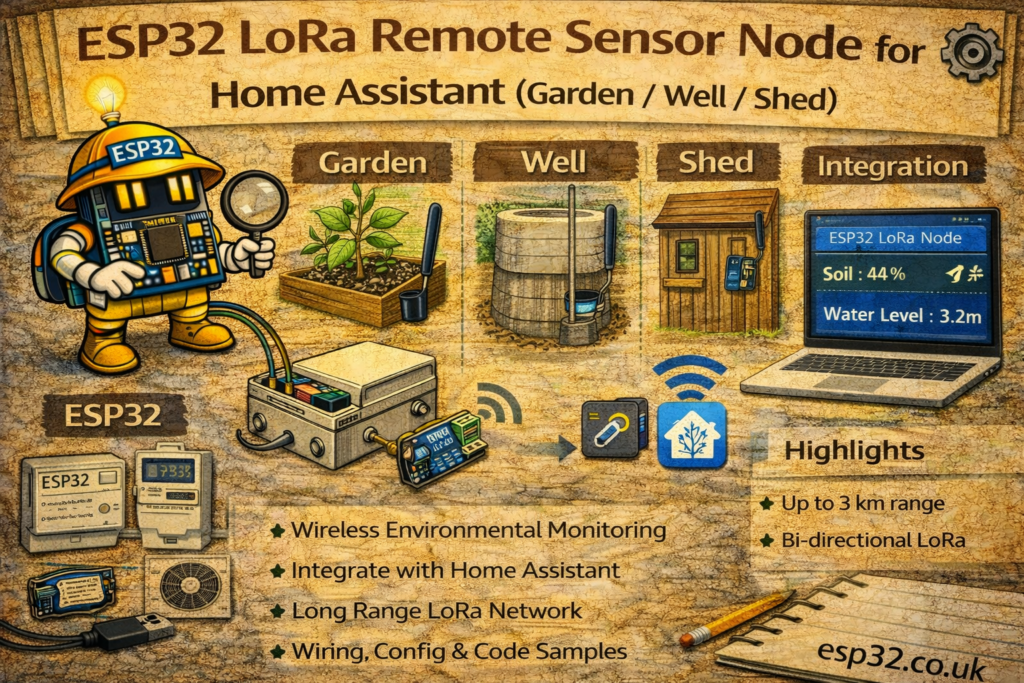
This architecture works extremely well with Home Assistant:
LoRa sensor node (remote) → LoRa gateway (near Wi-Fi) → MQTT broker → Home Assistant
This guide covers:
- When LoRa is the right tool
- Hardware choices (SX1276 / SX1262)
- A practical topology (node + gateway)
- Payload format and MQTT topics
- Home Assistant YAML for MQTT sensors
- Reliability tips (ack, retries, spreading factor)
1. When to Use LoRa
LoRa is ideal when you need:
- Hundreds of meters to a few km (depending on terrain)
- Very low bandwidth but high reliability for sensor values
- Battery powered nodes (deep sleep + short transmit)
- A “remote island” you don’t want to extend Wi-Fi to
Good LoRa sensor use cases:
- Soil moisture + temperature in the garden
- Well water level / pressure / pump runtime
- Shed temperature/humidity + door open status
- Rain gauge pulses from far away
- Gate/driveway sensors
Not ideal for:
- Video or audio
- Fast streaming data
- Anything requiring high throughput
2. Architecture Overview
2.1 Remote Node (battery / solar)
- ESP32 + LoRa radio (SX1276 or SX1262)
- Sensors (BME280/SHT45, DS18B20, reed switch, soil sensor, etc.)
- Sleeps most of the time
- Wakes up:
- reads sensors
- sends a small packet
- returns to deep sleep
2.2 Gateway (always on, near Wi-Fi)
- ESP32 + LoRa radio
- Wi-Fi + MQTT connection
- Receives LoRa packets
- Publishes to topics like:
lora/garden/node1lora/well/node2
Home Assistant then consumes those topics like normal MQTT sensors.
3. Hardware Options
3.1 Popular LoRa Boards (Easy Mode)
- TTGO LoRa32 (SX1276 + OLED)
- Heltec WiFi LoRa 32 (SX1276 + OLED)
- ESP32 + Ra-02 / Ra-01 module (SX1276)
- ESP32 + SX1262 module (newer, better sensitivity, typically longer range)
Frequency choice:
- Europe: 868 MHz
- North America: 915 MHz
- Some regions: 433 MHz
Use the legal band for your country.
4. Wiring (Typical SX1276 SPI)
Many boards are pre-wired internally. If using a module, typical pins:
ESP32      LoRa SX1276
SCK   ---> SCK
MISO  ---> MISO
MOSI  ---> MOSI
CS    ---> NSS
RST   ---> RESET
DIO0  ---> DIO0
3.3V  ---> VCC
GND   ---> GND
Pin numbers vary by board. On TTGO/Heltec they are predefined and commonly:
- SCK 5
- MISO 19
- MOSI 27
- SS 18
- RST 14
- DIO0 26
(Always confirm your specific board.)
5. Payload Strategy (Keep It Simple)
A good LoRa payload is:
- Small
- Easy to parse
- Includes a node ID and battery voltage
Example JSON payload (works fine for LoRa if short):
{"id":1,"t":21.6,"h":48.2,"bat":3.91}
Even better for efficiency: binary struct, but JSON is easiest and usually fine for sensor networks.
NODE CODE (Remote Sensor → LoRa)
Below is a simple Arduino-style LoRa node example that sends temperature/humidity/battery.
6. Remote Node Example (LoRa Send)
#include <SPI.h>
#include <LoRa.h>

// Example pins (TTGO / Heltec style – adjust for your board)
#define SCK 5
#define MISO 19
#define MOSI 27
#define SS 18
#define RST 14
#define DIO0 26

#define BAND 868E6   // 866/868 Europe, 915 North America

int nodeId = 1;

float readBattery() {
  // Example: use ADC + divider in a real design
  return 3.95;
}

void setup() {
  Serial.begin(115200);

  SPI.begin(SCK, MISO, MOSI, SS);
  LoRa.setPins(SS, RST, DIO0);

  if (!LoRa.begin(BAND)) {
    Serial.println("LoRa init failed!");
    while (true) delay(1000);
  }

  // Optional range tuning (trade speed for range)
  LoRa.setSpreadingFactor(10);   // 7–12 (higher = longer range)
  LoRa.setSignalBandwidth(125E3);
  LoRa.setCodingRate4(5);

  // Read sensors (replace with real readings)
  float temp = 21.6;
  float hum  = 48.2;
  float bat  = readBattery();

  // Build compact JSON payload
  String msg = "{\"id\":" + String(nodeId) +
               ",\"t\":" + String(temp, 1) +
               ",\"h\":" + String(hum, 1) +
               ",\"bat\":" + String(bat, 2) + "}";

  LoRa.beginPacket();
  LoRa.print(msg);
  LoRa.endPacket();

  Serial.println("Sent: " + msg);

  // Deep sleep if battery-powered (example: 5 minutes)
  esp_deep_sleep(5ULL * 60ULL * 1000000ULL);
}

void loop() {}
GATEWAY CODE (LoRa Receive → MQTT → Home Assistant)
The gateway listens for LoRa packets and republishes them to MQTT.
7. LoRa → MQTT Gateway Example
#include <SPI.h>
#include <LoRa.h>
#include <WiFi.h>
#include <PubSubClient.h>

// LoRa pins (adjust for your board)
#define SCK 5
#define MISO 19
#define MOSI 27
#define SS 18
#define RST 14
#define DIO0 26
#define BAND 868E6

// Wi-Fi / MQTT
#define WIFI_SSID   "YOUR_WIFI"
#define WIFI_PASS   "YOUR_PASSWORD"
#define MQTT_SERVER "192.168.0.10"

WiFiClient espClient;
PubSubClient mqtt(espClient);

void reconnectMQTT() {
  while (!mqtt.connected()) {
    mqtt.connect("lora_gateway");
    delay(500);
  }
}

void setup() {
  Serial.begin(115200);

  // Wi-Fi
  WiFi.mode(WIFI_STA);
  WiFi.begin(WIFI_SSID, WIFI_PASS);
  while (WiFi.status() != WL_CONNECTED) delay(500);

  mqtt.setServer(MQTT_SERVER, 1883);

  // LoRa
  SPI.begin(SCK, MISO, MOSI, SS);
  LoRa.setPins(SS, RST, DIO0);

  if (!LoRa.begin(BAND)) {
    Serial.println("LoRa init failed!");
    while (true) delay(1000);
  }

  LoRa.setSpreadingFactor(10);
  LoRa.setSignalBandwidth(125E3);
  LoRa.setCodingRate4(5);

  Serial.println("LoRa gateway ready");
}

void loop() {
  if (!mqtt.connected()) reconnectMQTT();
  mqtt.loop();

  int packetSize = LoRa.parsePacket();
  if (packetSize) {
    String msg = "";
    while (LoRa.available()) msg += (char)LoRa.read();

    int rssi = LoRa.packetRssi();
    float snr = LoRa.packetSnr();

    Serial.printf("RX: %s (RSSI %d, SNR %.1f)\n", msg.c_str(), rssi, snr);

    // Publish raw JSON payload to MQTT
    mqtt.publish("lora/sensor/raw", msg.c_str(), false);

    // Optional: also publish signal quality
    String radio = "{\"rssi\":" + String(rssi) + ",\"snr\":" + String(snr, 1) + "}";
    mqtt.publish("lora/sensor/radio", radio.c_str(), false);
  }
}
A nicer version is to publish per node:
lora/node1/envlora/node2/env
You can do that by parsing "id":1 from the JSON and building a topic dynamically.
8. Home Assistant MQTT Sensors
This matches your style (mqtt: sensor: with JSON templates).
If the gateway publishes each node’s data to lora/node1/env:
mqtt:
  sensor:
    - name: "Garden Node 1 Temperature"
      state_topic: "lora/node1/env"
      value_template: "{{ value_json.t }}"
      unit_of_measurement: "°C"

    - name: "Garden Node 1 Humidity"
      state_topic: "lora/node1/env"
      value_template: "{{ value_json.h }}"
      unit_of_measurement: "%"

    - name: "Garden Node 1 Battery"
      state_topic: "lora/node1/env"
      value_template: "{{ value_json.bat }}"
      unit_of_measurement: "V"
If you’re publishing everything to lora/sensor/raw, you can filter by node ID in HA templates, but it’s cleaner to split topics at the gateway.
9. Reliability: ACK + Retries (Worth It)
LoRa is reliable, but not perfect—especially with interference or long range.
For important sensors (leak, gate, well level), consider:
- Gateway sends a short ACK back:
ACK:1 - Node waits up to 300–500 ms for ACK
- If not received, retry once or twice
Also include a counter:
{"id":1,"seq":120,"t":21.6,"h":48.2}
So you can detect missing packets.
10. Range Tuning Cheat Sheet
Trade-off: Range vs speed
- Spreading Factor (SF)
- SF7 = fast, shorter range
- SF10–SF12 = slower, longer range
- Bandwidth
- 125 kHz typical
- 62.5 kHz more range, slower
- Coding rate
- 4/5 typical
- higher coding = more error correction, slower
A good starting point for “garden/shed” is:
- SF10
- BW 125 kHz
- CR 4/5
Then increase SF if needed.
11. Practical Deployment Tips
- Use an antenna appropriate for your band (868/915 MHz)
- Place gateway antenna high and away from metal
- Use waterproof enclosure for outdoor nodes
- If battery powered:
- deep sleep
- publish every 5–15 minutes
- send immediately on events (door open, leak)
Summary
A LoRa sensor network is one of the cleanest ways to extend Home Assistant beyond Wi-Fi range:
- Remote ESP32 LoRa nodes can live in gardens, wells, and sheds
- A single always-on gateway bridges LoRa to MQTT
- Home Assistant consumes it like standard MQTT sensors
- With proper tuning (SF/ACK/retries) it becomes extremely robust
This setup scales well: once the gateway is built, adding new remote sensors becomes a repeatable “copy + change node ID + add topic” workflow.