Monitoring indoor CO₂ levels is one of the most effective ways to track air quality, improve ventilation, and maintain a healthy indoor environment.
The SCD30 and SCD41 are two of the best consumer-grade CO₂ sensors, offering accurate measurements and excellent long-term stability.
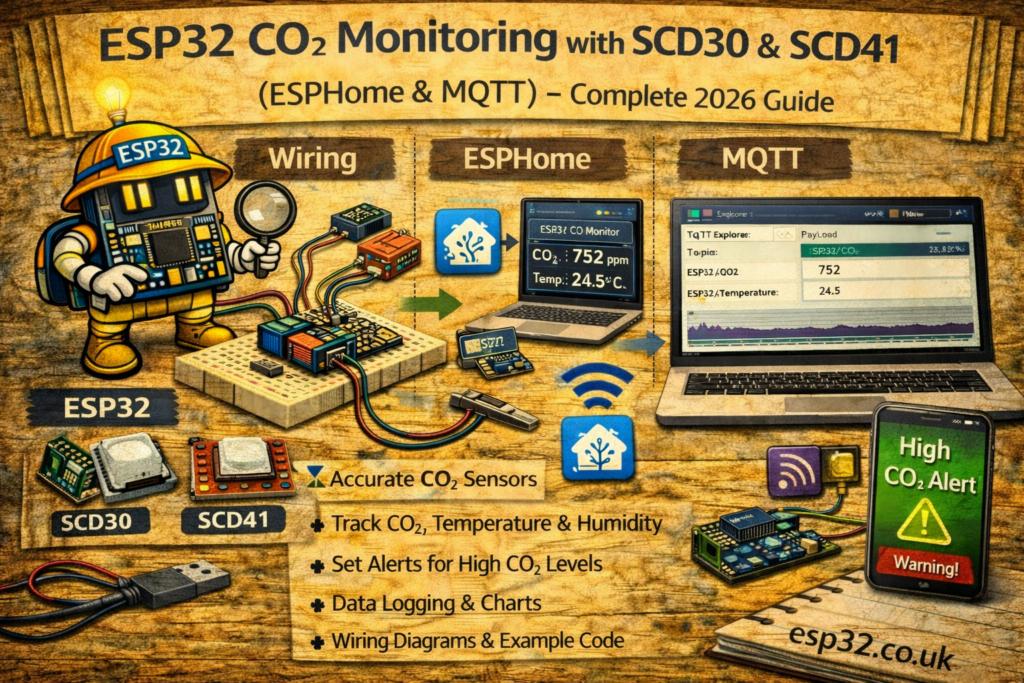
This guide explains how to connect an ESP32 to either the SCD30 or the SCD41, and integrate them into Home Assistant using ESPHome and MQTT.
1. Sensors Covered in This Guide
SCD30 – CO₂, Temperature, Humidity
- Accuracy: ±30 ppm
- Interface: I2C
- Warm-up: ~30 seconds
- Best for: affordable reliable CO₂ monitoring
SCD41 – Next-gen CO₂ sensor
- Accuracy: ±20 ppm
- Faster response
- Lower power
- Best for: high-precision indoor monitoring
2. Hardware Required
- ESP32 DevKit
- SCD30 or SCD41 sensor
- Jumper wires
- USB cable
- (Optional) Enclosure with air vents
3. Wiring Diagrams
Shared I2C Wiring (both SCD30 and SCD41)
ESP32 → Sensor
3.3V → VIN
GND  → GND
GPIO21 → SDA
GPIO22 → SCL
Both sensors operate at 3.3V and support I2C directly.
METHOD 1 — ESPHome Integration
ESPHome has native support for both SCD30 and SCD41, making integration extremely easy.
4. ESPHome YAML for SCD30
esphome:
  name: esp32-scd30
  platform: ESP32
  board: esp32dev

wifi:
  ssid: "YOUR_WIFI"
  password: "YOUR_PASSWORD"

logger:
api:
ota:

i2c:
  sda: 21
  scl: 22
  scan: true

sensor:
  - platform: scd30
    co2:
      name: "SCD30 CO2"
    temperature:
      name: "SCD30 Temperature"
    humidity:
      name: "SCD30 Humidity"
    update_interval: 10s
5. ESPHome YAML for SCD41
esphome:
  name: esp32-scd41
  platform: ESP32
  board: esp32dev

wifi:
  ssid: "YOUR_WIFI"
  password: "YOUR_PASSWORD"

logger:
api:
ota:

i2c:
  sda: 21
  scl: 22
  scan: true

sensor:
  - platform: scd4x
    co2:
      name: "SCD41 CO2"
    temperature:
      name: "SCD41 Temperature"
    humidity:
      name: "SCD41 Humidity"
    update_interval: 10s
Both devices appear automatically in Home Assistant.
METHOD 2 — MQTT Integration (Manual HA YAML)
This section matches the same style used for BME280, SHT45, DS18B20 and PZEM articles.
The ESP32 publishes JSON via MQTT, and Home Assistant reads individual values.
6. Home Assistant configuration.yaml – SCD30/SCD41 MQTT Sensors
Add under:
mqtt:
  sensor:
Correct MQTT YAML Block (Works for Both Sensors)
mqtt:
  sensor:
    - name: "CO2 Level"
      state_topic: "home/air/quality"
      value_template: "{{ value_json.co2 }}"
      unit_of_measurement: "ppm"

    - name: "Air Temperature"
      state_topic: "home/air/quality"
      value_template: "{{ value_json.temperature }}"
      unit_of_measurement: "°C"

    - name: "Air Humidity"
      state_topic: "home/air/quality"
      value_template: "{{ value_json.humidity }}"
      unit_of_measurement: "%"
Same MQTT topic, three values inside JSON.
7. ESP32 Arduino Code for MQTT (Supports SCD30 and SCD41)
Choose your sensor:
#define USE_SCD30 // or comment out and use SCD41
Full Code
#include <WiFi.h>
#include <PubSubClient.h>

#define WIFI_SSID "YOUR_WIFI"
#define WIFI_PASS "YOUR_PASSWORD"
#define MQTT_SERVER "192.168.0.10"

WiFiClient espClient;
PubSubClient client(espClient);

// -------------------------------------
// Choose sensor
// -------------------------------------
#define USE_SCD30
// #define USE_SCD41

#ifdef USE_SCD30
  #include <Adafruit_SCD30.h>
  Adafruit_SCD30 scd30;
#endif

#ifdef USE_SCD41
  #include <SensirionI2CScd4x.h>
  SensirionI2CScd4x scd41;
#endif

void setup() {
  Serial.begin(115200);

#ifdef USE_SCD41
  Wire.begin(21, 22);
  scd41.begin(Wire);
  scd41.startPeriodicMeasurement();
#endif

#ifdef USE_SCD30
  scd30.begin();
  scd30.setMeasurementInterval(2);
#endif

  WiFi.begin(WIFI_SSID, WIFI_PASS);
  while (WiFi.status() != WL_CONNECTED) delay(500);

  client.setServer(MQTT_SERVER, 1883);
}

void loop() {
  if (!client.connected()) {
    while (!client.connected()) client.connect("ESP32_CO2");
  }

#ifdef USE_SCD30
  if (scd30.dataReady()) {
    scd30.read();
    float co2 = scd30.CO2;
    float temp = scd30.temperature;
    float hum = scd30.relative_humidity;

    String json = "{";
    json += "\"co2\":" + String(co2) + ",";
    json += "\"temperature\":" + String(temp) + ",";
    json += "\"humidity\":" + String(hum);
    json += "}";

    client.publish("home/air/quality", json.c_str());
  }
#endif

#ifdef USE_SCD41
  uint16_t co2; float temp, hum;
  scd41.readMeasurement(co2, temp, hum);

  String json = "{";
  json += "\"co2\":" + String(co2) + ",";
  json += "\"temperature\":" + String(temp) + ",";
  json += "\"humidity\":" + String(hum);
  json += "}";

  client.publish("home/air/quality", json.c_str());
#endif

  client.loop();
  delay(3000);
}
8. Home Assistant Dashboard Example
type: vertical-stack
cards:
  - type: sensor
    entity: sensor.co2_level
  - type: sensor
    entity: sensor.air_temperature
  - type: sensor
    entity: sensor.air_humidity
  - type: history-graph
    entities:
      - sensor.co2_level
      - sensor.air_temperature
      - sensor.air_humidity
9. Recommended Automations
Ventilate the room when CO₂ exceeds 1,000 ppm
automation:
  - alias: "Ventilation Alert"
    trigger:
      - platform: numeric_state
        entity_id: sensor.co2_level
        above: 1000
    action:
      - service: notify.mobile_app
        data:
          message: "CO₂ levels are high — open a window."
Automatically turn on HVAC ventilation
  - alias: "HVAC Ventilate on High CO2"
    trigger:
      - platform: numeric_state
        entity_id: sensor.co2_level
        above: 1200
    action:
      - service: climate.set_fan_mode
        target:
          entity_id: climate.living_room
        data:
          fan_mode: "high"
10. Accuracy Comparison: SCD30 vs SCD41
| Feature | SCD30 | SCD41 |
|---|---|---|
| CO₂ Accuracy | ±30 ppm | ±20 ppm |
| Warm-up | 30–45 sec | 15 sec |
| Power Use | Medium | Low |
| I2C | Yes | Yes |
| Recommended For | General IAQ | High-precision environments |
11. Troubleshooting
CO₂ values stuck or too slow
- Sensors require 1–3 minutes of warm-up
- Avoid enclosed boxes — airflow needed
Temperature seems too high
- CO₂ sensors generate self-heat
- Increase update interval in ESPHome to reduce drift
Sensor not detected
- Enable
i2c: scan: true - Check pin order (SCD41 pins can be inverted on cheap clones)
- Use short wires (<30 cm)
Keywords
esp32 scd30
esp32 scd41
home assistant co2 monitor
esphome scd30
esphome scd41
mqtt co2 sensor esp32
esp32 air quality sensor
scd30 vs scd41
indoor co2 monitoring home assistant