If you followed our Bluetooth Proxy Guide, you probably have an ESP32 sitting behind a sofa or plugged into a wall, doing a great job listening for Bluetooth signals.
But it’s wasted potential.
That ESP32 is a powerful microcontroller running 24/7. Why use it just for Bluetooth? For less than £5 in extra parts, you can upgrade that existing proxy into a complete Room Presence Node that detects:
- Bluetooth Devices (Watches, SwitchBots, Thermometers).
- Motion (Turn lights on when you walk in).
- Temperature & Humidity (Smart heating control).
This guide will show you how to wire a PIR Motion Sensor and a Temperature Sensor directly to your existing Bluetooth Proxy without losing performance.
The Hardware Shopping List
You don’t need a new ESP32. You just need to solder (or jumper wire) these onto your current board:
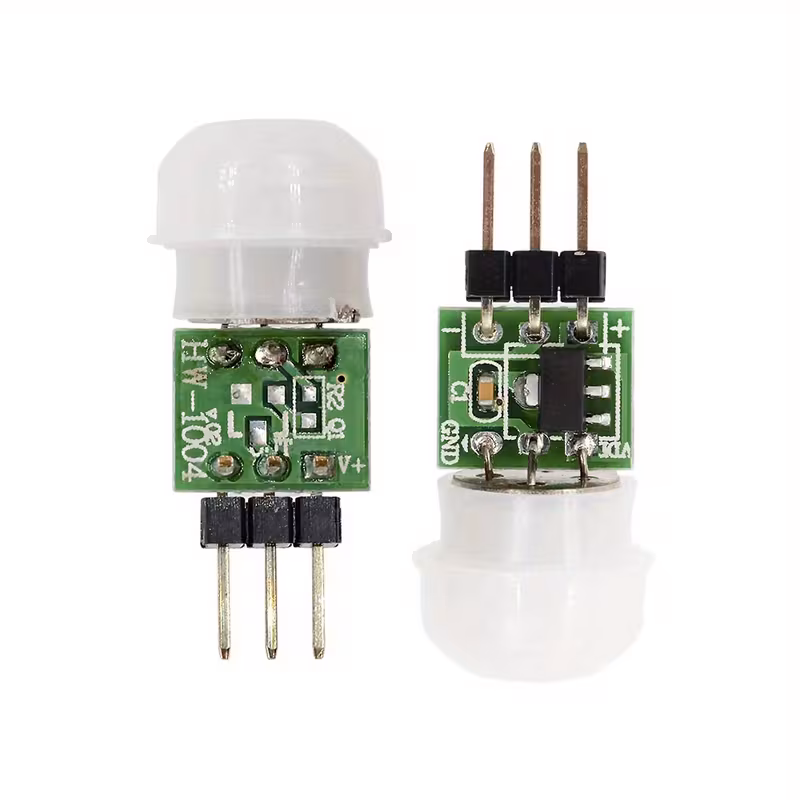
- PIR Motion Sensor (AM312):
- Why: The standard SR501 is huge and false-triggers easily with Wi-Fi interference. The AM312 is tiny, digital, and much more stable near ESP32 Wi-Fi radios.
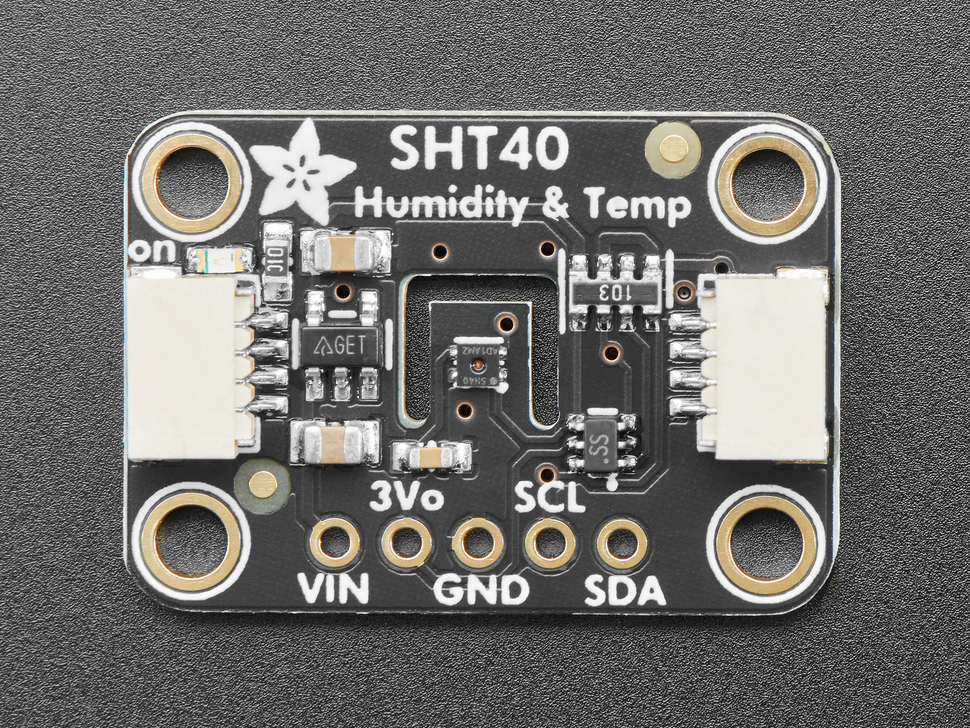
- Temperature Sensor (SHT40 or BME280):
- Why: The DHT11/DHT22 are notoriously inaccurate. The SHT40 is the new gold standard for 2025—fast, precise, and I2C based.
The Wiring (It’s Simple)
We will use the standard I2C pins for the temperature sensor and a simple GPIO for the motion sensor.
- ESP32 3V3 -> Sensor VCC
- ESP32 GND -> Sensor GND
- ESP32 GPIO 21 (SDA) -> SHT40/BME280 SDA
- ESP32 GPIO 22 (SCL) -> SHT40/BME280 SCL
- ESP32 GPIO 13 -> PIR Sensor DATA (Middle pin)
Note: GPIO numbers may vary slightly depending on your board (DevKit V1 vs D1 Mini).
The “Super Node” YAML Configuration
Here is the magic code. Copy-paste this into your existing Bluetooth Proxy YAML file in ESPHome. We are adding the sensor blocks below your existing wifi and proxy settings.
YAML
esphome:
  name: "living-room-super-node"
  friendly_name: "Living Room Multisensor"

esp32:
  board: esp32dev
  framework:
    type: arduino

# ... [Keep your existing WiFi and API/OTA settings here] ...

# 1. The Bluetooth Proxy (Keep this!)
esp32_ble_tracker:
  scan_parameters:
    active: false # Passive scanning saves CPU for the other sensors
bluetooth_proxy:
  active: true

# 2. I2C Bus for Temperature
i2c:
  sda: GPIO21
  scl: GPIO22
  scan: true

# 3. Temperature Sensor (SHT40 Example)
sensor:
  - platform: sht4x
    temperature:
      name: "Living Room Temperature"
      # IMPORTANT: Offset for ESP32 heat
      filters:
        - offset: -2.0
    humidity:
      name: "Living Room Humidity"
    address: 0x44
    update_interval: 60s

# 4. PIR Motion Sensor
binary_sensor:
  - platform: gpio
    pin: GPIO13
    name: "Living Room Motion"
    device_class: motion
    # Filters prevent "ghost" triggers
    filters:
      - delayed_on: 100ms
Critical Trick: Solving the Heat Problem
The biggest issue with “All-in-One” sensors is that the ESP32 CPU generates heat (approx 10-15°C above ambient). If you stick a temperature sensor right on top of it, your room will look 25°C when it’s actually 20°C.
Two solutions:
- The “Antenna” Method: Use jumper wires to position the temperature sensor 3-5cm away from the ESP32 board. Do not glue it directly to the chip.
- The Software Fix: Notice the
offset: -2.0in the YAML above? Measure the real temperature with a trusted thermometer, compare it to your ESP32’s reading, and adjust this offset number until they match.
Why This Upgrade is Worth It
By combining these, you free up USB sockets and reduce clutter. Instead of three devices (Bluetooth Dongle, Motion Sensor, Temp Sensor), you have one tiny box doing it all.
Ready to solder? Grab an AM312 and let’s get building.