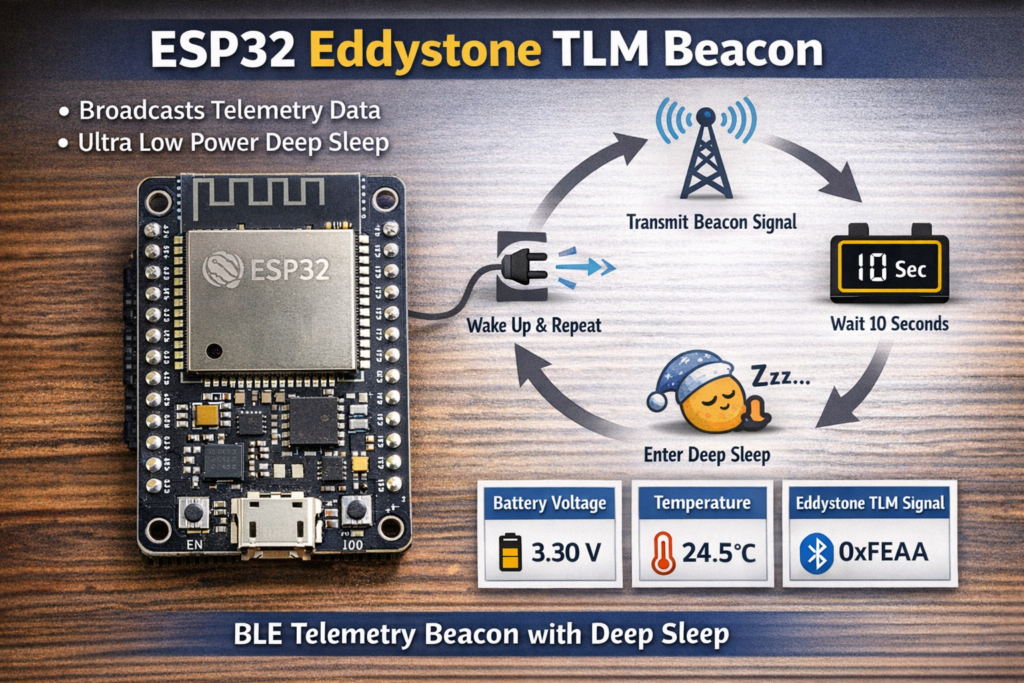
This example shows how to turn an ESP32 into a BLE beacon that broadcasts Eddystone TLM (Telemetry) frames. It periodically advertises battery voltage and temperature, then enters deep sleep to conserve power — making it ideal for low-power IoT beacon applications.
1. Introduction
This example demonstrates a very different BLE use case compared to clients and servers:
👉 broadcast-only BLE (beacon mode)
Instead of:
- connecting
- exchanging data
The ESP32:
- advertises telemetry data
- does not accept connections
- operates in ultra-low-power cycles
It uses Eddystone TLM, a Google-defined BLE beacon format designed specifically for telemetry data.
2. What is Eddystone TLM
Eddystone TLM (Telemetry) is a BLE advertisement format that broadcasts:
- battery voltage
- temperature
- uptime
- packet count
Unlike iBeacon or Eddystone-URL:
👉 TLM is designed for device health monitoring, not user interaction.
Specification:
https://github.com/google/eddystone/blob/master/eddystone-tlm/tlm-plain.md
3. What this example does
The ESP32 runs this cycle:
- Boot
- Generate telemetry data (voltage + temperature)
- Broadcast BLE advertisement (Eddystone TLM)
- Wait 10 seconds
- Stop advertising
- Enter deep sleep
- Wake up and repeat
This creates a low-power periodic beacon
4. Key design concept: Deep sleep beacon
This is the most important part:
#define GPIO_DEEP_SLEEP_DURATION 10
And later:
esp_deep_sleep(1000000LL * GPIO_DEEP_SLEEP_DURATION);
👉 The ESP32 is not continuously running
Instead:
- wakes up
- transmits
- sleeps
This drastically reduces power consumption.
5. RTC memory usage
RTC_DATA_ATTR static time_t last;
RTC_DATA_ATTR static uint32_t bootcount;
These variables survive deep sleep.
They are used to:
- track number of wake cycles
- measure time between boots
👉 This is critical for low-power designs
6. Setting up the beacon
BLE initialization
BLEDevice::init("TLMBeacon");
BLEDevice::setPower(BEACON_POWER);
- Initializes BLE stack
- Sets transmission power
#define BEACON_POWER ESP_PWR_LVL_N12
This is low transmit power → saves energy
Advertising object
pAdvertising = BLEDevice::getAdvertising();
This controls BLE broadcast behavior.
7. Creating telemetry data
The core logic is inside:
void setBeacon()
Battery voltage
EddystoneTLM.setVolt((uint16_t)random(2800, 3700));
- Simulates voltage between 2.8V and 3.7V
- Value stored in millivolts
Temperature
EddystoneTLM.setTemp(random(-3000, 3000) / 100.0f);
- Generates temperature between -30°C and +30°C
- Converted to float
Fixed-point format (important)
EddystoneTLM.getRawTemp()
Eddystone uses:
👉 8.8 fixed-point format
Meaning:
- 8 bits integer
- 8 bits fractional
This is why conversion is needed.
8. Advertising payload structure
oScanResponseData.setServiceData(
  BLEUUID((uint16_t)0xFEAA),
  ...
);
Key points:
0xFEAA= Eddystone UUID- Telemetry data is placed in scan response
Advertisement vs Scan Response
oAdvertisementData.setName("ESP32 TLM Beacon");
- Advertisement → device name
- Scan response → telemetry data
👉 This is standard BLE practice
9. Starting and stopping advertising
pAdvertising->start();
delay(10000);
pAdvertising->stop();
The beacon:
- advertises for 10 seconds
- then stops
10. Deep sleep cycle
esp_deep_sleep(...)
This is where power savings happen.
Instead of idle looping:
👉 ESP32 shuts down almost completely
Only RTC memory remains active.
11. Boot diagnostics
Serial.printf("Starting ESP32. Bootcount = %lu\n", bootcount++);
And:
Serial.printf("Deep sleep (%llds since last reset, %llds since last boot)\n", ...)
These help track:
- how often the device wakes
- how long it has been running
12. Complete runtime flow
- ESP32 wakes from deep sleep
- Initializes BLE
- Generates telemetry data
- Starts advertising
- Broadcasts for 10 seconds
- Stops advertising
- Enters deep sleep
- Repeats
13. How to read this beacon
You need a scanner.
Options:
- ESP32 with BLE_Beacon_Scanner example
- nRF Connect app (Android/iOS)
- Any BLE scanner supporting Eddystone
👉 Look for:
- Service UUID:
0xFEAA - TLM frame
14. Important limitations
1. No connections
This is a pure beacon:
- cannot be connected to
- cannot receive data
2. Random data
Voltage and temperature are simulated:
random(...)
Replace with real sensors for production.
3. No uptime/frame counters
TLM supports:
- uptime
- packet count
But this example does not fully implement them.
15. Real-world applications
This pattern is used in:
- battery-powered IoT sensors
- environmental monitoring
- asset tracking beacons
- industrial telemetry
- smart building systems
16. How to improve this example
1. Use real sensors
Replace random values with:
- ADC battery measurement
- temperature sensor
2. Adjust sleep interval
Balance:
- update frequency
- battery life
3. Increase transmit power if needed
Trade-off:
- range vs battery
4. Add uptime counter
Use RTC memory to track:
- total uptime
- beacon frame count
5. Optimize advertising duration
10 seconds is arbitrary — tune for your use case.
17. Honest take
This example is:
- excellent for low-power design concepts
- underused compared to BLE client/server
Big takeaway:
👉 BLE does not require connections to be useful
For many IoT systems:
- broadcasting is enough
- and much more efficient
Conclusion
This example shows how to build a true low-power BLE telemetry device using ESP32.
Instead of constant communication, it uses:
- short advertising bursts
- deep sleep cycles
This is exactly how modern IoT beacons are designed.
If you combine this with a scanner or gateway, you get:
👉 a complete low-power wireless telemetry system
|
1 2 3 4 5 6 7 8 9 10 11 12 13 14 15 16 17 18 19 20 21 22 23 24 25 26 27 28 29 30 31 32 33 34 35 36 37 38 39 40 41 42 43 44 45 46 47 48 49 50 51 52 53 54 55 56 57 58 59 60 61 62 63 64 65 66 67 68 69 70 71 72 73 74 75 76 77 78 79 80 81 82 83 84 85 86 87 88 89 90 91 92 93 94 |
/* EddystoneTLM beacon by BeeGee based on https://github.com/pcbreflux/espressif/blob/master/esp32/arduino/sketchbook/ESP32_Eddystone_TLM_deepsleep/ESP32_Eddystone_TLM_deepsleep.ino EddystoneTLM frame specification https://github.com/google/eddystone/blob/master/eddystone-tlm/tlm-plain.md */ /* Create a BLE server that will send periodic Eddystone URL frames. The design of creating the BLE server is: 1. Create a BLE Server 2. Create advertising data 3. Start advertising. 4. wait 5. Stop advertising. 6. deep sleep To read data advertised by this beacon use second ESP with example sketch BLE_Beacon_Scanner */ #include "sys/time.h" #include <Arduino.h> #include "BLEDevice.h" #include "BLEUtils.h" #include "BLEBeacon.h" #include "BLEAdvertising.h" #include "BLEEddystoneTLM.h" #include "esp_sleep.h" #define GPIO_DEEP_SLEEP_DURATION 10 // sleep x seconds and then wake up #define BEACON_POWER ESP_PWR_LVL_N12 RTC_DATA_ATTR static time_t last; // remember last boot in RTC Memory RTC_DATA_ATTR static uint32_t bootcount; // remember number of boots in RTC Memory // See the following for generating UUIDs: // https://www.uuidgenerator.net/ BLEAdvertising *pAdvertising; struct timeval nowTimeStruct; time_t lastTenth; #define BEACON_UUID "8ec76ea3-6668-48da-9866-75be8bc86f4d" // UUID 1 128-Bit (may use linux tool uuidgen or random numbers via https://www.uuidgenerator.net/) // Check // https://github.com/google/eddystone/blob/master/eddystone-tlm/tlm-plain.md // and http://www.hugi.scene.org/online/coding/hugi%2015%20-%20cmtadfix.htm // for the temperature value. It is a 8.8 fixed-point notation void setBeacon() { BLEEddystoneTLM EddystoneTLM; EddystoneTLM.setVolt((uint16_t)random(2800, 3700)); // 3300mV = 3.3V EddystoneTLM.setTemp(random(-3000, 3000) / 100.0f); // 3000 = 30.00 ˚C Serial.printf("Random Battery voltage is %d mV = 0x%04X\n", EddystoneTLM.getVolt(), EddystoneTLM.getVolt()); Serial.printf("Random temperature is %.2f°C\n", EddystoneTLM.getTemp()); Serial.printf("Converted to 8.8 format: 0x%04X\n", EddystoneTLM.getRawTemp()); BLEAdvertisementData oAdvertisementData = BLEAdvertisementData(); BLEAdvertisementData oScanResponseData = BLEAdvertisementData(); oScanResponseData.setServiceData(BLEUUID((uint16_t)0xFEAA), String(EddystoneTLM.getData().c_str(), EddystoneTLM.getData().length())); oAdvertisementData.setName("ESP32 TLM Beacon"); pAdvertising->setAdvertisementData(oAdvertisementData); pAdvertising->setScanResponseData(oScanResponseData); } void setup() { Serial.begin(115200); gettimeofday(&nowTimeStruct, NULL); Serial.printf("Starting ESP32. Bootcount = %lu\n", bootcount++); Serial.printf("Deep sleep (%llds since last reset, %llds since last boot)\n", nowTimeStruct.tv_sec, nowTimeStruct.tv_sec - last); last = nowTimeStruct.tv_sec; lastTenth = nowTimeStruct.tv_sec * 10; // Time since last reset as 0.1 second resolution counter // Create the BLE Device BLEDevice::init("TLMBeacon"); BLEDevice::setPower(BEACON_POWER); pAdvertising = BLEDevice::getAdvertising(); setBeacon(); // Start advertising pAdvertising->start(); Serial.println("Advertising started for 10s ..."); delay(10000); pAdvertising->stop(); Serial.printf("Enter deep sleep for 10s\n"); esp_deep_sleep(1000000LL * GPIO_DEEP_SLEEP_DURATION); } void loop() {} |