This beginner guide explains a typical ESP32 BLE beacon scanner sketch: how scanning works, what RSSI means, how to detect iBeacon/Eddystone (or any BLE advertising packet), and how to filter by MAC address, UUID, or name. You’ll also learn the common gotchas (scan interval/window, duplicates, power use) and get a clean “working baseline” example you can paste into your own project.
1. What is a beacon scanner?
A “beacon” is just a device that broadcasts short BLE advertising packets (no pairing needed). Examples:
- iBeacon tags (UUID/Major/Minor)
- Eddystone beacons (URL/UID/TLM)
- Phones, watches, trackers, BLE sensors that advertise
- ESP32 boards advertising their name or service UUID
A beacon scanner is an ESP32 program that listens for those packets and prints out useful info like:
- Device address (MAC)
- Device name (if present)
- RSSI (signal strength)
- Manufacturer data (where iBeacon usually lives)
- Service UUIDs (common for BLE sensors)
2. How BLE scanning works (in plain English)
BLE devices don’t “broadcast continuously”. They advertise in short bursts on three special channels:
- A beacon sends an advertisement packet
- Your ESP32 listens during a scan window
- If it hears a packet, it triggers a callback (or stores the result)
- Your code decides whether to print it, ignore it, or treat it as “found”
Two important settings control how often you’ll detect devices:
- Scan interval: how often scanning cycles repeat
- Scan window: how long you listen during each cycle
If the scan window is tiny, you’ll miss packets. If it’s huge, you’ll detect more but waste more power.
3. What RSSI means (and why it jumps)
RSSI is the received signal strength indicator, in dBm (usually negative numbers).
Typical interpretation indoors:
- -30 to -55 dBm: very close (same room)
- -55 to -70 dBm: close/medium (nearby rooms)
- -70 to -90 dBm: far/weak (edge of range)
RSSI is noisy because of reflections, body blocking, walls, and antenna orientation. Expect it to bounce even when nothing moves.
If you want “presence detection”, use RSSI as a rough threshold with smoothing, not as a precise distance meter.
4. The “beacon scanner example” structure
Most ESP32 beacon scanner examples follow the same pattern:
- Initialize BLE stack
- Create a scanner object
- Configure scan parameters (active scan, interval/window, duplicates)
- Register a callback for discovered devices
- Start scanning in a loop or on a timer
- Print results or trigger actions
The only big difference between examples is the BLE library:
- ESP32 BLE Arduino (older, heavier)
- NimBLE-Arduino (lighter, faster, usually preferred today for scanning)
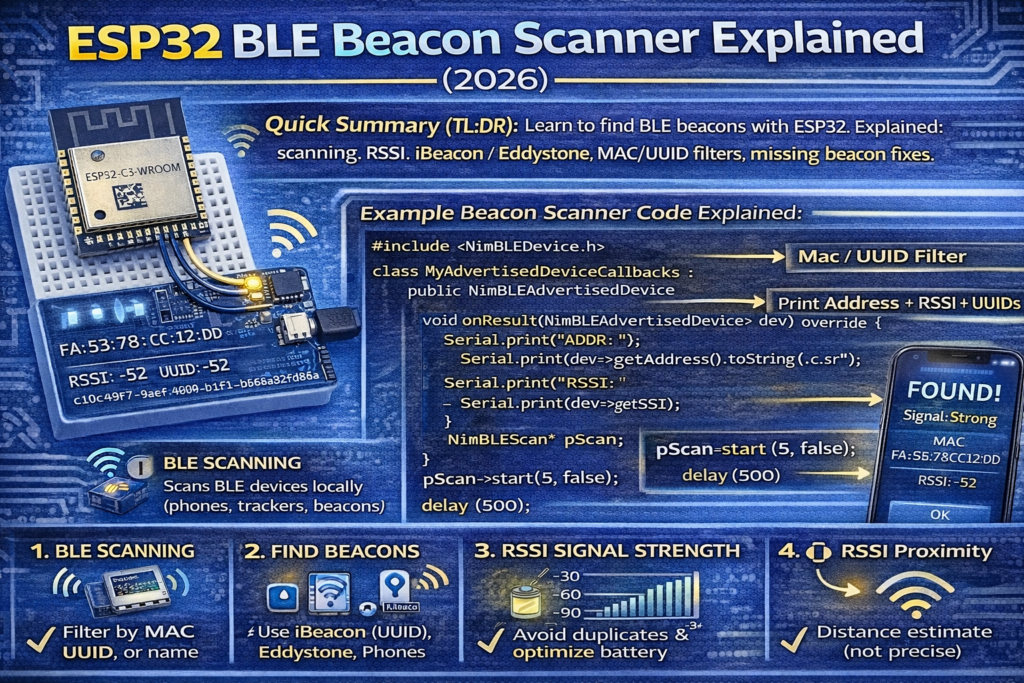
5. A clean beacon scanner example you can reuse
This is a simple “scan and print everything” example using NimBLE-Arduino style APIs. It prints address, name, RSSI, and raw manufacturer data when present.
#include <NimBLEDevice.h>class MyAdvertisedDeviceCallbacks : public NimBLEAdvertisedDeviceCallbacks {
  void onResult(NimBLEAdvertisedDevice* dev) override {
    Serial.print("ADDR: ");
    Serial.print(dev->getAddress().toString().c_str());    Serial.print("  RSSI: ");
    Serial.print(dev->getRSSI());    if (dev->haveName()) {
      Serial.print("  NAME: ");
      Serial.print(dev->getName().c_str());
    }    if (dev->haveManufacturerData()) {
      std::string mfg = dev->getManufacturerData();
      Serial.print("  MFG: ");
      for (size_t i = 0; i < mfg.size(); i++) {
        uint8_t b = (uint8_t)mfg[i];
        if (b < 16) Serial.print("0");
        Serial.print(b, HEX);
      }
    }    Serial.println();
  }
};NimBLEScan* pScan;void setup() {
  Serial.begin(115200);
  delay(300);  Serial.println("BLE Beacon Scanner starting...");  NimBLEDevice::init("");                 // no device name needed for scanning
  pScan = NimBLEDevice::getScan();  pScan->setAdvertisedDeviceCallbacks(new MyAdvertisedDeviceCallbacks(), true);  pScan->setActiveScan(true);             // request scan responses (more data, more power)
  pScan->setInterval(100);                // scan interval in ms
  pScan->setWindow(80);                   // scan window in ms (<= interval)
  pScan->setDuplicateFilter(true);        // reduce spam
}void loop() {
  // Scan for 5 seconds, then pause briefly
  pScan->start(5, false);
  delay(500);
}
What each setting does:
- setActiveScan(true): ESP32 actively requests extra data (“scan response”). Helps reveal names/services but uses more power.
- setInterval / setWindow: more window = better detection, more power.
- setDuplicateFilter(true): you won’t print the same device constantly. Turn off if you want continuous RSSI tracking.
6. How to scan only for one beacon (MAC filter)
If you already know the beacon MAC address, filter in the callback:
const char* TARGET = "aa:bb:cc:dd:ee:ff";void onResult(NimBLEAdvertisedDevice* dev) override {
  if (dev->getAddress().toString() != TARGET) return;
  Serial.printf("FOUND %s RSSI=%d\n", TARGET, dev->getRSSI());
}
This is the fastest and most reliable filter.
7. How to detect iBeacon (UUID/Major/Minor idea)
iBeacon is normally embedded in manufacturer data (Apple’s company ID + iBeacon prefix + UUID + major/minor + tx power).
A beginner-friendly approach:
- Print manufacturer data in hex (as in the example)
- Confirm it matches an iBeacon pattern (you’ll see a consistent payload)
- Then parse UUID/major/minor bytes once you know your tag format
Many “beacon scanner examples” stop at printing the manufacturer data because parsing differs by beacon type.
If you want a dedicated iBeacon parser section, tell me which tags you’re using (iBeacon vs Eddystone) and I’ll include a ready parser with UUID formatting.
8. “Why don’t I see my beacon?”
Common reasons:
- You’re scanning BLE but the device is classic Bluetooth only
- The beacon advertises rarely (long advertising interval)
- Scan window is too small
- You’re on “guest Wi-Fi” or network isolation (doesn’t matter for BLE itself, but matters if you expected phone apps to discover or to publish via MQTT)
- The beacon randomizes its address (phones often do)
- You’re too far or the beacon battery is dying
Quick fixes:
- Increase scan window closer to interval (e.g., interval 120ms, window 100ms)
- Disable duplicate filtering if you want continuous output
- Move beacon closer and confirm RSSI rises
9. Using beacon scanning for presence detection
The simplest approach:
- Track RSSI for a known beacon MAC
- Smooth it (moving average)
- Decide “present” if RSSI is above a threshold for N seconds
- Decide “away” if below threshold for N seconds
Don’t base presence on a single packet. BLE is bursty.
10. Performance and power notes
Continuous scanning is expensive on battery. For battery projects:
- scan for 2–5 seconds
- sleep for 20–60 seconds
- repeat
If you need constant presence, use mains power or accept frequent charging.
|
1 2 3 4 5 6 7 8 9 10 11 12 13 14 15 16 17 18 19 20 21 22 23 24 25 26 27 28 29 30 31 32 33 34 35 36 37 38 39 40 41 42 43 44 45 46 47 48 49 50 51 52 53 54 |
/* BLE5 extended scan example for esp32 C3 and S3 with this code it is simple to scan legacy (BLE4) compatible advertising, and BLE5 extended advertising. New coded added in BLEScan is not changing old behavior, which can be used with old esp32, but is adding functionality to use on C3/S3. With this new API advertised device wont be stored in API, it is now user responsibility author: chegewara */ #ifndef CONFIG_BLUEDROID_ENABLED #error "NimBLE does not support extended scan yet. Try using Bluedroid." #elif !defined(SOC_BLE_50_SUPPORTED) #error "This SoC does not support BLE5. Try using ESP32-C3, or ESP32-S3" #else #include <BLEDevice.h> #include <BLEUtils.h> #include <BLEScan.h> #include <BLEAdvertisedDevice.h> uint32_t scanTime = 100; //In 10ms (1000ms) BLEScan *pBLEScan; class MyBLEExtAdvertisingCallbacks : public BLEExtAdvertisingCallbacks { void onResult(esp_ble_gap_ext_adv_report_t report) { if (report.event_type & ESP_BLE_GAP_SET_EXT_ADV_PROP_LEGACY) { // here we can receive regular advertising data from BLE4.x devices Serial.println("BLE4.2"); } else { // here we will get extended advertising data that are advertised over data channel by BLE5 devices Serial.printf("Ext advertise: data_le: %d, data_status: %d \n", report.adv_data_len, report.data_status); } } }; void setup() { Serial.begin(115200); Serial.println("Scanning..."); BLEDevice::init(""); pBLEScan = BLEDevice::getScan(); //create new scan pBLEScan->setExtendedScanCallback(new MyBLEExtAdvertisingCallbacks()); pBLEScan->setExtScanParams(); // use with pre-defined/default values, overloaded function allows to pass parameters delay(1000); // it is just for simplicity this example, to let ble stack to set extended scan params pBLEScan->startExtScan(scanTime, 3); // scan duration in n * 10ms, period - repeat after n seconds (period >= duration) } void loop() { // put your main code here, to run repeatedly: delay(2000); } #endif // SOC_BLE_50_SUPPORTED |