BLE temperature/humidity sensors are one of the cheapest “high impact” upgrades you can add to Home Assistant. You can scatter them everywhere:
- Bedrooms
- Living room
- Baby room
- Bathroom (humidity spikes)
- Closet / storage
- Garage / shed (if covered by a proxy)
But people run into the same problem:
“It works for a day, then stops updating.”
This article shows how to do BLE sensors properly using ESP32 Bluetooth Proxies, with a practical comparison of Xiaomi/Mijia and Govee BLE sensors, plus the design patterns that make them stable long-term.
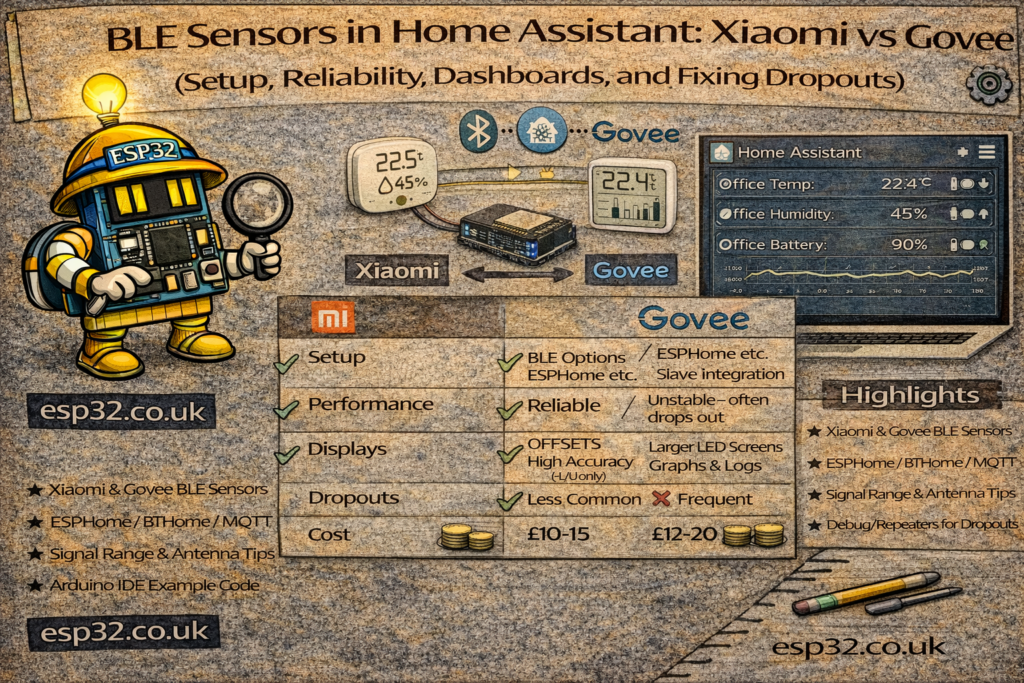
1. The Two Families: Xiaomi vs Govee (What’s the real difference?)
Xiaomi / Mijia BLE sensors (popular models)
- Usually very low power and cheap
- Good temperature/humidity stability
- Widely used in HA
- Many models broadcast in a predictable way (easy to pick up by proxies)
Typical strengths
- Battery life is strong
- Great for “lots of rooms”
Typical weaknesses
- Some models have slower advertising intervals (updates feel less “live”)
- Some versions need the right integration path to decode properly
Govee BLE sensors (popular models)
- Often advertise more frequently
- Can feel more responsive for graphs
- Some models expose extra metrics (depending on product)
Typical strengths
- Fast updates and “smooth graphs”
- Good range in many houses
Typical weaknesses
- Some models are more sensitive to RF placement
- Battery life varies by model (some are great, some average)
The truth: both can be excellent—if your BLE proxy network is designed properly.
2. The Real Requirement: ESP32 Bluetooth Proxies
If you rely on one proxy at the other end of the house, you’ll get random “unavailable” updates and blame the sensor.
A stable setup is:
- 1 proxy per floor minimum
- Preferably 1 proxy near clusters of BLE sensors
Placement rules:
- Chest height or higher
- Not in a cabinet
- Not next to a fridge/metal rack
- Not pressed against a Wi-Fi router
If you already followed the proxy network guide, you’re 80% done.
3. Adding BLE Sensors to Home Assistant
There are multiple ways HA can ingest BLE sensors. The cleanest path is:
- Add ESP32 Bluetooth Proxy devices (ESPHome)
- Put BLE sensor batteries in
- Let Home Assistant discover them
- Add the integration that matches the brand/model
3.1 ESPHome proxy YAML (minimal)
bluetooth_proxy:
  active: true
Once the proxy is online, HA can “hear” BLE devices across the house.
4. The Most Common BLE Sensor Problem: Dropouts
Why dropouts happen
- BLE is 2.4 GHz, like Wi-Fi → congestion affects both
- Walls and metal reflect/absorb signals
- Some sensors advertise less often (feels like it “stopped”)
- Phone/tablet Bluetooth is irrelevant here—proxies matter
The fix is always one of:
- Move the proxy
- Add a proxy
- Reduce 2.4 GHz chaos
- Add timeouts and smoothing in HA
Not “restart Home Assistant every week”.
5. Making BLE Sensors “Stable” in Home Assistant
Even with perfect RF, you should treat BLE data as “occasionally missing packets”. The correct HA pattern is:
- Don’t use raw sensor values directly for decisions
- Use “last updated” / “seen recently” logic
- Apply smoothing (statistics sensor) for noisy signals
5.1 Create a “sensor is alive” binary sensor
If your BLE sensor exposes an entity that updates regularly, create:
template:
  - binary_sensor:
      - name: "Bedroom BLE Sensor Alive"
        state: >
          {{ (as_timestamp(now()) - as_timestamp(states.sensor.bedroom_temperature.last_changed)) < 600 }}
This says: it’s alive if it updated in the last 10 minutes.
If it goes false, you know it’s coverage—not that your room is suddenly -999°C.
6. Smoothing: Better Graphs, Better Automations
Humidity especially can be spiky. Use a rolling mean:
6.1 Statistics sensor (rolling mean)
Create a Statistics helper in UI, or YAML:
sensor:
  - platform: statistics
    name: "Bathroom Humidity Mean 5min"
    entity_id: sensor.bathroom_humidity
    state_characteristic: mean
    max_age:
      minutes: 5
Then drive automations from the mean, not raw spikes.
7. Dashboards That Actually Help
7.1 Whole-house comfort dashboard layout
A practical dashboard:
- One card per room
- Show temperature + humidity + a “comfort status”
Example entities card:
type: entities
title: Bedroom
entities:
  - sensor.bedroom_temperature
  - sensor.bedroom_humidity
  - binary_sensor.bedroom_ble_sensor_alive
Do this for each room.
7.2 Add “dew point” (useful for condensation/mold risk)
Once you have temp + humidity, you can compute dew point and show it.
8. Bathroom Fan Automation (Best real use case)
BLE humidity sensors shine in bathrooms.
Use:
- humidity rise rate, not absolute humidity
- cooldown timer
- manual override
9. Xiaomi vs Govee: Which to pick?
Pick Xiaomi/Mijia if:
- You want lots of sensors for cheap
- You care about battery life and “set and forget”
- You’re okay with slightly slower update cadence
Pick Govee if:
- You want faster updates / smoother graphs
- You don’t mind paying a bit more
- You want a more “responsive” feel
The real answer:
If your proxy network is weak, both will feel unreliable.
If your proxy network is solid, both will be excellent.
10. Troubleshooting Checklist (fast)
- Is there a proxy within reasonable range of the sensor?
- Is the proxy placed high and not blocked by metal?
- Is 2.4 GHz Wi-Fi overloaded? (IoT devices + neighbors)
- Does the sensor update at least every few minutes?
- Add a “sensor alive” binary sensor to separate RF issues from sensor faults
- Add smoothing for humidity and for room-presence RSSI logic
Summary
BLE sensors are cheap, local, and perfect for Home Assistant—but only if you treat them like RF devices:
- Build a solid Bluetooth Proxy network
- Expect occasional missed packets and design around it
- Add “alive” checks and smoothing
- Then build dashboards and automations that feel stable
Do that, and you’ll end up with a whole-house comfort map that’s genuinely useful—and not another “it worked yesterday” smart-home headache.