A classic doorbell can be upgraded into a smart doorbell with just:
With Home Assistant you can:
- Keep your physical chime
- Get mobile notifications when someone rings
- Attach an image snapshot from a camera
- Log and automate everything (quiet hours, different sounds, etc.)
This guide covers:
- Simple button + relay wiring
- ESPHome configuration
- Home Assistant automations for chime + notification + snapshot
- An outline of a MQTT version for your usual style
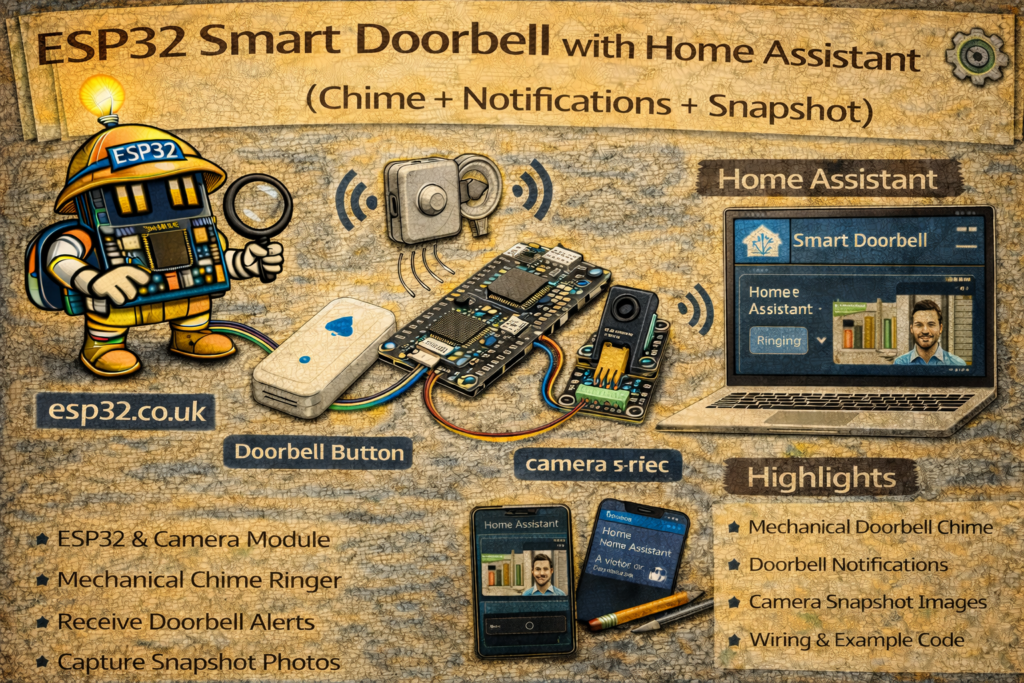
1. Hardware Overview
Base setup (no camera):
- ESP32 DevKit
- Doorbell push button (momentary switch)
- Relay module (3.3 V logic input, dry-contact)
- Existing low-voltage chime (ideally 8–24 V AC or DC), or a 5–12 V DC buzzer
- Low-voltage PSU (for ESP32 + relay; or reuse doorbell transformer if suitable)
Optional add-on:
⚠️ If your doorbell is powered by mains voltage, only work on the low-voltage side of the transformer and follow local regulations. When in doubt, treat anything on 230 V as off-limits and get an electrician.
2. Concept: How the Smart Doorbell Works
We want three things:
- Detect button press → ESP32 reads a GPIO from the doorbell pushbutton.
- Ring a chime
- Either via relay contacts across the existing chime button input
- Or by directly powering a low-voltage buzzer
- Notify Home Assistant
- Event → HA sends mobile push + (optional) camera snapshot
We’ll do the main implementation with ESPHome & native API.
After that, a quick MQTT variant.
3. Wiring
3.1 Button → ESP32
Wire the button as a simple contact to ground:
ESP32 GPIO  → one side of button
ESP32 GND   → other side of button
We’ll use the internal pull-up so:
- Button released → GPIO = HIGH
- Button pressed → GPIO = LOW
Example pin: GPIO 32.
3.2 Relay → Chime
Two typical options:
A. Existing low-voltage chime (recommended)
Most wired doorbells have:
- Transformer → low voltage (e.g. 8–12 V AC)
- Chime unit
- Button wired in series
We emulate the button with a relay:
Chime transformer/chime low-voltage line:

[TRANSFORMER] --- [CHIME] ---[PB1]----(button)----[PB2]

Relay COM  → PB1
Relay NO   → PB2
The existing physical button remains in parallel:
PB1 ---- Button ---- PB2
PB1 ---- Relay COM
PB2 ---- Relay NO
ESP32 → Relay module:
ESP32 3.3V  → Relay VCC
ESP32 GND   → Relay GND
GPIO 25     → Relay IN
B. Direct DC buzzer
If you don’t have an existing chime:
- Use a 5–12 V DC buzzer or chime module
- Drive it via relay or MOSFET from a DC PSU
- Logic is the same: ESP32 toggles the relay for ~1 second.
METHOD 1 – ESPHome Doorbell Node
We’ll create:
- A
binary_sensorfor the doorbell button - A
switchfor the relay / chime - A doorbell event for Home Assistant
- Optional integration with an ESP32-CAM
4. ESPHome Base Config
esphome:
  name: esp32-doorbell
  platform: ESP32
  board: esp32dev

wifi:
  ssid: "YOUR_WIFI"
  password: "YOUR_PASSWORD"

logger:
api:
ota:
5. Relay as Chime Output
We want a momentary relay pulse whenever HA or the ESP32 rings the doorbell.
switch:
  - platform: gpio
    id: doorbell_relay
    name: "Doorbell Chime Relay"
    pin: 25
    restore_mode: ALWAYS_OFF
    icon: mdi:bell-ring
    on_turn_on:
      - delay: 800ms    # ring duration
      - switch.turn_off: doorbell_relay
You can hide this from the UI later if you prefer to trigger via automations only:
internal: true
6. Button Input – Doorbell Press
binary_sensor:
  - platform: gpio
    id: doorbell_button
    name: "Doorbell Button"
    pin:
      number: 32
      mode:
        input: true
        pullup: true
    filters:
      - invert: true          # pressed = ON
      - delayed_on: 30ms      # debounce
      - delayed_off: 50ms
    device_class: occupancy
    on_press:
      - logger.log: "Doorbell pressed!"
      - switch.turn_on: doorbell_relay
      - homeassistant.event:
          event: esphome_doorbell_pressed
          data:
            source: esp32-doorbell
Behaviour:
- Short press → ESP32 logs, rings relay, sends an HA event
esphome_doorbell_pressed. - Home Assistant can use either:
binary_sensor.doorbell_buttonstate change, or- the
esphome_doorbell_pressedevent as a trigger.
7. Optional ESP32-CAM Snapshot Integration
You can:
- Use a separate ESP32-CAM running ESPHome with
esp32_camera: - Add a
cameraentity in HA (e.g.camera.door_camera) - On doorbell press, request a snapshot and send notification with the image
Example ESPHome for ESP32-CAM (very minimal idea):
esphome:
  name: esp32-doorcam
  platform: ESP32
  board: esp32cam

wifi:
  ssid: "YOUR_WIFI"
  password: "YOUR_PASSWORD"

logger:
api:
ota:

esp32_camera:
  name: "Door Camera"
  external_clock:
    pin: GPIO0
    frequency: 20MHz
  i2c_pins:
    sda: GPIO26
    scl: GPIO27
  data_pins: [GPIO5, GPIO18, GPIO19, GPIO21, GPIO36, GPIO39, GPIO34, GPIO35]
  vsync_pin: GPIO25
  href_pin: GPIO23
  pixel_clock_pin: GPIO22
  resolution: 800x600
(Exact pins depend on module; you’d use the standard ESPHome example for your specific ESP32-CAM board.)
In Home Assistant, this becomes camera.door_camera.
8. Home Assistant Automations
We’ll use the ESPHome event esphome_doorbell_pressed as the central trigger.
8.1 Basic Doorbell Notification + Chime (redundant, but clear)
If you want HA to also control the relay (instead of ESPHome doing it directly), you can remove switch.turn_on: doorbell_relay from ESPHome and move all logic into HA.
Example automation using the event:
automation:
  - alias: "Doorbell – Chime + Notification"
    trigger:
      - platform: event
        event_type: esphome_doorbell_pressed
    action:
      - service: switch.turn_on
        target:
          entity_id: switch.doorbell_chime_relay
      - service: notify.mobile_app
        data:
          title: "Doorbell"
          message: "Someone is at the door"
If you keep the ESPHome on_press action to ring locally, use this automation only for the notification.
8.2 Snapshot + Notification (ESP32-CAM or Other Camera)
Assuming you have:
camera.door_camera
Automation:
  - alias: "Doorbell – Snapshot + Mobile Notification"
    trigger:
      - platform: event
        event_type: esphome_doorbell_pressed
    action:
      - service: camera.snapshot
        target:
          entity_id: camera.door_camera
        data:
          filename: "/config/www/snapshots/doorbell_{{ now().timestamp() }}.jpg"

      - delay: "00:00:02"  # Give snapshot time to save

      - service: notify.mobile_app
        data:
          title: "Doorbell"
          message: "Someone is at the door"
          data:
            image: "/local/snapshots/doorbell_{{ now().timestamp() | int - 2 }}.jpg"
Notes:
/config/wwwmaps to/localin HA URLs.- The timestamp trick gives a roughly matching filename; you can simplify to a static filename if you don’t care about history.
8.3 Quiet Hours (Do Not Disturb)
Disable chime at night, but still get a silent notification:
  - alias: "Doorbell – Silent Night Mode"
    trigger:
      - platform: event
        event_type: esphome_doorbell_pressed
    condition:
      - condition: time
        after: "23:00:00"
        before: "07:00:00"
    action:
      - service: notify.mobile_app
        data:
          title: "Doorbell (Silent)"
          message: "Someone rang the doorbell during quiet hours"
And update the main chime automation with a time condition to exclude night.
METHOD 2 – MQTT Doorbell (Your Style)
If you want the ESP32 to speak pure MQTT:
- Button press → ESP32 publishes
home/doorbell/buttonmessage - Relay control → HA sends commands to an MQTT switch
9.1 Home Assistant MQTT Entities
Binary_sensor for button:
mqtt:
  binary_sensor:
    - name: "Doorbell Button"
      state_topic: "home/doorbell/button"
      payload_on: "PRESSED"
      payload_off: "IDLE"
      device_class: occupancy
Switch for chime:
mqtt:
  switch:
    - name: "Doorbell Chime Relay"
      command_topic: "home/doorbell/chime/set"
      state_topic: "home/doorbell/chime/state"
      payload_on: "ON"
      payload_off: "OFF"
      retain: false
ESP32 behaviour:
- On button press:
- Publish
"PRESSED"then (optionally)"IDLE"shortly after
- Publish
- On
"ON"command to.../chime/set:- Pulse relay and afterwards publish
"OFF"to state topic
- Pulse relay and afterwards publish
All the notification/snapshot automations remain the same, just triggered from binary_sensor.doorbell_button instead of an ESPHome event.
10. Practical Tips
- Debounce: mechanical buttons bounce; ESPHome
delayed_onis enough in most cases. - Local chime even if HA is down: keep
switch.turn_on: doorbell_relayin ESPHome’son_press, so doorbell still rings even if HA/MQTT is offline. - Camera choice: if ESP32-CAM image quality is not good enough, use any IP camera; you only need a
cameraentity for snapshots. - Power: use a reliable PSU; a doorbell that reboots whenever someone presses it is… sub-optimal.
Summary
With a single ESP32 and relay you get a smart, still-local doorbell:
- Button press detected via GPIO
- Relay triggers existing chime
- Home Assistant sends notifications and snapshots
- Quiet hours and advanced logic are just YAML away
The optional ESP32-CAM (or any IP camera) adds the “who is at the door?” piece without needing an expensive commercial smart doorbell.