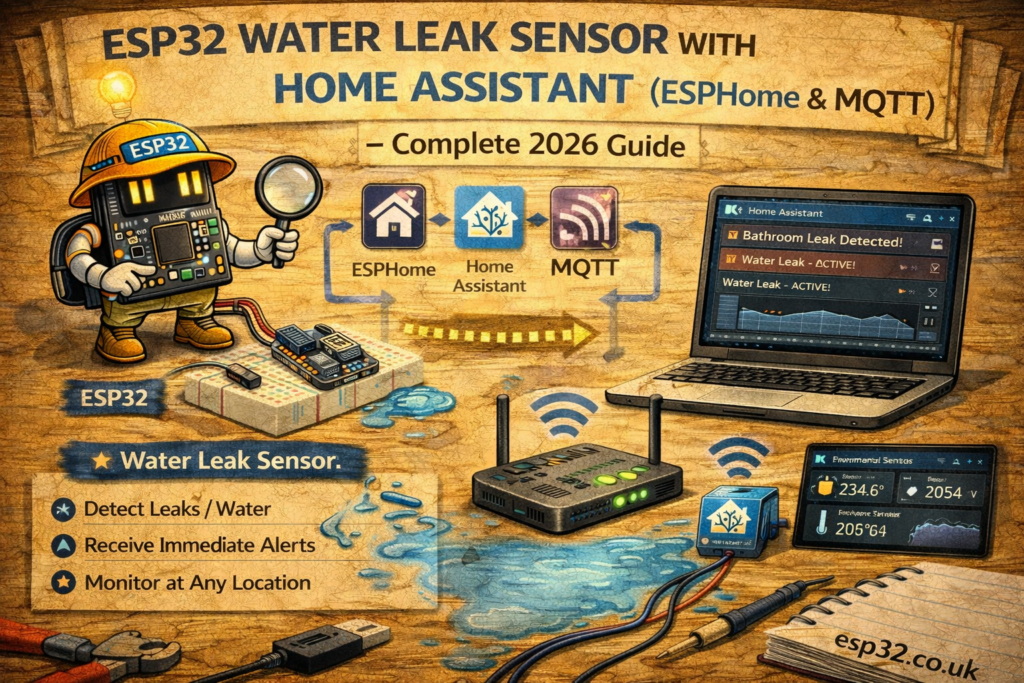
Water leak sensors can prevent serious damage from leaking pipes, washing machines, dishwashers, boilers, and under-sink plumbing.
With an ESP32 and a simple water leak probe, it is easy to build a low-cost, fast, and fully local leak detection system that integrates with Home Assistant.
This guide shows how to build an ESP32-based water leak detector using:
- Simple wired probes or low-cost leak modules
- ESPHome for auto-discovery
- MQTT for manual integration
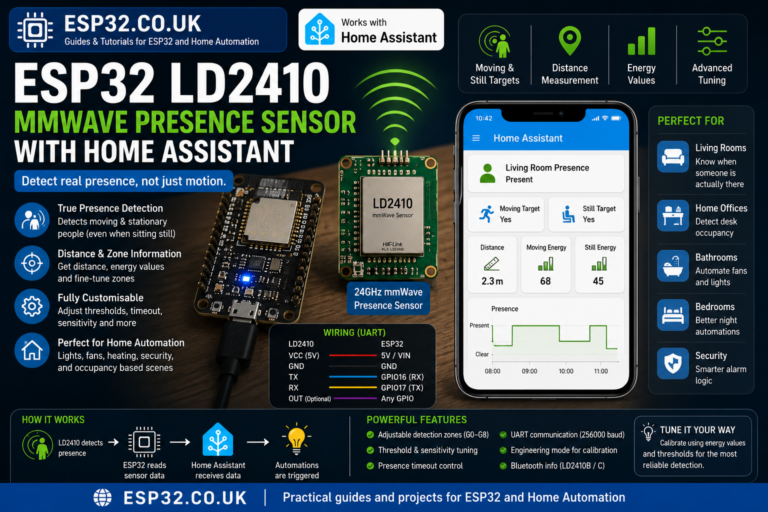
1. How the Water Leak Sensor Works
Most DIY water leak sensors are simple contact probes:
- Two exposed metal pads or wires are placed near the floor
- When water touches both, it conducts electricity
- The ESP32 reads this as a digital ON/OFF signal
- Home Assistant sees a binary_sensor indicating LEAK / DRY
This can trigger:
- Push notifications
- Sirens or buzzers
- Pump shutdown
- Valve closure
2. Hardware Required
- ESP32 DevKit
- Water leak sensor board or two stainless-steel probe wires
- Jumper wires
- 10kΩ resistor (if using bare probes)
- USB cable
- (Optional) Buzzer or siren relay
Common leak sensor options:
- “Rain sensor / water level detection” modules
- “Water leak sensor board with 3-pin connector”
- Bare probes made from stainless screw heads or copper pads on PCB
3. Wiring the ESP32 Water Leak Sensor
3.1 Using a ready-made leak sensor module (digital output)
Most modules have:
- VCC (3.3V or 5V)
- GND
- DO – digital output, goes HIGH/LOW based on water presence
Example wiring:
ESP32 → Leak Sensor Module
3.3V  → VCC
GND   → GND
GPIO32 → DO
3.2 Using bare probes (simple DIY)
Use a pull-up resistor and read the probes as a digital input.
3.3V ── 10kΩ ── GPIO32
GPIO32 ── Probe 1
Probe 2 ── GND
When water touches Probe 1 and Probe 2, GPIO32 is pulled toward GND → leak detected.
4. Method 1 – ESPHome Integration
ESPHome makes the water leak sensor a simple binary_sensor with device_class: moisture.
4.1 ESPHome YAML for Water Leak Sensor
esphome:
  name: esp32-leak
  platform: ESP32
  board: esp32dev

wifi:
  ssid: "YOUR_WIFI"
  password: "YOUR_PASSWORD"

logger:
api:
ota:

binary_sensor:
  - platform: gpio
    name: "Kitchen Water Leak"
    pin:
      number: 32
      mode:
        input: true
        pullup: true
    device_class: moisture
    filters:
      - delayed_on: 200ms
      - delayed_off: 10s
Explanation:
pullup: truekeeps the pin stable using internal pull-updevice_class: moistureshows correct icon and state in Home Assistantdelayed_onreduces false alarms due to noise or condensationdelayed_offrequires a sustained dry state before clearing the alert
ESPHome devices are discovered automatically in Home Assistant.
5. Method 2 – MQTT Integration (Wired + MQTT)
For MQTT-centric setups, the ESP32 publishes "LEAK" or "DRY" to a dedicated MQTT topic.
5.1 Home Assistant configuration.yaml – MQTT Leak Sensor
Add under:
mqtt:
  binary_sensor:
Example configuration:
mqtt:
  binary_sensor:
    - name: "Kitchen Water Leak"
      state_topic: "home/kitchen/leak"
      payload_on: "LEAK"
      payload_off: "DRY"
      device_class: moisture
This creates a binary_sensor.kitchen_water_leak entity in Home Assistant.
6. ESP32 Arduino MQTT Code for Water Leak Sensor
The sketch below:
- Connects to WiFi
- Monitors the leak sensor on GPIO32
- Publishes
"LEAK"or"DRY"to the MQTT broker only when state changes
#include <WiFi.h>
#include <PubSubClient.h>

#define LEAK_PIN 32

#define WIFI_SSID "YOUR_WIFI"
#define WIFI_PASS "YOUR_PASSWORD"
#define MQTT_SERVER "192.168.0.10"

WiFiClient espClient;
PubSubClient client(espClient);

int lastState = -1;

void setup() {
  Serial.begin(115200);

  pinMode(LEAK_PIN, INPUT_PULLUP);

  WiFi.begin(WIFI_SSID, WIFI_PASS);
  while (WiFi.status() != WL_CONNECTED) delay(500);

  client.setServer(MQTT_SERVER, 1883);
}

void loop() {
  if (!client.connected()) {
    while (!client.connected()) client.connect("ESP32_Leak_Sensor");
  }

  int state = digitalRead(LEAK_PIN);  // LOW → water present (if wired to ground)

  if (state != lastState) {
    lastState = state;

    if (state == LOW)
      client.publish("home/kitchen/leak", "LEAK");
    else
      client.publish("home/kitchen/leak", "DRY");
  }

  client.loop();
  delay(100);
}
For modules where DO goes HIGH on water detection, invert the logic accordingly.
7. Dashboard Example in Home Assistant
A simple card to show leak status:
type: entities
entities:
  - entity: binary_sensor.kitchen_water_leak
Optional: add it to a dedicated “Safety” or “Alarms” dashboard with other critical sensors.
8. Example Automations
8.1 Send a critical mobile notification on leak detection
automation:
  - alias: "Kitchen Leak Alarm"
    trigger:
      - platform: state
        entity_id: binary_sensor.kitchen_water_leak
        to: "on"
    action:
      - service: notify.mobile_app
        data:
          message: "Water leak detected in the kitchen!"
8.2 Turn on a siren or buzzer
  - alias: "Leak Siren"
    trigger:
      - platform: state
        entity_id: binary_sensor.kitchen_water_leak
        to: "on"
    action:
      - service: switch.turn_on
        target:
          entity_id: switch.leak_siren
8.3 Shut off a smart valve
  - alias: "Leak Auto Shutoff"
    trigger:
      - platform: state
        entity_id: binary_sensor.kitchen_water_leak
        to: "on"
    action:
      - service: switch.turn_off
        target:
          entity_id: switch.main_water_valve
9. Recommended Installation Locations
Common places for leak sensors:
- Under kitchen sinks
- Under bathroom sinks
- Behind dishwashers
- Behind washing machines
- Around boilers / water heaters
- Near underfloor heating manifolds
- Below fridge/freezers with water/ice connections
Probes should be:
- As close to the floor as possible
- Not submerged permanently, but able to touch pooled water
- Protected from direct splashes that are not real leaks (e.g. from mopping)
10. Troubleshooting
Sensor always shows LEAK
- Short between probes or wires
- Standing water under sensor
- Module adjusted too sensitively (if using adjustable board)
Sensor never detects LEAK
- Probes too far apart
- Surface too non-conductive (e.g. thick epoxy floor)
- Poor wire connection to probes
False alarms due to humidity or condensation
- Use delayed_on / delayed_off filters in ESPHome
- Raise the probes slightly on a small spacer so only pooled water triggers them
11. Safety Notes
- The entire detection circuit (probes, ESP32, wiring) should operate at low voltage (3.3V / 5V).
- Do not run mains voltage near floor-level probes.
- If controlling mains-powered valves or pumps, use isolated relays or contactors, as covered in ESP32 relay control guides.
Keywords
esp32 water leak sensor
home assistant leak detection
mqtt water leak esp32
esphome moisture sensor
esp32 flood sensor
water leak probe esp32
kitchen leak home assistant
washing machine leak sensor esp32