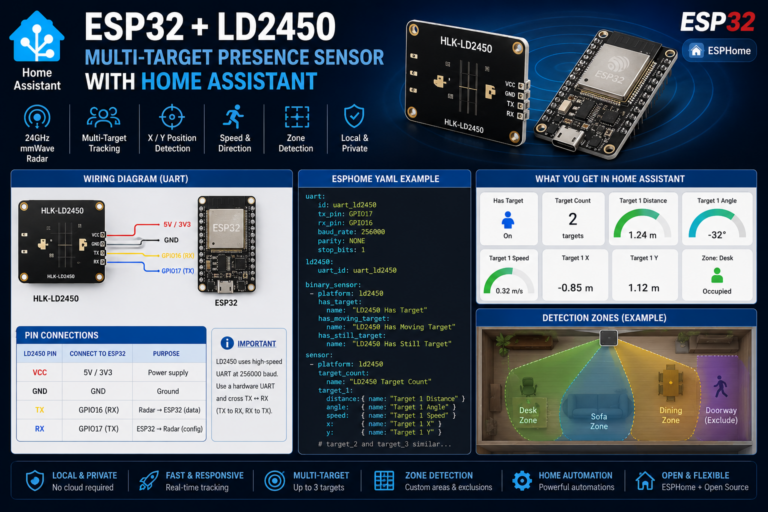
A motion sensor that only turns lights on when it’s dark is one of the most useful smart home automations.
By combining a PIR motion sensor with a simple LDR (light-dependent resistor) and an ESP32, it’s easy to build a local, fast, and cloud-free “smart presence + ambient light” node for Home Assistant.
This guide shows how to connect:
- PIR sensor → detects motion
- LDR + resistor → measures ambient light level
and integrate them into Home Assistant using:
- ESPHome (auto-discovery)
- MQTT (manual YAML configuration)
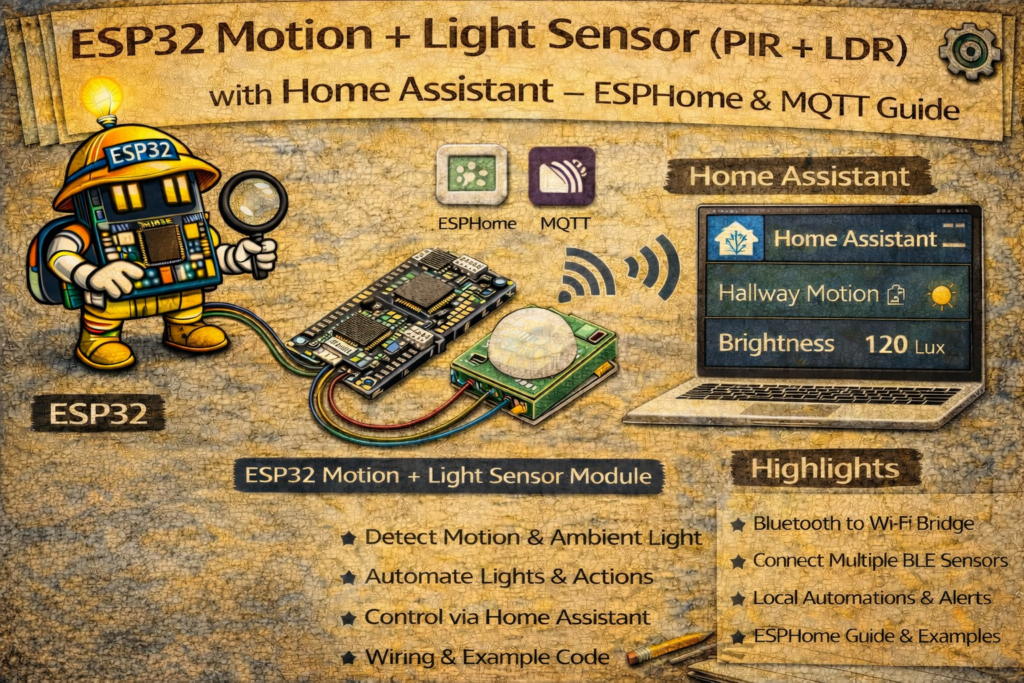
1. Hardware Required
- ESP32 DevKit
- PIR sensor (HC-SR501, AM312, or similar)
- LDR (light-dependent resistor/photoresistor)
- 10kΩ resistor (for LDR voltage divider)
- Jumper wires
- Breadboard (optional)
- USB cable
2. Wiring the PIR and LDR to ESP32
2.1 PIR Motion Sensor Wiring
Most PIR modules have three pins:
- VCC (3.3V or 5V depending on module)
- GND
- OUT (digital motion signal)
Example wiring (3.3V-compatible PIR like AM312):
ESP32 → PIR
3.3V  → VCC
GND   → GND
GPIO27 → OUT
2.2 LDR + Resistor Voltage Divider
The ESP32 cannot read resistance directly, so the LDR is wired as a voltage divider with a fixed resistor.
3.3V ── LDR ── A0 (GPIO34, analog in)
A0 (GPIO34) ── 10kΩ ── GND
- When it is bright, LDR resistance is low → higher voltage at A0
- When it is dark, LDR resistance is high → lower voltage at A0
3. Method 1 – ESPHome Integration
ESPHome makes it easy to define both a motion binary sensor and a light-level sensor.
3.1 ESPHome YAML for PIR + LDR
esphome:
  name: esp32-motion-light
  platform: ESP32
  board: esp32dev

wifi:
  ssid: "YOUR_WIFI"
  password: "YOUR_PASSWORD"

logger:
api:
ota:

# PIR motion sensor on GPIO27
binary_sensor:
  - platform: gpio
    name: "Hallway Motion"
    pin:
      number: 27
      mode:
        input: true
        pullup: true
    device_class: motion
    filters:
      - delayed_off: 2s

# LDR on GPIO34 (analog read)
sensor:
  - platform: adc
    pin: 34
    name: "Hallway Light Level"
    update_interval: 5s
    attenuation: 11db          # allows 0–3.3V range
    filters:
      - multiply: 100.0        # optional scaling to 0–100 range
This exposes two entities in Home Assistant:
binary_sensor.hallway_motionsensor.hallway_light_level
These can then be used in automations.
4. Method 2 – MQTT Integration (PIR + LDR)
For MQTT-based setups, the ESP32 publishes motion and light-level data via MQTT, and Home Assistant reads them via mqtt: sensors.
4.1 Home Assistant configuration.yaml – MQTT Sensors
mqtt:
  binary_sensor:
    - name: "Hallway Motion"
      state_topic: "home/hallway/pir"
      payload_on: "1"
      payload_off: "0"
      device_class: motion

  sensor:
    - name: "Hallway Light Level"
      state_topic: "home/hallway/light"
      unit_of_measurement: "%"
      value_template: "{{ value | float }}"
home/hallway/pir→ receives"1"or"0"home/hallway/light→ receives a numeric value (0–100, for example)
4.2 ESP32 Arduino MQTT Code (PIR + LDR)
#include <WiFi.h>
#include <PubSubClient.h>

#define PIR_PIN 27
#define LDR_PIN 34

#define WIFI_SSID "YOUR_WIFI"
#define WIFI_PASS "YOUR_PASSWORD"
#define MQTT_SERVER "192.168.0.10"

WiFiClient espClient;
PubSubClient client(espClient);

int lastPirState = -1;

void setup() {
  Serial.begin(115200);

  pinMode(PIR_PIN, INPUT_PULLUP);
  analogReadResolution(12); // 0–4095

  WiFi.begin(WIFI_SSID, WIFI_PASS);
  while (WiFi.status() != WL_CONNECTED) delay(500);

  client.setServer(MQTT_SERVER, 1883);
}

void loop() {
  if (!client.connected()) {
    while (!client.connected()) client.connect("ESP32_Motion_Light");
  }

  // PIR state
  int pirState = digitalRead(PIR_PIN);
  if (pirState != lastPirState) {
    lastPirState = pirState;
    if (pirState == HIGH)
      client.publish("home/hallway/pir", "1");
    else
      client.publish("home/hallway/pir", "0");
  }

  // LDR reading → convert 0–4095 to 0–100
  int raw = analogRead(LDR_PIN);
  float level = (raw / 4095.0) * 100.0;
  char buf[8];
  dtostrf(level, 1, 1, buf);
  client.publish("home/hallway/light", buf);

  client.loop();
  delay(500);
}
5. Home Assistant Dashboard Example
A simple card showing motion and light level:
type: entities
entities:
  - entity: binary_sensor.hallway_motion
  - entity: sensor.hallway_light_level
6. Example Automations (Only Turn Lights On When Dark)
The real power of combining PIR + LDR is conditional lighting: only turn lights on when motion is detected and it is dark.
6.1 Turn on light when motion is detected AND it’s dark
automation:
  - alias: "Hallway Light On with Motion (When Dark)"
    trigger:
      - platform: state
        entity_id: binary_sensor.hallway_motion
        to: "on"
    condition:
      - condition: numeric_state
        entity_id: sensor.hallway_light_level
        below: 40
    action:
      - service: light.turn_on
        target:
          entity_id: light.hallway
6.2 Turn off light after no motion for 2 minutes
  - alias: "Hallway Light Off After No Motion"
    trigger:
      - platform: state
        entity_id: binary_sensor.hallway_motion
        to: "off"
        for: "00:02:00"
    action:
      - service: light.turn_off
        target:
          entity_id: light.hallway
7. Calibration Tips for the LDR
Because LDRs are not calibrated lux meters, it’s best to think of the reading as a relative light level:
- Note the sensor value when the room is bright
- Note the value when the room is too dark
- Choose a threshold roughly in between (e.g. 40%)
If using ESPHome, the raw ADC reading (0–1.0 or 0–3.3V) can be scaled or mapped using filters.
Example scaling filter in ESPHome:
filters:
  - multiply: 100.0
This converts 0–1.0 to 0–100 for easier comparisons.
8. Troubleshooting
Motion is detected all the time
- PIR pointed at hot objects (radiators, TVs)
- PIR sensitivity too high (adjust trimmer on HC-SR501)
- Warm-up period not completed (PIR modules often require 30–60 seconds after power-on)
LDR readings are unstable
- Use an analog pin from ADC1 (GPIO32–GPIO39, not used by WiFi)
- Use shielded or short wires
- Apply a longer
update_interval(5–10 seconds)
Light level seems inverted
If high values appear when it’s dark, swap the position of LDR and fixed resistor in the divider, then adjust logic or invert mapping.
9. Typical Use Cases
- Hallway / staircase automatic lighting
- Closet or pantry light that only turns on when it’s dark
- Garage entrance lighting
- Night lighting in children’s rooms
- Entryway lights that don’t turn on during daytime
Keywords
esp32 pir ldr
esp32 motion and light sensor
home assistant motion light automation
mqtt pir ldr esp32
esphome pir ldr
esp32 hallway sensor
ambient light sensor esp32
smart lighting with motion and light