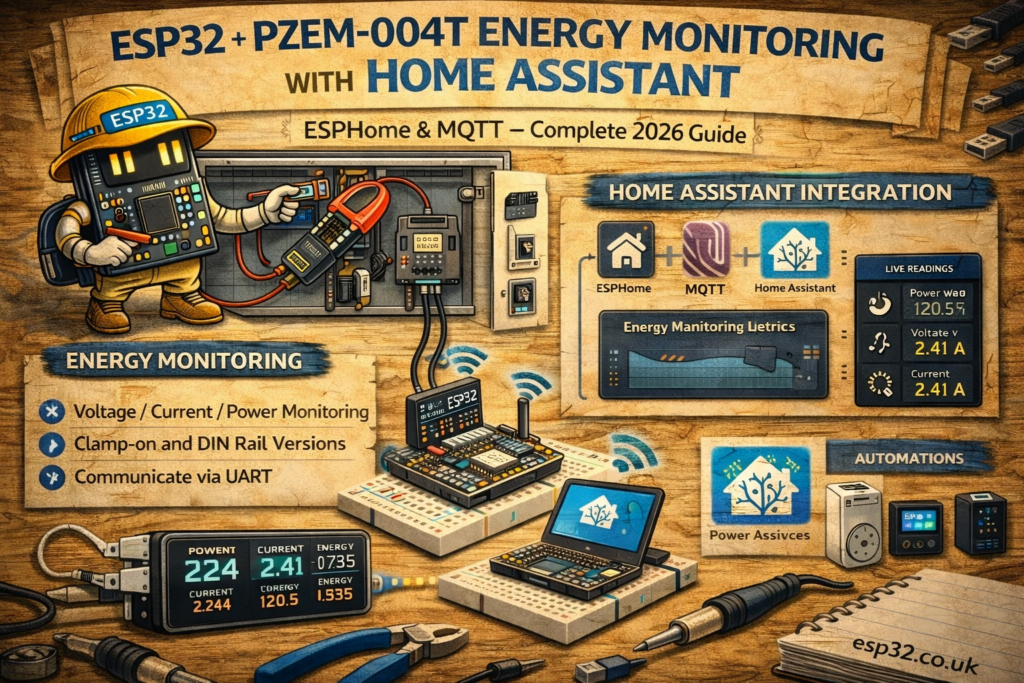
Real-time energy monitoring is one of the most valuable additions to a smart home. The PZEM-004T module provides accurate measurements of:
- Voltage
- Current
- Power (W)
- Energy consumption (kWh)
- Frequency
- Power factor
When combined with an ESP32, it offers a powerful, inexpensive way to send energy data directly into Home Assistant.
This guide covers both ESPHome (automatic discovery) and MQTT (manual configuration) integration methods.
1. Supported PZEM Models
The guide covers:
- PZEM-004T v3.0 (most common)
- PZEM-004T v2.0
- PZEM-017 (DC version — similar code structure)
AC mains wiring must always be handled with extreme caution by an authorised professional.
2. Hardware Required
- ESP32 DevKit
- PZEM-004T v3.0
- Jumper wires
- USB cable
- (Optional) DIN-rail enclosure
3. Wiring Diagram
The PZEM communicates via TTL UART.
Low-Voltage Wiring (ESP32 Side)
ESP32 → PZEM-004T
5V    → VCC
GND   → GND
GPIO16 → RX
GPIO17 → TX
High-Voltage Side
The PZEM’s AC terminals must be installed according to local electrical regulations.
Only qualified persons should wire the live AC side.
METHOD 1 — ESPHome Integration
ESPHome includes native support for PZEM-004T v3 sensors.
4. ESPHome YAML for PZEM-004T v3
esphome:
  name: esp32-pzem
  platform: ESP32
  board: esp32dev

wifi:
  ssid: "YOUR_WIFI"
  password: "YOUR_PASSWORD"

logger:
api:
ota:

uart:
  tx_pin: 17
  rx_pin: 16
  baud_rate: 9600

sensor:
  - platform: pzemac
    voltage:
      name: "PZEM Voltage"
    current:
      name: "PZEM Current"
    power:
      name: "PZEM Power"
    energy:
      name: "PZEM Energy"
    frequency:
      name: "PZEM Frequency"
    power_factor:
      name: "PZEM Power Factor"
    update_interval: 5s
Notes
- ESPHome automatically discovers the device in Home Assistant
- Update interval can be increased for long-term logging
- Works for PZEM-004T v3 without modification
METHOD 2 — MQTT Integration
This method matches the configuration style used for existing MQTT sensors like BME280 and SHT45.
5. Home Assistant configuration.yaml (Correct MQTT Format)
Add under your existing:
mqtt:
  sensor:
MQTT YAML Block
mqtt:
  sensor:
    - name: "PZEM Voltage"
      state_topic: "home/energy/pzem"
      value_template: "{{ value_json.voltage }}"
      unit_of_measurement: "V"

    - name: "PZEM Current"
      state_topic: "home/energy/pzem"
      value_template: "{{ value_json.current }}"
      unit_of_measurement: "A"

    - name: "PZEM Power"
      state_topic: "home/energy/pzem"
      value_template: "{{ value_json.power }}"
      unit_of_measurement: "W"

    - name: "PZEM Energy"
      state_topic: "home/energy/pzem"
      value_template: "{{ value_json.energy }}"
      unit_of_measurement: "kWh"

    - name: "PZEM Frequency"
      state_topic: "home/energy/pzem"
      value_template: "{{ value_json.frequency }}"
      unit_of_measurement: "Hz"

    - name: "PZEM Power Factor"
      state_topic: "home/energy/pzem"
      value_template: "{{ value_json.pf }}"
      unit_of_measurement: ""
6. ESP32 Arduino Code for MQTT (PZEM-004T v3)
#include <WiFi.h>
#include <PubSubClient.h>
#include <PZEM004Tv30.h>

#define WIFI_SSID "YOUR_WIFI"
#define WIFI_PASS "YOUR_PASSWORD"
#define MQTT_SERVER "192.168.0.10"

PZEM004Tv30 pzem(Serial2);   // Serial2 uses pins 16 (RX) & 17 (TX)

WiFiClient espClient;
PubSubClient client(espClient);

void setup() {
  Serial.begin(115200);
  Serial2.begin(9600, SERIAL_8N1, 16, 17);

  WiFi.begin(WIFI_SSID, WIFI_PASS);
  while (WiFi.status() != WL_CONNECTED) delay(500);

  client.setServer(MQTT_SERVER, 1883);
}

void loop() {
  if (!client.connected()) {
    while (!client.connected()) client.connect("ESP32_PZEM");
  }

  float voltage = pzem.voltage();
  float current = pzem.current();
  float power   = pzem.power();
  float energy  = pzem.energy();
  float freq    = pzem.frequency();
  float pf      = pzem.pf();

  String json = "{";
  json += "\"voltage\":" + String(voltage) + ",";
  json += "\"current\":" + String(current) + ",";
  json += "\"power\":" + String(power) + ",";
  json += "\"energy\":" + String(energy) + ",";
  json += "\"frequency\":" + String(freq) + ",";
  json += "\"pf\":" + String(pf);
  json += "}";

  client.publish("home/energy/pzem", json.c_str());

  client.loop();
  delay(5000);
}
7. Home Assistant Dashboard Example
type: vertical-stack
cards:
  - type: entities
    entities:
      - sensor.pzem_voltage
      - sensor.pzem_current
      - sensor.pzem_power
      - sensor.pzem_energy
8. Optional Automation Examples
Trigger a warning if power exceeds 3 kW
automation:
  - alias: "High Power Warning"
    trigger:
      - platform: numeric_state
        entity_id: sensor.pzem_power
        above: 3000
    action:
      - service: notify.mobile_app_phone
        data:
          message: "Warning: Power usage above 3 kW"
Track daily energy consumption
Home Assistant’s Energy Dashboard automatically uses the PZEM Energy sensor (kWh).
9. Troubleshooting
No data shown
- Check RX/TX pins
- Ensure baud rate is 9600
- PZEM must be powered from 5V
- AC measurement terminals must be correctly wired
Wrong or unstable values
- Use shielded cable for UART
- Keep ESP32 and PZEM away from high-EMI sources
Energy value not increasing
- PZEM energy counter resets after reflashing
- Persistent calibration data can be stored manually
10. Safety Warning
The PZEM-004T monitors high-voltage AC.
All wiring must be done with mains power disconnected and preferably inside an insulated enclosure.
AC mains wiring must always be handled with extreme caution by an authorised professional.