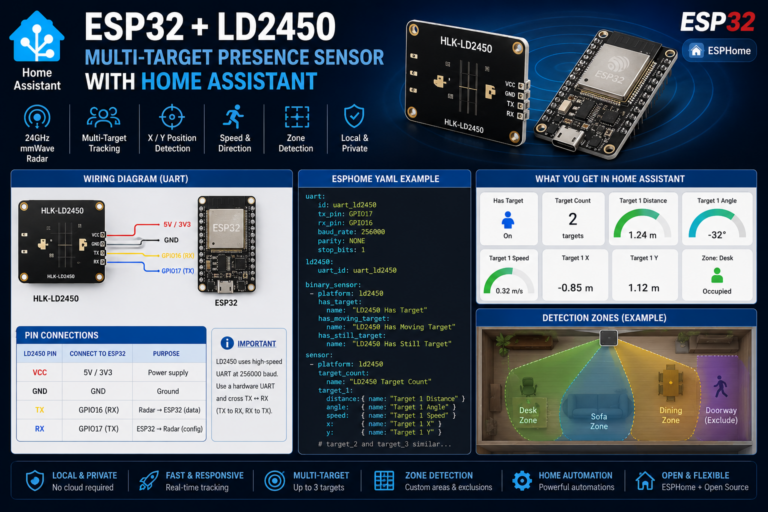
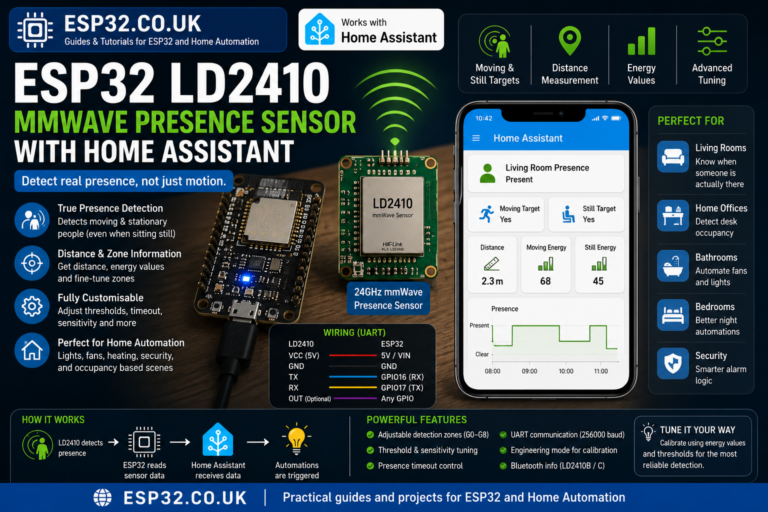
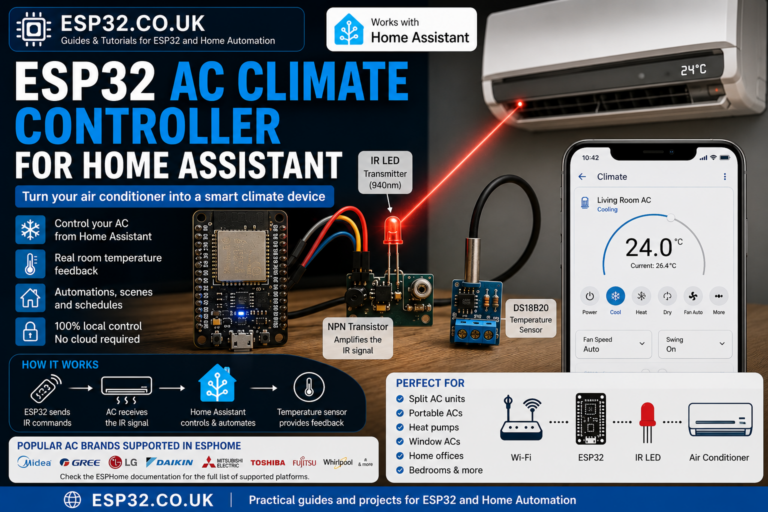
The SHT45 is currently one of the most accurate temperature and humidity sensors available.
It offers laboratory-grade precision, ultra-low power consumption, and very stable measurements.
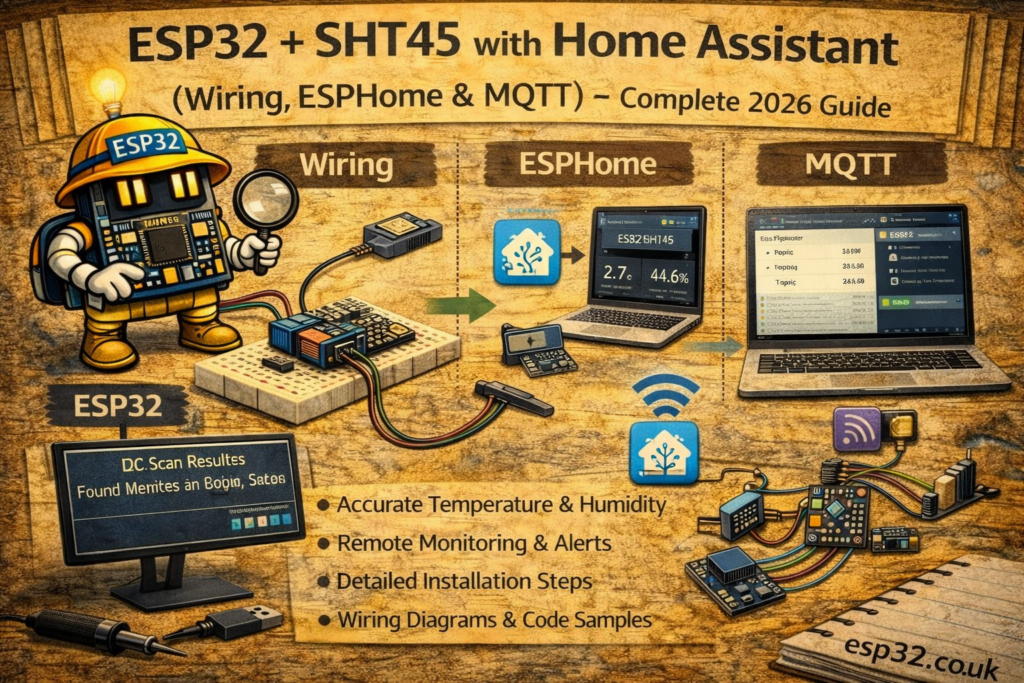
This guide shows you how to connect an ESP32 + SHT45 to Home Assistant using two methods:
- ESPHome (best for most users — automatic integration)
- MQTT (your current method — manual but flexible)
You can choose the method you prefer, and both can run on the same hardware.
1. Hardware Required
- ESP32 DevKit (DOIT, WROOM, NodeMCU, etc.)
- SHT45 sensor
- 4× Female-to-female jumper wires
- USB cable
- (Optional) Breadboard
2. Wiring the ESP32 to SHT45
SHT45 uses I2C.
ESP32 → SHT45
3.3V → VIN
GND  → GND
GPIO22 → SCL
GPIO21 → SDA
[Image: ESP32 connected to SHT45 wiring diagram]
METHOD 1 — ESPHome (Recommended for Most Users)
If you use ESPHome, sensors appear automatically in Home Assistant.
3. ESPHome Configuration (Working YAML)
Create or edit your ESPHome device and add the following blocks:
ESPHome YAML
esphome:
  name: esp32-sht45
  platform: ESP32
  board: esp32dev

wifi:
  ssid: "YOUR_WIFI"
  password: "YOUR_PASSWORD"

# Enable fallback hotspot
ap:
  ssid: "ESP32-SHT45-Fallback"

logger:
api:
ota:

i2c:
  sda: 21
  scl: 22
  scan: true

sensor:
  - platform: sht4x
    type: SHT45
    temperature:
      name: "SHT45 Temperature"
    humidity:
      name: "SHT45 Humidity"
    update_interval: 10s
Notes
✔ No MQTT needed → auto-discovered in HA
✔ Very stable readings
✔ Works instantly with minimal config
METHOD 2 — MQTT
If you are using Home Assistant’s mqtt: section inside configuration.yaml, not ESPHome YAML.
Below is the correct SHT45 YAML written in the same format as your working BME280 sensors.
4. Home Assistant configuration.yaml (Correct MQTT Syntax)
Add these entries under your existing:
mqtt:
  sensor:
SHT45 MQTT YAML
mqtt:
  sensor:
    - name: "Living Room SHT45 Temperature"
      state_topic: "home/livingroom/sht45"
      value_template: "{{ value_json.temperature }}"
      unit_of_measurement: "°C"

    - name: "Living Room SHT45 Humidity"
      state_topic: "home/livingroom/sht45"
      value_template: "{{ value_json.humidity }}"
      unit_of_measurement: "%"

    - name: "Living Room SHT45 Heater"
      state_topic: "home/livingroom/sht45"
      value_template: "{{ value_json.heater }}"
      unit_of_measurement: ""
HA now reads the JSON your ESP32 publishes.
5. ESP32 Arduino Code for SHT45 (MQTT JSON Payload)
This publishes data in the exact structure your YAML expects.
#include <WiFi.h>
#include <PubSubClient.h>
#include <Adafruit_SHT4x.h>

#define WIFI_SSID "YOUR_WIFI"
#define WIFI_PASS "YOUR_PASSWORD"
#define MQTT_SERVER "192.168.0.10"

WiFiClient espClient;
PubSubClient client(espClient);
Adafruit_SHT4x sht4 = Adafruit_SHT4x();

void setup() {
  Serial.begin(115200);

  WiFi.begin(WIFI_SSID, WIFI_PASS);
  while (WiFi.status() != WL_CONNECTED) delay(500);

  client.setServer(MQTT_SERVER, 1883);

  if (!sht4.begin()) {
    Serial.println("SHT45 not found!");
    while (1);
  }
}

void loop() {
  if (!client.connected()) {
    while (!client.connected())
      client.connect("ESP32_SHT45");
  }

  sensors_event_t humidity, temp;
  sht4.getEvent(&humidity, &temp);

  String json = "{";
  json += "\"temperature\":" + String(temp.temperature) + ",";
  json += "\"humidity\":" + String(humidity.relative_humidity) + ",";
  json += "\"heater\":\"off\"";
  json += "}";

  client.publish("home/livingroom/sht45", json.c_str());

  client.loop();
  delay(5000);
}
6. Adding the SHT45 to a Home Assistant Dashboard
Example Lovelace card:
type: vertical-stack
cards:
  - type: sensor
    entity: sensor.living_room_sht45_temperature

  - type: sensor
    entity: sensor.living_room_sht45_humidity

  - type: history-graph
    hours_to_show: 24
    entities:
      - sensor.living_room_sht45_temperature
      - sensor.living_room_sht45_humidity
7. Optional Automations
Turn on AC if humidity exceeds 65%:
automation:
  - alias: "Dehumidify Living Room"
    trigger:
      - platform: numeric_state
        entity_id: sensor.living_room_sht45_humidity
        above: 65
    action:
      - service: climate.set_hvac_mode
        target:
          entity_id: climate.living_room
        data:
          hvac_mode: dry
8. Troubleshooting
SHT45 not detected (ESPHome)
- Check 3.3V vs 5V
- Enable
scan: true - Sometimes swapping SDA/SCL fixes a bad cable
MQTT sensors not showing in Home Assistant
- Confirm MQTT server IP
- Confirm JSON is valid
- Check Home Assistant logs
Humidity too high or too low
- Longer
update_interval:reduces self-heating
9. SHT45 vs BME280 vs DHT22 Comparison
| Sensor | Accuracy | Stability | Notes |
|---|---|---|---|
| SHT45 | ★★★★★ | ★★★★★ | Most accurate consumer humidity sensor |
| BME280 | ★★★★☆ | ★★★☆☆ | Good but humidity drifts over time |
| DHT22 | ★★☆☆☆ | ★★☆☆☆ | Outdated, slow response |